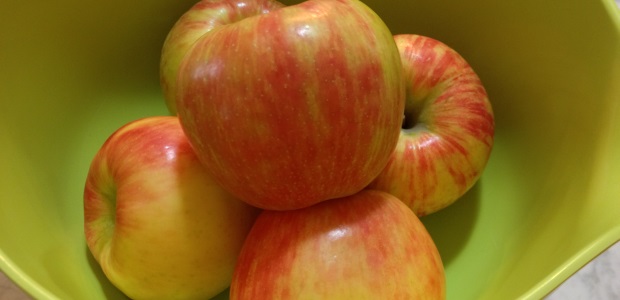
Aw, nuts! It’s National Almond Day. Almonds are one of my favorite baking ingredients because they’re so versatile. They play well with other nuts but can also stand alone. And isn’t that all you really want from a nut!?!
With over 500 recipes on Baked Chicago, I decided to go through the “archives” [e.g. Google site search] to find some of my favorite almond dessert recipes to share with you on this nut-tastic day.
What’s your favorite dish to make with almonds? Post your comments below and let’s see how nutty it gets.
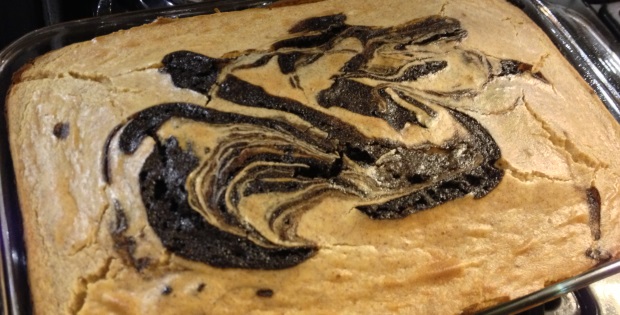
This Valentine’s Day you don’t have to choose between sweet and savory. You can have both in this delicious recipe mashup featuring Garrett Popcorn’s The Chicago Mix in a decadent brownie cookie.
Click on the image below to get the recipe, which first appeared on the Gapers Block Drive-Thru.
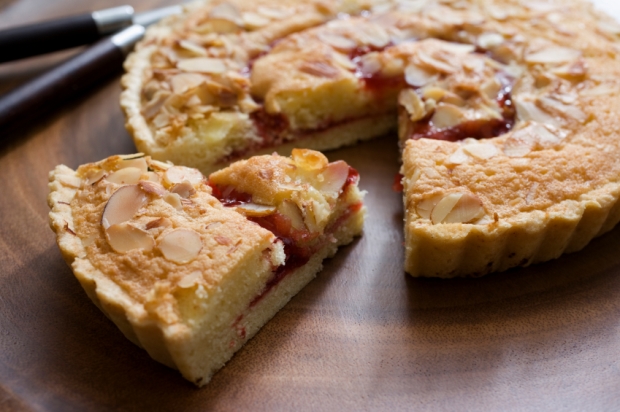
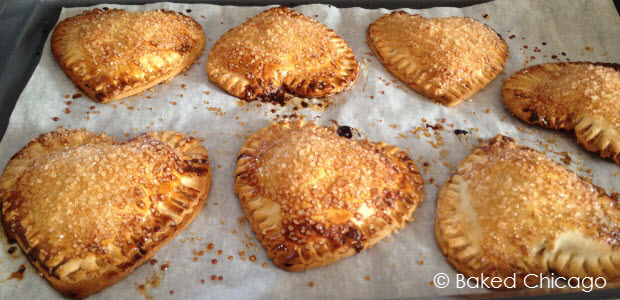
Valentine’s Day isn’t just for lovers anymore. It’s evolved to where we’re encouraged to also show those closest to us how much we care. That might include your mom and dad, brothers and sisters, and sometimes your best girlfriend or even your pet. But don’t forget the ‘littlest Valentines’ living under your roof – aka the kids! They’ll greatly appreciate even a small gesture of how much you love them. This recipe for Chocolate-Raspberry Heart Tarts is a perfect Valentine’s Day breakfast or after-school treat for your rug rats. It’s so easy to make and you can change-up the ingredients to reflect your favorite flavor combinations.
I love the combination of chocolate and raspberry, so I used my favorite raspberry preserves and a new chocolate spread product from Hershey’s. But you could use peanut butter and jelly, banana and chocolate, or just about any flavor combo that your kids will love. And if you go the non-chocolate route, like peanut butter and banana, you could even share a heart tart with your furry, four-legged kids. My four pugs LOVE banana and peanut butter, so I’m going to make one special heart tart for them to share (remembering portion control for my svelte puggies!). That comes down to one heart chamber per pug!
Use a heart-shaped cookie cutter (about 3.5- to 4-inches wide) to cut out your hearts from store-bought pie crust. Arrange them on a parchment paper-lined baking sheet.
Put 1 level teaspoon each of preserves and chocolate spread in the center of each heart. Don’t overfill, or the contents will just burst out during the baking process giving your heart tart a heart attack. Not pretty. Use egg wash to seal the hearts, and crimp the edges with a fork. Brush the egg wash on top of each heart and sprinkle with turbinado sugar.
Bake for about 16 minutes or until golden brown and puffy. Remove from oven and let cool slightly before serving. What a great way for you and your kids to start off Valentine’s Day!
Influencer Disclosure: I was given a free sample of Hershey’s spreads chocolate because I’m a Klout influencer. I am under no obligation to receive this sample or talk about this company. I get no additional benefits for talking about this product or company. All opinions about this product are 100% my own.
Preheat oven to 400 F degrees. Line a baking sheet with parchment paper; set aside.
Beat the egg in a small bowl. Unroll 2 sheets of store-bought pie dough. Using a 3.5-inch heart cookie cutter, cut out about 8 heart shapes from each sheet of pie dough.
Arrange half of the hearts on the prepared baking sheet. Fill the center of each heart with 1 level teaspoon of raspberry preserves and 1 level teaspoon of chocolate spread.
Moisten the edges of the remaining hearts with the beaten egg. Align each heart on top of a heart on the baking sheet. Press firmly around all edges to seal the fillings inside each tart. Crimp the edges with a fork.
Brush the tops with the remaining egg and sprinkle generously with turbinado sugar.
Bake until golden brown and puffed, about 16 to 18 minutes. Do not overbake or the turbinado sugar will burn.
For the last several weeks, we’ve been hearing from the hard-working weather teams and meteorologists around the country just how cold it has been, including:
It’s the 3rd coldest winter ever
Over 80% of the Great Lakes is covered in ice, the most ever
In Chicago, we’ve had 285% more snow than the average and we may break the all-time record for most snow in a single season EVER
With over half of the country in a historic, prolonged blast of sub-zero cold, you don’t need another statistic or a “most ever” dramatic statement to know it’s damn cold out there.
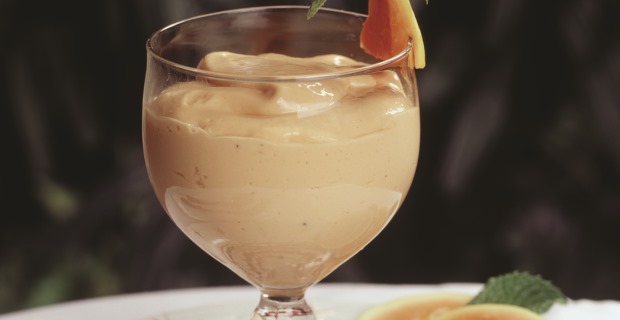
One way to fight back the cold is to think warm and tropical. One of the warmest, tropical locations I’ve yet to visit is Brazil so when I learned about this contest launched by Fogo de Chão I thought I would share it in case Brazil was on your list of warm destinations to visit.
The contest, called “Expedition Brazil,” invites adventure-seekers (Fogo de Chão call these individuals “culture-vores”) a chance to get an insider’s look into the beautiful country of Brazil. One winner and their guest will win one of four (4) 7-day travel expeditions. Entries, accepted through February 16, 2014, will be judged on creativity in describing why they are perfect to win an exciting journey to Brazil. You’ll find complete details and the entry form at http://www.fogo.com/expedition.
Expedition Brazil was launched in conjunction with “The Gaucho Way,” a short 3-minute film that tells the Fogo story through the eyes of one of their gauchos. The majority of the video was shot on location in Southern Brazil and represents the many gauchos that have traveled to the U.S. with Fogo to share their culture here in America.
If you win the contest and go to Brazil – or if you just pretend you’re in Brazil to escape the polar vortex – you’ll need something sweet to celebrate. I asked the folks at Fogo de Chão if they would share a recipe from one of their signature dishes and they kindly provided the recipe for their most popular dessert, Papaya Cream. Enjoy!
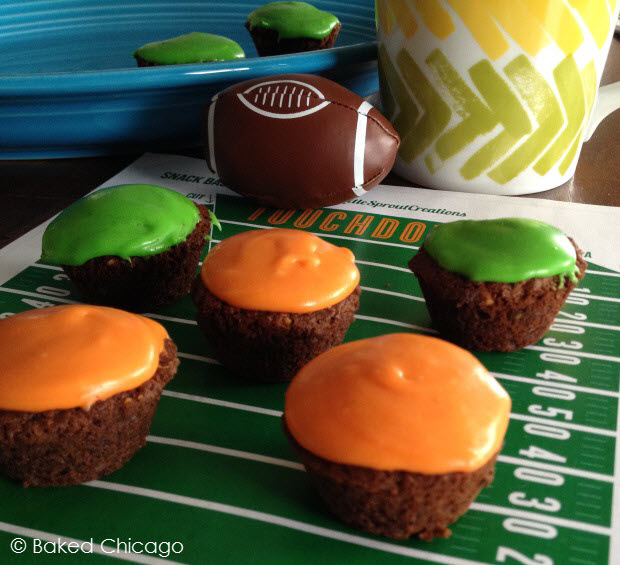
You might have heard that there’s a small football game happening this Sunday. Not a big match up at all. Just some teams from Colorado and Washington state getting together for a quick game. NOT!
It’s amazing what a big cultural phenomenon and big business the Super Bowl is in the United States. At the heart of it, football is a team sport and big game days like the Super Bowl are best shared with friends and family. Like the 100+ million others who will be watching the Big Game (and I freely admit I like the commercials and half-time show best), I hoping to cook up some fun foods that will be enjoyed by all, but are also easy-to-make with little or no cleanup. That’s my kind of game day victory!
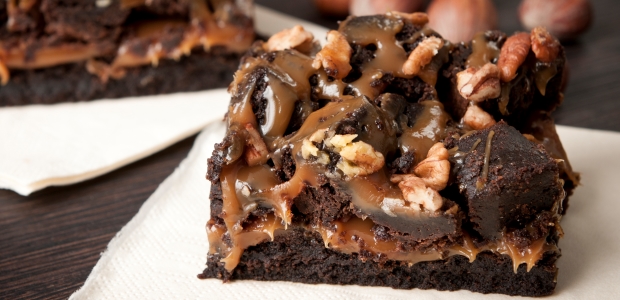
This year I decided to do a twist on one of my classic brownie recipes from Baked Chicago’s Simply Decadent Brownies cookbook, and have some fun with Seattle green- and Denver orange-colored butter cream frostings.
Football Fumble Nutter Brownie Bites?
You’ve all heard of the fluffer nutter, right? A peanut butter and marshmallow cream sandwich. I don’t know a lot of football terms, but one I do know is “fumble.” And when I do brainstorming, I tend to think in sound-alikes so I started thinking about what I might do with a brownie for the Big Game. My brain went from ‘fumble’ to ‘fluffer nutter’ to ‘fumble nutter’ in about 90 seconds, so this brownie recipe incorporates yummy peanut butter and it’s topped with a marshmallow butter cream frosting.
To add some fun for Game Day and to make it easy to eat (and hard to ‘fumble’ up), I decided that brownie bites were the perfect size for a sweet snack and to frost half of the brownies each with orange- or green-colored frosting to cheer on Denver and Seattle. I haven’t decided yet who I’m rooting for, but I’m leaning toward the Broncos. What do you think about that choice? Will I be crying in my brownies at the end of the game or doing an end zone dance in victory?
After you’ve baked the Football Fumble Nutter Brownie Bites, let them cool on a wire rack or platter. Then prepare your frosting.
Follow the directions on your food color packaging to get the right shades of green and orange. After I made the frosting, I divided it into two coffee cups and from there added the food coloring.
Frost half of your brownies in one team’s color, then the other. Let them set a bit after you frost them. I found they can set out for a few hours with no issues, but I recommend putting them in the refrigerator until you’re ready to serve them. We all know how long the Big Game can last and you want to make sure to practice proper food safety when entertaining your guests.
Football Fumble Nutter Brownie Bites (Peanut Butter Brownies with Marshmallow Butter Cream Frosting)
Rating: 51
Cook Time: 12 minutes
Yield: approximately 3 dozen
Ingredients
For Brownies:
1/2 cup butter
2 eggs
3/4 cup all-purpose flour
1/2 teaspoon baking powder
1/2 teaspoon sea salt
1/2 cup unsweetened cocoa powder
1 1/4 cups dark brown sugar
1/2 cup peanut butter
2 ounces milk
For Marshmallow Butter Cream Frosting:
1/2 cup butter, softened
8 ounces marshmallow creme
1 teaspoon vanilla extract
16 ounces confectioners' sugar
1 to 2 tablespoons milk, divided
food coloring (optional)
Instructions
For brownie bites: Preheat your oven to 350 F degrees. Generously grease a mini muffin pan with non-stick spray.
Melt the butter in a microwave-safe bowl. Add the milk and eggs to the melted butter. Stir in the peanut butter. Stir in all the dry ingredients and mix just until blended.
Using a small cookie scoop, add batter into the prepared mini muffin pan. Do not fill the mini muffin cups more than 2/3 full, or it will overflow into the others as it bakes.
Bake for about 12 minutes or until the brownies are dry around the edges. Cool before frosting.
For frosting: Place the butter, marshmallow cream and vanilla in a small bowl. Beat with electric mixer on medium until well blended. Gradually add the confectioners' sugar, beating after each addition until well blended.
Blend in 1 tablespoon of milk. Add remaining tablespoon, if necessary, for desired spreading consistency. Frost brownie bite and let set.
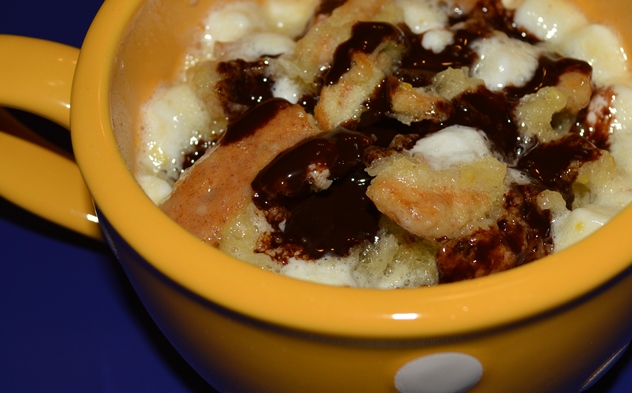
Right now it’s -10 degrees in Chicago (aka #Chiberia) and I am fantasizing about sitting in front of a roaring fire. I don’t have a fireplace so my Vornado space heater under my desk will have to do for now! But if I did have a fireplace, I’d surely be popping some corn or making some toasty s’mores. The perfect fuel to keep warm through this bitter, winter night.
Since this fantasy is not going to happen right now, the next best thing is a microwaveable vessel filled with a deliciously-portioned-for-one s’mores mug cake. Recently, I’ve started playing around with mug cake versions of traditional baked goodies. I’ve been surprised how well the microwave can “bake” some individual cakes and brownies – and I think you’ll find this s’mores mug cake will definitely satisfy a craving for chocolate, graham cracker and hot marshmallow.
Find your largest microwaveable mug; I recommend one that can hold at least 16 ounces. Coat it with non-stick spray for easy cleanup, then mix all the ingredients together in the mug just until combined. Zap it on HIGH in your microwave for about 90 seconds and voila! You’ve got a campfire treat courtesy of your microwave.
Pair a s’mores mug cake with a cup of steaming hot cocoa and you’ll be ready to face the polar vortex head on!
Combine all ingredients in a large microwaveable mug (recommend 16 ounce-size). Whisk well until blended.
Microwave on HIGH for 90 seconds, then check to see if it is done. If not, continue to microwave in additional 30-second intervals. Be careful not to overcook or cake will become rubbery.
Let cool down for a bit (the cake will continue to cook in the mug), then enjoy with a spoon!
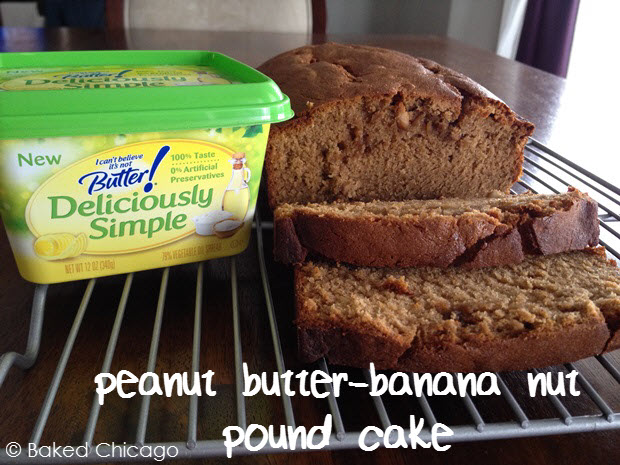
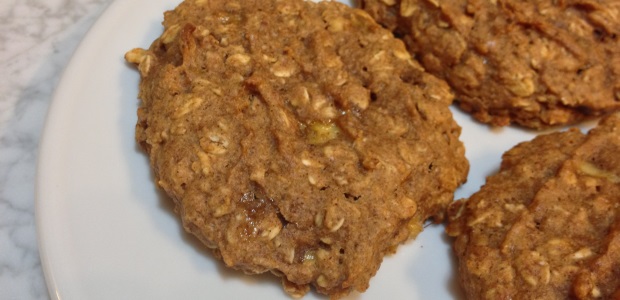
When trying an ingredient in a recipe for the first time, it’s important to review the basics like taste and texture in order to understand how those will work in the final product. What I liked about Deliciously Simple™ is that it’s made with simple ingredients I recognize and frequently use in my baking, like non-fat yogurt and vegetable oil. So I first tried it on my morning toast. The taste was buttery and the texture was creamy – even straight out of the refrigerator. Deliciously Simple™ has no artificial ingredients, and that’s something I look for in every product I bring into my home.
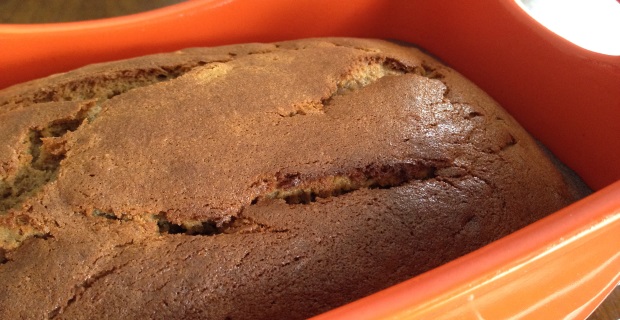
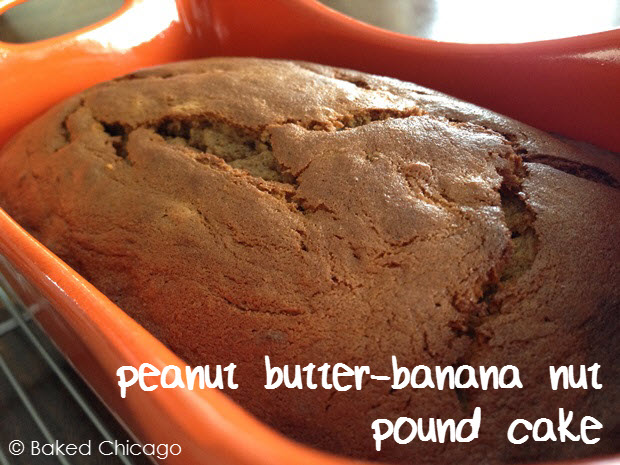
So I decided to incorporate Deliciously Simple™ into a new recipe for peanut butter-banana nut pound cake. The buttery taste and creamy texture would work well with either sweet or savory foods, and this pound cake straddles that line well because of the balance of the peanut butter, banana and pistachios. Together, this pound cake is slightly sweet and slightly savory.
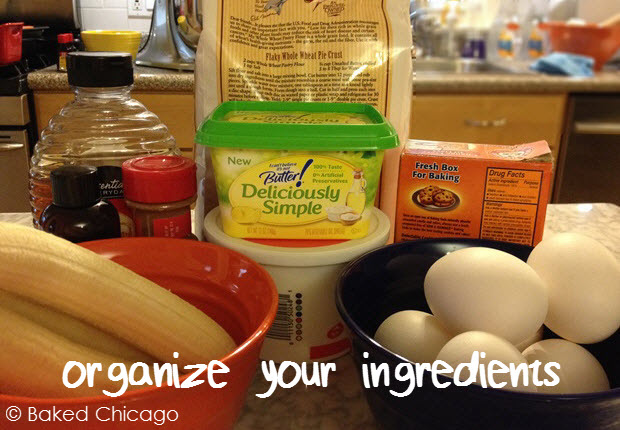
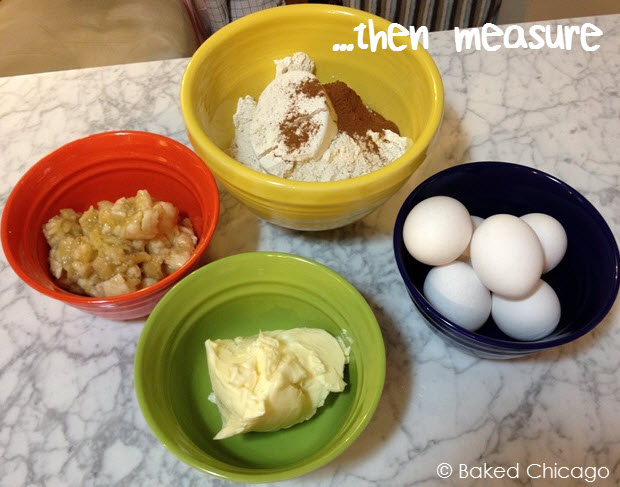
It’s always easier to execute a recipe by getting all of your ingredients organized first.
Then measure out each ingredient and sort by the order you’re going to use the ingredient in executing the recipe. This process, called ‘mise en place’ – which means everything in its place, will save you so much time and possible heartache. It’s like the law of gravity. It just works, so you gotta do it! Let’s get started.
You’re going to preheat your oven and preparing your baking pan. You can go traditional and grease-flour your pan but I’ve found that non-stick cooking spray, when applied correctly, works just as well and is much easier.
Sift together your dry ingredients: flour, salt, baking soda, baking powder and cinnamon. Next you’ll cream the Deliciously Simple™ with the brown sugar and peanut butter. Be sure to incorporate lots of air into this mixture; it will help the pound cakes rise properly.
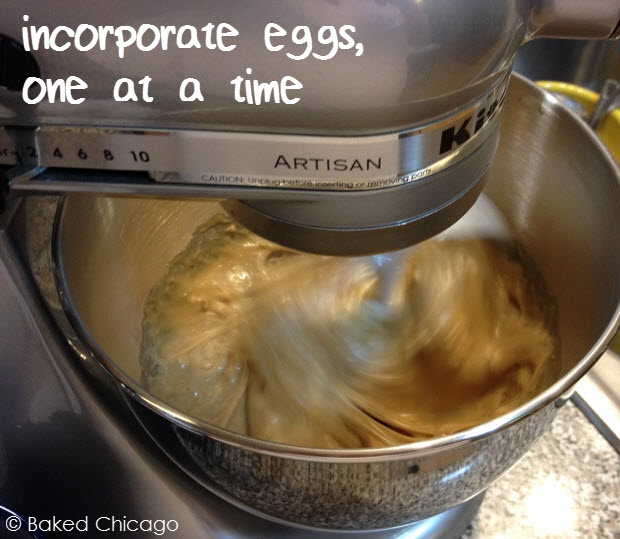
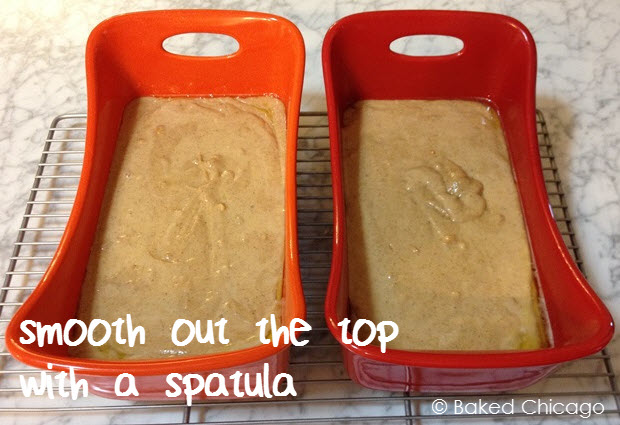
Add your eggs, as instructed, followed by the mashed banana and vanilla.Then add the flour mixture and sour cream, alternately. Then you’ll fold in the pistachios by hand with a spatula. Pour the batter into your prepared baking pan and smooth out the top with the spatula.
Bake for 50 to 65 minutes. I recommend checking at the 45-minute mark, because the baking process accelerates toward the end. It is very easy to over bake a pound cake, unless you are monitoring closely. The top should be golden brown and an inserted toothpick should come out clean.
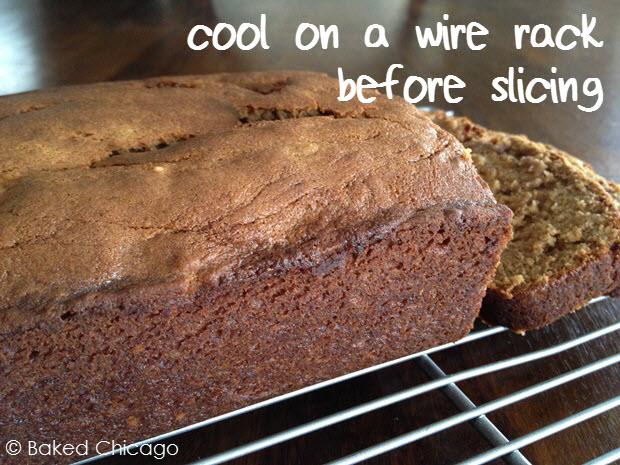
After cooling in the pan for about 10 minutes, remove and let cool complete on a wire rack. You can freeze a whole loaf for up to 2 months in an airtight container. But I recommend enjoying it warm fresh out of the oven!
1/2 cup ripe banana, mashed (about 2 small or 1 large banana)
1 tablespoon vanilla extract
1/2 cup sour cream
1/4 cup pistachios, chopped (optional)
Instructions
Preheat your oven to 350 F degrees. Generously coat a 9x5-inch loaf pan with non-stick cooking spray. Set aside.
In a medium bowl, sift together the flour, salt, baking soda, baking powder and cinnamon. Set aside.
In the bowl of a stand mixer, cream together the butter, brown sugar and peanut butter until light and fluffy (at least 5 minutes).
Add the eggs, one at a time, beating well after each addition. Scrape down the sides of the bowl, as needed, between additions. Add the mashed banana and vanilla.
Continuing on low speed, add the sifted flour mixture and sour cream, alternately; begin and end with the flour mixture. Beat just until combined. Fold in the pistachios with a spatula by hand.
Pour the batter into the prepared baking pan. Smooth out the top with your spatula.
Bake for about 50 to 65 minutes. The top should be gold brown and a toothpick inserted in the center should come out clean. If the top is browning too quickly, cover loosely with aluminum foil. I recommend checking your pound cake at the 45-minute mark. The baking process accelerates toward the end and it can be easy to over bake your cake.
Cool for at least 10 minutes in the pan before removing. The sides should start to come away from the pan to make removal easier. Then remove the loaf and cool completely on a wire rack.
Slice while still warm and enjoy with butter on top. Store any remaining slices in the refrigerator. The whole loaf may be frozen for up to 2 months.
Will Lady Mary ever be happy again after the untimely demise of her husband, Matthew Crawley? Will Lady Edith become the Carrie Bradshaw of the post-Edwardian era? Who will become Thomas Barrow’s new BFF after O’Brien leaves Downton Abbey? We’ll have to watch to find out, as season 4 begins tonight on PBS stations across America.
If you’re an avid watcher of “The Abbey,” you know that season 4 aired in the United Kingdom last fall. That means that you may have come across many “spoilers” for the upcoming season via social media. I don’t know how I did it, but I think the only spoiler I was not able to avoid was the departure of that bitch (er….Lady Grantham’s personal maid) O’Brien. O’Brien is a character you love to hate, so I give the actress who played her major kudos. But I won’t be sorry to see O’Brien go from the story lines; I was rooting for someone to “take her down” for all the nastiness she spread throughout Downton Abbey.
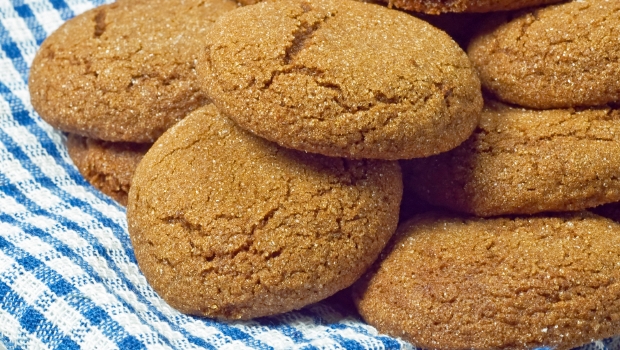
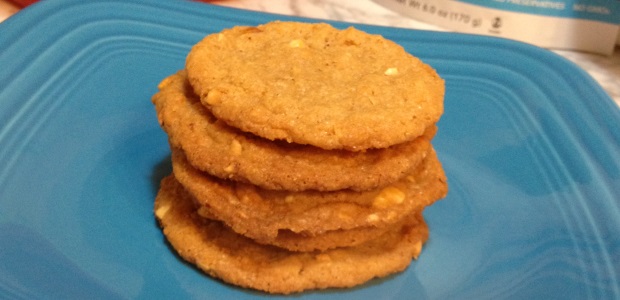
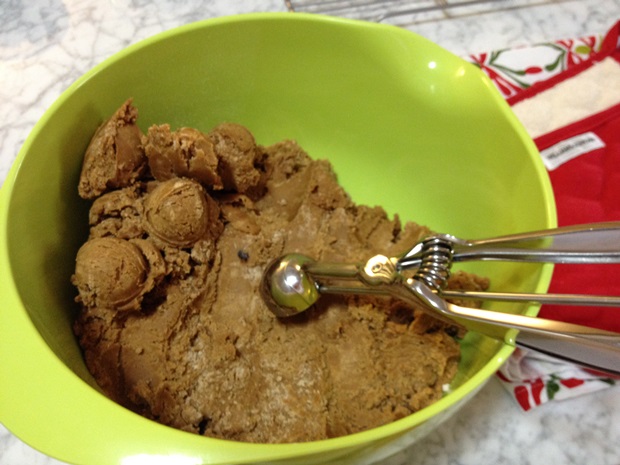
If you’re hosting a Downton Abbey viewing party tonight or just want to make some authentic treats to enjoy in front of the telly, here’s a recipe for gingernuts – also known as gingersnaps or ginger biscuits. Gingernuts are extremely popular throughout the UK, as well as other countries within the British empire like Australia and New Zealand. One of the reasons for their popularity is the tough texture, which can withstand dunking into tea or cocoa. I can just imagine the Dowager Countess of Grantham (played to perfection by the incomparable Maggie Smith) enjoying a gingernut with her tea…but I doubt she dunks it!
Preheat your oven to 350 F degrees. Line a large baking sheet with parchment paper. Put the dark brown sugar in a shallow bowl or plate; set aside.
In a medium bowl, cream the butter and granulated sugar until light and fluffy. Add both molasses and continue beating until well incorporated.
In another bowl, sift the remaining dry ingredients. Add to the butter mixture. Use a small cookie scoop (about 1 1/2 inches) to make balls of dough. Roll the dough balls in the brown sugar and place on the prepared cookie sheet, about 2 inches apart. Press down gently to flatten the cookie slightly.
Bake for about 12 minutes, or until edges begin to brown. The cookies are done when they have cracked and will be slightly firm to the touch. Cool on the baking sheet for a few minutes before transferring to a wire rack to cool completely.
Store in an airtight container for about one week at room temperature.
Notes
Lightly adapted from Downtown Abbey Cooks recipe for gingernuts.
The new year is almost upon us. I want to say a special “thank you” to all of the readers of the Baked Chicago blog for a phenomenal year. Your support and feedback have been terrific. In preparing for the new year, it’s important to look back at 2013 to appreciate the blessings received, learn from any stumbles or falls, and to ready yourself for the challenges and opportunities of the coming year.
Today, I wanted to share the recipes that were most popular with you, the readers of Baked Chicago, in the past year. Many of the recipes were expected, but there are a few surprises. I wonder what recipes we’ll embrace the most in 2014? I guess there’s only one way to find out. Here’s to a 2014 filled with health, prosperity and culinary adventure for you and your family!
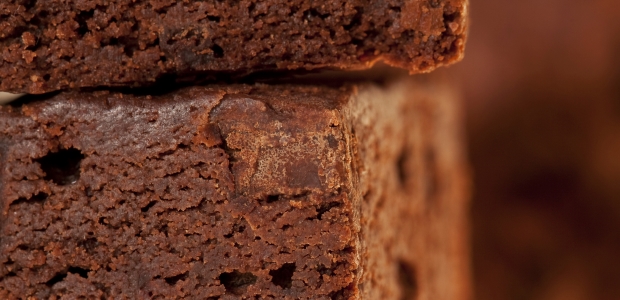
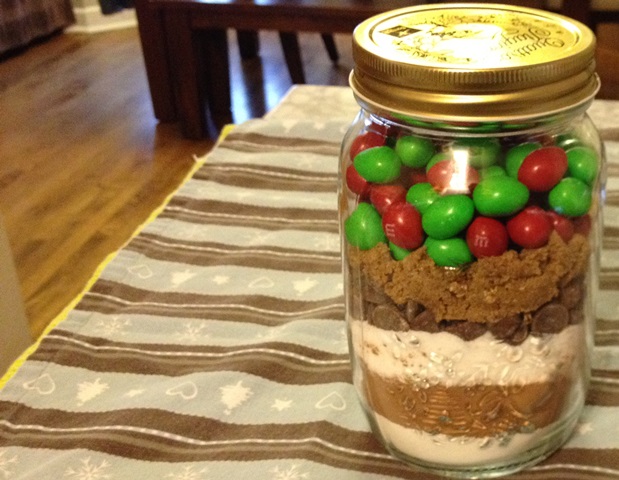
We all know the holidays can be stressful for many reasons. You’ve got present shopping, holiday cards to write and mail, office or neighborhood holiday parties to attend, laundry and luggage to ready for holiday travel, putting newspaper and mail deliveries on hold, and much, much more on your To Do List this week. That’s why your pantry needs (at least one, if not a half-dozen) Brownie Mix in a Jar on hand — much in the same way you have an emergency kit in your car or a fire extinguisher in your kitchen. You just never know when you’re going to need the kind of help that only a fresh, homemade brownie can deliver!
This Brownie Mix in a Jar can help you survive the holidays – and every day – in a number of ways, including as a:
Perfect last-minute hostess gift
Welcome to the neighborhood gift
Grab bag gift for the office party
Holiday gift for the letter carrier
A great way to personalize a holiday bonus for the dog walker
Gift any time of the year for that homesick college student (especially during midterms or finals)
In about 10 minutes of time and about $3 for ingredients (not including cost of airtight container or wrapping), you can have a great gift that reflects your personality and that everyone will appreciate. I started this tradition several years ago with family and friends, and quickly learned that it also inspired them to do more baking from scratch. When the ingredients are already on hand and ready to go, it’s so easy – and often more delicious – to bake from scratch. That’s what this Brownie Mix in a Jar gift can do for the recipient: inspire them to be more creative in the kitchen.
I suggest buying a case of one-quart canning jars (about $24 for 12) and making a batch of 12 to have on hand for easier gifting. Buying the canning jars and dry ingredients in bulk will also lower your overall costs. It will also ensure that you have one on hand for your own personal brownie emergencies!
Organize all of your dry ingredients, including measuring cups and spoons.
In a clean, airtight container (such as a jar), layer the dry ingredients in the order listed starting with flour and ending with M&M's®. As you add each layer, tap the sides of container to level ingredients. Seal the container and set aside.
Personalize and print out the preparation and baking instructions (below) to accompany the brownie mix jar.
DIRECTIONS FOR HARVEY'S BROWNIE MIX:
Add to dry mix:
- 1/2 cup butter
- 2 eggs
- 2 ounces milk or water
Preheat oven to 350 F degrees. Grease the bottom of an 8x8-inch or 9x9-inch baking pan.
Melt 1/2 cup butter. Mix melted butter, 2 eggs and 2 ounces of milk in medium bowl with spoon until blended. Stir in dry contents of the brownie mix, until moistened. Batter will appear slightly lumpy. Spread batter into prepared pan.
Bake for 30 to 35 minutes, or until dry around edges and toothpick inserted comes out almost clean. Cool completely, for about an hour. Cut into 4 rows by 4 rows to make 16 brownies.
Notes
Personalize as you wish to create a gift that reflects your personality. For example, you could swap the chocolate chips for peanut butter chips OR swap the peanut M&M's® for chopped walnuts. One of my favorite versions of this brownie mix swaps out the milk for raspberry liqueur and the peanut M&M's® for fresh raspberries.
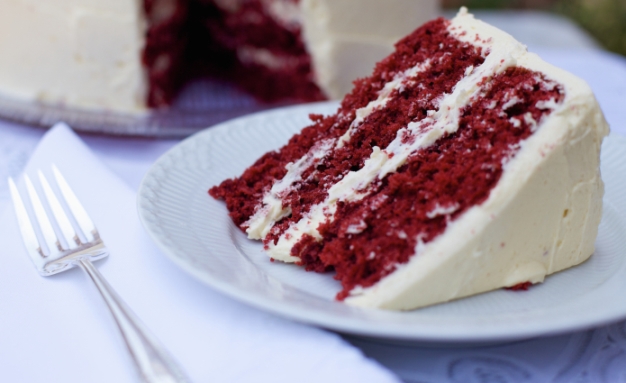
I admit that the popularity of red velvet cake is a bit lost on me. I can appreciate its deep roots in Southern cuisine. As the story goes, during the Great Depression (not the Great Recession of 2008!), a Texas-based company – Adams Extract & Spice Company – created a moist, noticeably flamboyant red cake in an attempt to lure back customers to their products. You can imagine during the Great Depression that simple ingredients like butter, eggs and cream cheese where expensive and often saved for special occasions. Well, the Adams Extract & Spice Company is still around today and their red velvet cake creation is a star in the culinary world.
I think the reason why I’ve always been surprised by how popular red velvet cake has become is because I’m constantly breaking down recipes and rebuilding them with my favorite ingredients. And when I break down the basics of a classic red velvet cake recipe, once you take out the MASSIVE amounts of red food coloring and the vinegar, the remaining ingredients are fairly standard for any chocolate cake recipe. So from one baker to another (Adams Extract & Spice Company), my hat is off to their genius. With the right leverage of two simple ingredients, they created a new dessert unlike anything before seen.
Red Velvet Cake with Eggnog Frosting
What I like about this red velvet cake with eggnog frosting recipe is the liberal use of cream cheese and bourbon. Cream cheese frosting is always so delicious but when you throw in eggnog and a healthy “splash” of bourbon, it becomes – wait for it – legendary. About a month ago, I was making a microwave-in-a-mug version of red velvet cake (that I’ll share at another time with y’all) for my niece. She ADORES red velvet cake. But she was also dumbfounded by how much red food coloring goes into the recipe to the point where I think she (almost) reconsidered her passion for it. When I explained to her that “red velvet” is more of a “look” than a flavor for a cake, she gave me this perplexed look. So she asked, “what does red velvet taste like to you?” What popped into my mind immediately was the word “bourbon.” I kept that to myself (she’s still impressionable). So I wimped out and said something like, “well I’m not sure but it doesn’t taste red and it doesn’t take like velvet.”
Preheat your oven to 350F degrees. Grease three (3) 9-inch round cake pans with butter and dust with flour. Set aside.
In a large mixing bowl, beat together the butter and sugars on high speed with an electric mixer until fluffy. Add eggs, one at a time, beating well after each addition. With mixer on low speed, beat in food coloring.
In a medium bowl, whisk together the flour, cocoa powder, baking soda and salt. Add the flour mixture to the butter mixture in thirds. Alternate with the buttermilk, beginning and ending with the flour mixture. Add vinegar and vanilla. Beat just until blended. Divide the batter evenly among the prepared pans.
Bake for 18 to 20 minutes, or until a wooden toothpick inserted in the center comes out clean. Let cool in pans on a wire rack for 10 minutes. Remove from pans and let cool completely on the wire rack.
While cooling, prepare the eggnog frosting in a large blow. Beat the butter on medium speed with an electric mixer until smooth. Add the cream cheese, beating until blended and smooth. Reduce the mixer speed to low. Gradually add in the confectioners' sugar, eggnog and bourbon. Beat until blended. Use as room temperature when frosting the cake.
Spread the eggnog frosting between the layers and on the top, sides of the cake. Garnish with ground nutmeg. Store covered in a refrigerator for up to 2 days.
Notes
This recipe adapted from Taste of the South's Southern Christmas magazine.
The Great Food Blogger Cookie Swap brings together food bloggers from all over the world in celebration of all things cookie. This is my first year participating; last year the Great Food Blogger Cookie Swap had nearly 600 participants and raised $4,400. For 2013, there were 619 confirmed participants in 8 countries, and together with our phenomenal partners (OXO, Dixie Crystals, Gold Medal Flour and Grandma’s Molasses) we raised over $13,000 for Cookies for Kids’ Cancer.
The premise is simple: bake 3 dozen cookies using a new recipe that you’ve not tried before. You’re matched up with three other food bloggers to whom you’ll send one dozen cookies. The food bloggers get to stretch their creative muscles by trying out a new recipe and in return get one dozen cookies from three other food bloggers. In the process of learning and sharing, you also get to know (perhaps for the first time) three other incredible food bloggers who share you passion for baking and blogging.
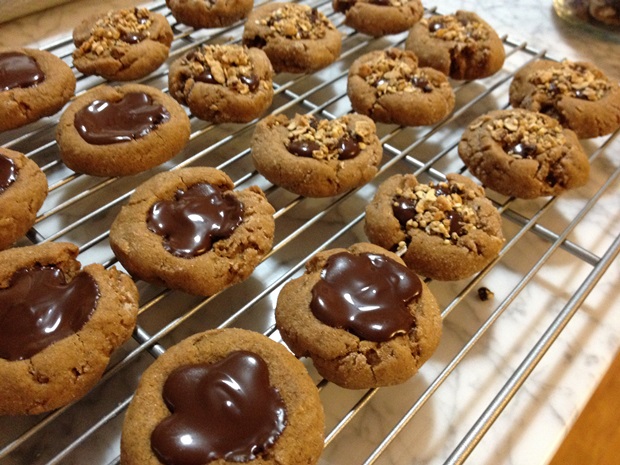
I found my inspiration for my cookie recipe from one of my favorite blogs, Sally’s Baking Addiction. I’ve done crunchy gingersnap and molasses cookie recipes galore, but (to my surprise) I’ve never done a soft-based gingersnap molasses cookie. When I got Sally’s recipe for soft-baked gingersnap molasses cookies 4-ways, I had to try it – giving it my own stamp of individuality with some of my favorite cookie garnishes. I decided to do the recipe three ways:
Original
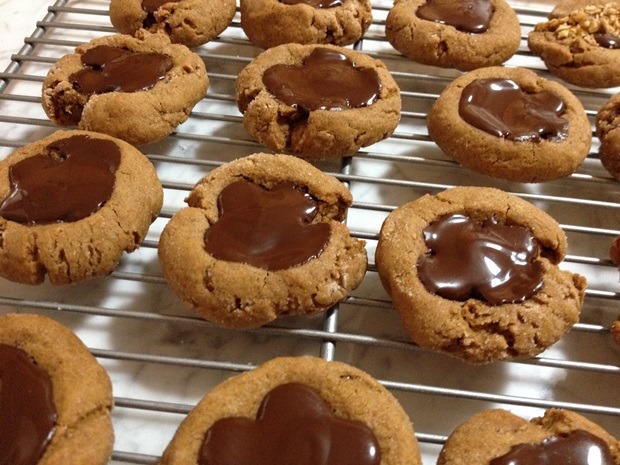
Topped with Bittersweet Chocolate
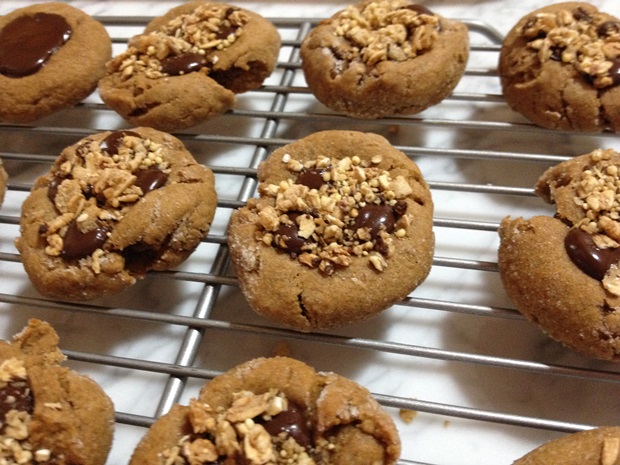
Topped with Bittersweet Chocolate and Dark Chocolate-Cranberry Granola Clusters
This recipe makes about 5 dozen cookies. If you don’t need that many, simply halve all of the ingredients to get about 2 1/2 dozen cookies. I recommend getting all of your ingredients in place, measured first to make execution easy and seamless. You’ll want to work with the dough chilled to make it easier to shape and manipulate. And you’ll want to work quickly when adding toppings after the baking process because you want the heat of the cookies fresh out of the oven to melt the chocolate.
Start by whisking together all of the dry ingredients in a large mixing bowl. Set aside. Cream the butter in the bowl of your stand mixer. Then add the brown sugar and beat until fluffy. Add molasses, egg and vanilla, beating well. Slowly add dry ingredients, on low-speed. DO NOT OVERMIX. Cover the bowl with plastic wrap and chill for at least 2 hours.
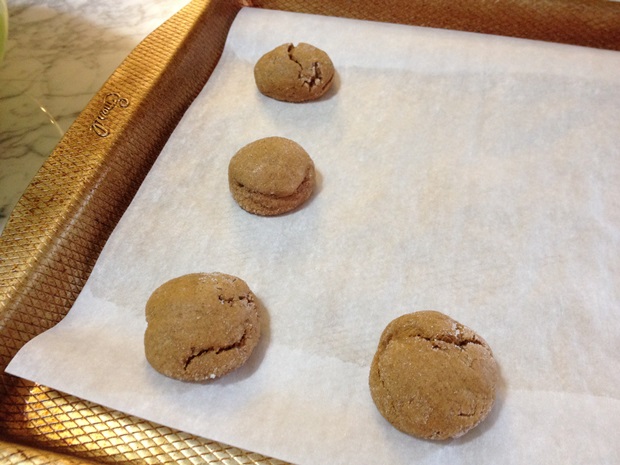
Preheat your oven to 350F degrees. Using a cookie scoop for consistent cookie sizing, shape the dough into 1-inch balls. Roll cookie balls in granulated sugar. Place on prepared baking sheets and flatten with your thumb, leaving a slight indentation.
Bake one sheet of cookies at a time for about 12 minutes, or until edges are brown. Cookies will be puffy and appear soft in the middle. Remove from the oven and immediately press four chocolate chips into the center of the cookie and allow them to melt.
After a few minutes, transfer to a wire rack to cool completely. With the back of a teaspoon, smooth out the melted chocolate. Add one heaping teaspoon of the granola on top of the melted chocolate. Let cool completely before storing in an airtight container.
In a large mixing bowl, combine the flour, baking soda, ginger, cinnamon, cloves, nutmeg and salt. Set aside.
In the bowl of a stand mixer, cream the butter for about 1 minute on medium speed. Add the brown sugar and beat until fluffy. Scrape down sides of the bowl, as needed. Add the molasses, egg and vanilla. Beat well.
Slowly add the dry ingredients to the wet ingredients, on low speed. Be careful not to overmix. Cover the dough with plastic wrap and chill for at least 2 hours (and up to overnight).
Preheat your oven to 350F degrees. Line two large baking sheets with parchment paper.
Take cookie dough out of refrigerator. Shape the cookie dough into 1 1/2-inch balls. I use a cookie scoop for consistent cookie sizing. Roll the cookie balls in granulated sugar. Place on the prepared baking sheet, about 2 inches apart. Lightly flatten cookies with your thumb, leaving a slight indentation to hold topping (applied after baking).
Bake for about 12 minutes, or until edges are just turning brown. The cookies will be puffy and appear soft in the middle. Remove from the oven and immediately add topping(s), as desired. Press 4 chocolate chips into the center of the cookie and allow to melt.
After a few minutes, transfer to a wire rack to cool completely. At this point, take a teaspoon and use the back of the spoon to smooth out the melted chocolate. Add about 1 heaping teaspoon of the granola, if desired, on top of the melted chocolate.
Store in an airtight container for about one week at room temperature.


")