Right now it’s -10 degrees in Chicago (aka #Chiberia) and I am fantasizing about sitting in front of a roaring fire. I don’t have a fireplace so my Vornado space heater under my desk will have to do for now! But if I did have a fireplace, I’d surely be popping some corn or making some toasty s’mores. The perfect fuel to keep warm through this bitter, winter night.
Since this fantasy is not going to happen right now, the next best thing is a microwaveable vessel filled with a deliciously-portioned-for-one s’mores mug cake. Recently, I’ve started playing around with mug cake versions of traditional baked goodies. I’ve been surprised how well the microwave can “bake” some individual cakes and brownies – and I think you’ll find this s’mores mug cake will definitely satisfy a craving for chocolate, graham cracker and hot marshmallow.
Find your largest microwaveable mug; I recommend one that can hold at least 16 ounces. Coat it with non-stick spray for easy cleanup, then mix all the ingredients together in the mug just until combined. Zap it on HIGH in your microwave for about 90 seconds and voila! You’ve got a campfire treat courtesy of your microwave.
Pair a s’mores mug cake with a cup of steaming hot cocoa and you’ll be ready to face the polar vortex head on!
Combine all ingredients in a large microwaveable mug (recommend 16 ounce-size). Whisk well until blended.
Microwave on HIGH for 90 seconds, then check to see if it is done. If not, continue to microwave in additional 30-second intervals. Be careful not to overcook or cake will become rubbery.
Let cool down for a bit (the cake will continue to cook in the mug), then enjoy with a spoon!
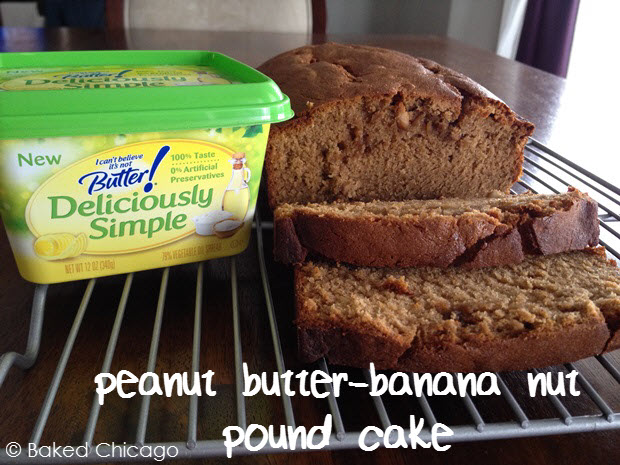
When trying an ingredient in a recipe for the first time, it’s important to review the basics like taste and texture in order to understand how those will work in the final product. What I liked about Deliciously Simple™ is that it’s made with simple ingredients I recognize and frequently use in my baking, like non-fat yogurt and vegetable oil. So I first tried it on my morning toast. The taste was buttery and the texture was creamy – even straight out of the refrigerator. Deliciously Simple™ has no artificial ingredients, and that’s something I look for in every product I bring into my home.
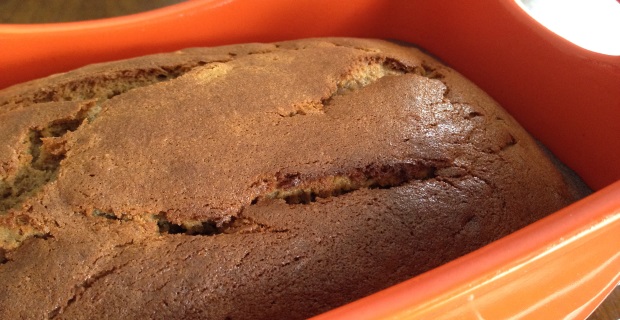
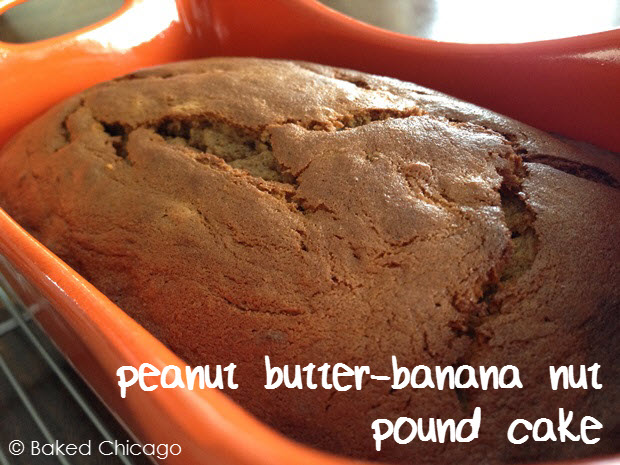
So I decided to incorporate Deliciously Simple™ into a new recipe for peanut butter-banana nut pound cake. The buttery taste and creamy texture would work well with either sweet or savory foods, and this pound cake straddles that line well because of the balance of the peanut butter, banana and pistachios. Together, this pound cake is slightly sweet and slightly savory.
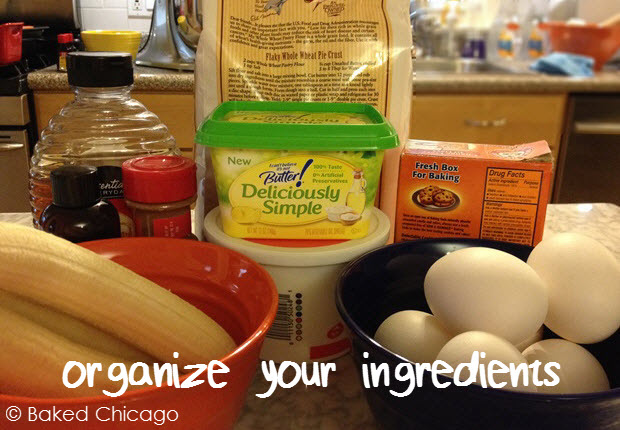
It’s always easier to execute a recipe by getting all of your ingredients organized first.
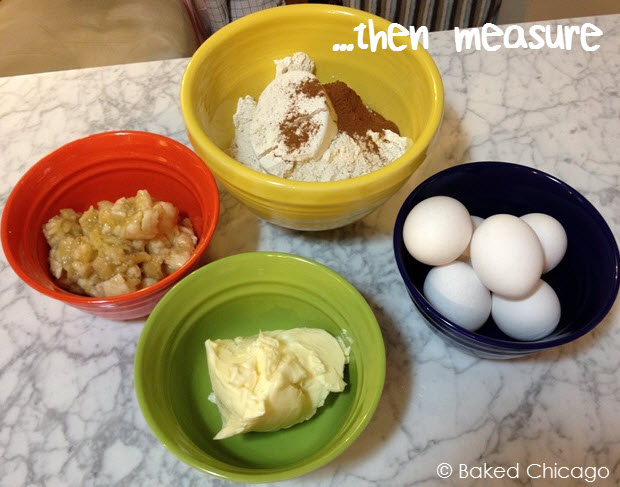
Then measure out each ingredient and sort by the order you’re going to use the ingredient in executing the recipe. This process, called ‘mise en place’ – which means everything in its place, will save you so much time and possible heartache. It’s like the law of gravity. It just works, so you gotta do it! Let’s get started.
You’re going to preheat your oven and preparing your baking pan. You can go traditional and grease-flour your pan but I’ve found that non-stick cooking spray, when applied correctly, works just as well and is much easier.
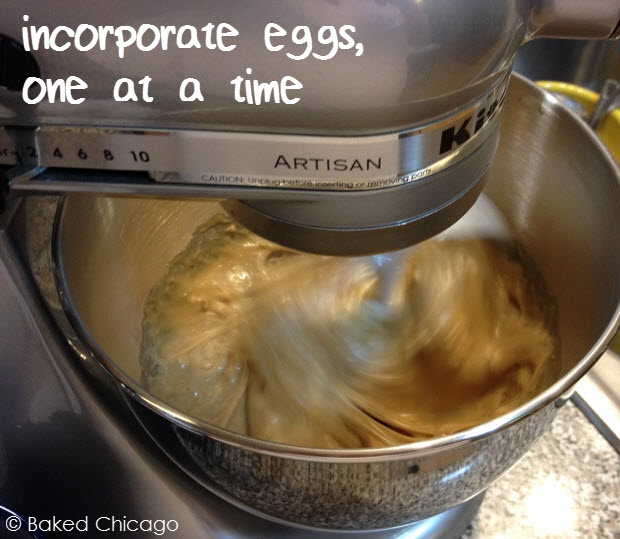
Sift together your dry ingredients: flour, salt, baking soda, baking powder and cinnamon. Next you’ll cream the Deliciously Simple™ with the brown sugar and peanut butter. Be sure to incorporate lots of air into this mixture; it will help the pound cakes rise properly.
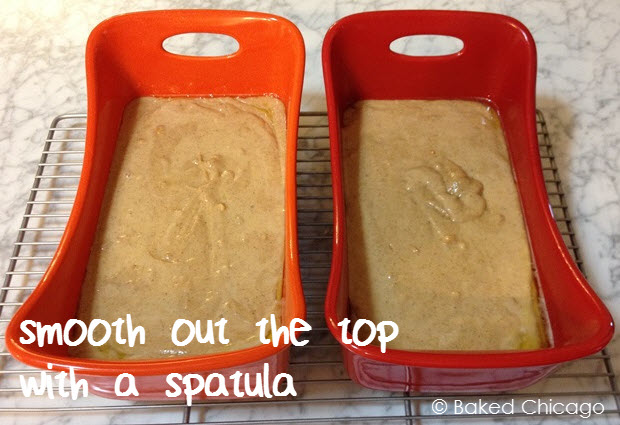
Add your eggs, as instructed, followed by the mashed banana and vanilla.Then add the flour mixture and sour cream, alternately. Then you’ll fold in the pistachios by hand with a spatula. Pour the batter into your prepared baking pan and smooth out the top with the spatula.
Bake for 50 to 65 minutes. I recommend checking at the 45-minute mark, because the baking process accelerates toward the end. It is very easy to over bake a pound cake, unless you are monitoring closely. The top should be golden brown and an inserted toothpick should come out clean.
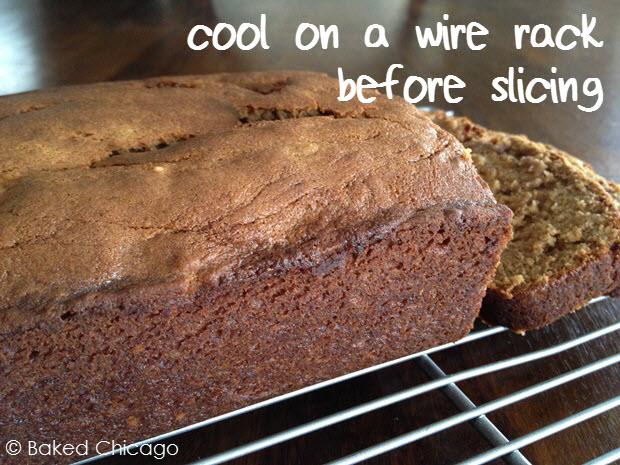
After cooling in the pan for about 10 minutes, remove and let cool complete on a wire rack. You can freeze a whole loaf for up to 2 months in an airtight container. But I recommend enjoying it warm fresh out of the oven!
1/2 cup ripe banana, mashed (about 2 small or 1 large banana)
1 tablespoon vanilla extract
1/2 cup sour cream
1/4 cup pistachios, chopped (optional)
Instructions
Preheat your oven to 350 F degrees. Generously coat a 9x5-inch loaf pan with non-stick cooking spray. Set aside.
In a medium bowl, sift together the flour, salt, baking soda, baking powder and cinnamon. Set aside.
In the bowl of a stand mixer, cream together the butter, brown sugar and peanut butter until light and fluffy (at least 5 minutes).
Add the eggs, one at a time, beating well after each addition. Scrape down the sides of the bowl, as needed, between additions. Add the mashed banana and vanilla.
Continuing on low speed, add the sifted flour mixture and sour cream, alternately; begin and end with the flour mixture. Beat just until combined. Fold in the pistachios with a spatula by hand.
Pour the batter into the prepared baking pan. Smooth out the top with your spatula.
Bake for about 50 to 65 minutes. The top should be gold brown and a toothpick inserted in the center should come out clean. If the top is browning too quickly, cover loosely with aluminum foil. I recommend checking your pound cake at the 45-minute mark. The baking process accelerates toward the end and it can be easy to over bake your cake.
Cool for at least 10 minutes in the pan before removing. The sides should start to come away from the pan to make removal easier. Then remove the loaf and cool completely on a wire rack.
Slice while still warm and enjoy with butter on top. Store any remaining slices in the refrigerator. The whole loaf may be frozen for up to 2 months.
Preheat oven to 400 F degrees. Grease two standard muffin tins or line with paper cups.
In a medium bowl, pour boiling water over oatmeal. Stir to moisten and set aside.
In a large bowl, combine flour, sugar, baking powder, cinnamon, baking soda and salt. In another bowl, combine eggs, buttermilk and oil. Stir wet mixture into the flour mixture, just until combined.
Spoon batter into prepared muffin pans. Fill each about 2/3 full. Bake for 20 minutes or until a wooden toothpick inserted in centers come out clean. Cool in pans on a wire rack for five minutes, then remove from pans.
Whisk together confectioners’ sugar and milk to form a glaze. Drizzle over muffins and serve.
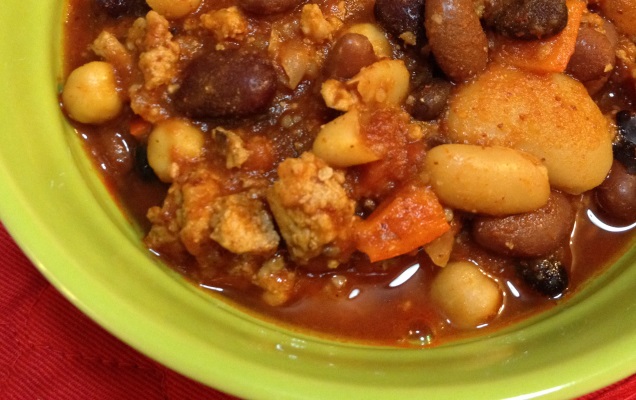
Feeding a huge crowd for the Big Game? This chili will feed a very hungry army so it’s a perfect quarterback for a Souper Bowl Party on any game day. It’s loaded with lots of lean protein and has a mild heat from the sweet red, orange and yellow peppers.
This chili has 6 beans. Yes, count them, 6 beans:
garbanzo (aka chick peas),
dark red kidney,
light red kidney,
white kidney,
black, and
butter
I used to make chili with four beans: butter, garbanzo, dark red and light red kidney. And that was fine for many years. But when I made this new version, I doubled the amount of ground turkey to 2 1/2 pounds. So I thought I should up the bean count as well. As I scoured the shelves at the supermarket, I found (for the first time) white kidney beans. My mind thinks in polar opposites quite a bit so I grabbed a can of white kidney beans and a can of black beans and was ready to get cooking.
It’s important to rinse the beans before putting them in the slow cooker. Depending on the type of bean, there will be a lot of starch in the bean juice and there will be little flavor (or nutritional value) in that. Simply empty the cans in a colander and rinse with cold water before putting in the slow cooker.
Then dice some small sweet peppers. To get about 1 cup of sweet peppers, I cut up 7 small red, orange and yellow sweet peppers. It adds a mild heat to the chili and a nice pop of color, as well.
Add the rest of the ingredients, and give it a good stir before putting on the lid to the slow cooker. Cook on HIGH for 2 to 3 hours, stirring every hour or so. Serve warm. Top with your favorite garnish, like popcorn or shredded cheese. Got any leftovers? It freezes well for up to 6 months.
In a 6-quart slow cooker, add the ground turkey, beans, tomato juice, chopped tomatoes, garlic, onion, chili powder and sweet peppers. Stir to combine.
Will Lady Mary ever be happy again after the untimely demise of her husband, Matthew Crawley? Will Lady Edith become the Carrie Bradshaw of the post-Edwardian era? Who will become Thomas Barrow’s new BFF after O’Brien leaves Downton Abbey? We’ll have to watch to find out, as season 4 begins tonight on PBS stations across America.
If you’re an avid watcher of “The Abbey,” you know that season 4 aired in the United Kingdom last fall. That means that you may have come across many “spoilers” for the upcoming season via social media. I don’t know how I did it, but I think the only spoiler I was not able to avoid was the departure of that bitch (er….Lady Grantham’s personal maid) O’Brien. O’Brien is a character you love to hate, so I give the actress who played her major kudos. But I won’t be sorry to see O’Brien go from the story lines; I was rooting for someone to “take her down” for all the nastiness she spread throughout Downton Abbey.
If you’re hosting a Downton Abbey viewing party tonight or just want to make some authentic treats to enjoy in front of the telly, here’s a recipe for gingernuts – also known as gingersnaps or ginger biscuits. Gingernuts are extremely popular throughout the UK, as well as other countries within the British empire like Australia and New Zealand. One of the reasons for their popularity is the tough texture, which can withstand dunking into tea or cocoa. I can just imagine the Dowager Countess of Grantham (played to perfection by the incomparable Maggie Smith) enjoying a gingernut with her tea…but I doubt she dunks it!
Preheat your oven to 350 F degrees. Line a large baking sheet with parchment paper. Put the dark brown sugar in a shallow bowl or plate; set aside.
In a medium bowl, cream the butter and granulated sugar until light and fluffy. Add both molasses and continue beating until well incorporated.
In another bowl, sift the remaining dry ingredients. Add to the butter mixture. Use a small cookie scoop (about 1 1/2 inches) to make balls of dough. Roll the dough balls in the brown sugar and place on the prepared cookie sheet, about 2 inches apart. Press down gently to flatten the cookie slightly.
Bake for about 12 minutes, or until edges begin to brown. The cookies are done when they have cracked and will be slightly firm to the touch. Cool on the baking sheet for a few minutes before transferring to a wire rack to cool completely.
Store in an airtight container for about one week at room temperature.
Notes
Lightly adapted from Downtown Abbey Cooks recipe for gingernuts.
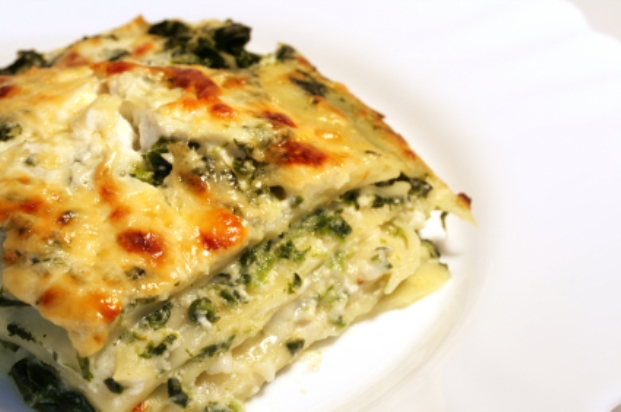
Italian food is so comforting, but it can sometimes be heavy. This lasagna primavera has many of the classic Italian flavors yet it is chock full of fresh vegetables.
Lasagna is a dish that I love, but rarely make at home. The preparation can sometimes be a bit much when cooking for one. But once it’s all assembled, everything after popping it in the oven is easy-peasy. So when I do make lasagna, I make a MEGA-batch so I can freeze portions to enjoy later. Cook once, eat thrice!
This lasagna primavera showcases baby spinach, baby carrots and sugar snap peas, along side rich cheeses. There’s no meat, and you won’t miss it. On a snowy weekend [like 70% of the country is experiencing this weekend] it’s a great dinner option your entire family can enjoy – especially when paired with hot garlic bread. Yes!
And while this recipe uses fresh vegetables, you can easily substitute baby spinach for frozen spinach and sugar snap peas for frozen peas. Whatever vegetables you have will work here so it can also be a great way to clean up odds-and-ends from the fridge and freezer.
1/2 pound baby carrots, halved lengthwise and thinly sliced
2 cups (about 15 ounces) ricotta cheese
1 large egg
1 package no-boil lasagna noodles (12 to 16 noodles)
1 pound shredded mozzarella cheese
1 cup grated Parmesan cheese
sea salt and ground black pepper
Instructions
Preheat oven to 400 F degrees. Spray a 9x13-inch baking pan with non-stick cooking spray; set aside.
In a large saucepan, heat oil over medium setting. Add flour and garlic; stir constantly for 2 to 3 minutes. Don't let the flour darken. Whisk in milk. Bring to a boil. Reduce to a simmer and cook until thickened while whisking occasionally for 3 to 5 minutes. Add spinach, peas and carrots. Season with salt and pepper. Set aside.
In a medium bowl, combine the ricotta, egg, 1/2 teaspoon of salt and 1 teaspoon of pepper.
In the bottom of the prepared baking dish, spread a thin layer of vegetable sauce. Layer four of the lasagna noodles over the sauce. Then layer about half of the remaining vegetable sauce on top of noodles. Add half of the remaining noodles in a layer over the vegetable sauce. Then half of the ricotta mixture, half of the mozzarella and half of the Parmesan. Repeat by layering the remaining lasagna noodles, followed by remaining vegetable sauce, and the remaining ricotta, mozzarella and Parmesan.
Cover with aluminum foil and place on a rimmed baking sheet. Bake for 45 minutes, then uncover and bake for another 20 minutes (or until bubbling and browned). Let cool for 10 minutes before cutting and serving.
Notes
Adapted from Martha Stewart's recipe for Freeze-Ahead Lasagna Primavera.
With the arrival of the new year, like many of you I am looking to recalibrate my food choices to make up for the over indulgence of holiday goodies. One of my go-to ingredients is boneless, skinless chicken breast. I’m also trying to make good use of my slow cooker, so I have more time to shovel snow! I’d be joking if we hadn’t received 13+ inches of snow in the last 2 days with about 6 more inches to arrive over the next 24 hours. I guess that will be my cardio workout.
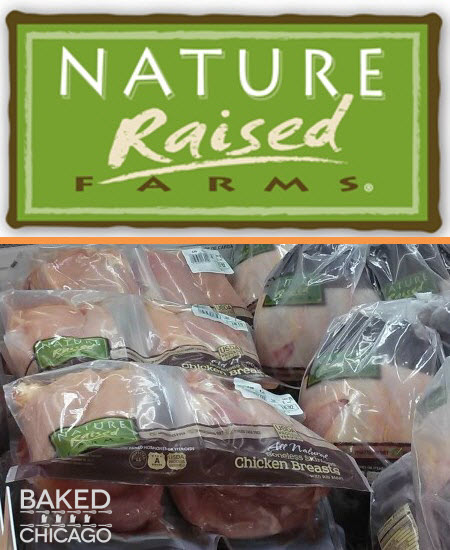
Before the snow storm hit, I made my way to my local Sam’s Club to stock up on pantry items. You can always find some really good deals on quality ingredients, and I love discovering new products. One of the new product lines that Sam’s Club is carrying in 2014 is NatureRaised Farms® Boneless, Skinless Chicken. If you’ve never heard of or used NatureRaised Farms® brand before, their products are quite remarkable.
I always prefer to focus on fewer, high-quality ingredients in a recipe to get the best flavor and nutrients possible. That goes for any recipe, sweet or savory. The NatureRaised Farms® chickens are vegetarian-fed, antibiotic-free and cage-free. There are no fillers, preservatives or artificial colors either. So I picked up a few packages of the Boneless, Skinless Chicken Breasts to make a big ole batch of Crock Pot Chicken Vesuvio, Family-Style. If you’d like to try the NatureRaised Farms® product before you buy, a select number of participating Sam’s Clubs will have in-store product demonstrations on January 4. Or for more information about NatureRaised Farms®, visit their website or find them on Facebook and Twitter.
The Origin of Chicken Vesuvio
It may surprise you that Chicken Vesuvio was born in Chicago. It’s an Italian-American dish typically made from chicken on the bone and wedges of potato. Both are sautéed with garlic, oregano, olive oil and white wine, then baked until the chicken’s skin becomes crisp. The dish would often be garnished with green peas for color. In many Chicago restaurants, you’ll often find the “Vesuvio” technique applied to other foods like Steak Vesuvio or Vesuvio Potatoes. The origins of the dish are widely attributed to the Vesuvio Restaurant, which operated on Chicago’s Wacker Drive in the 1930’s. The original recipe can be a bit heavy, because of the richness of certain ingredients, including olive oil, white wine and lots of potatoes.
Crock Pot Chicken Vesuvio
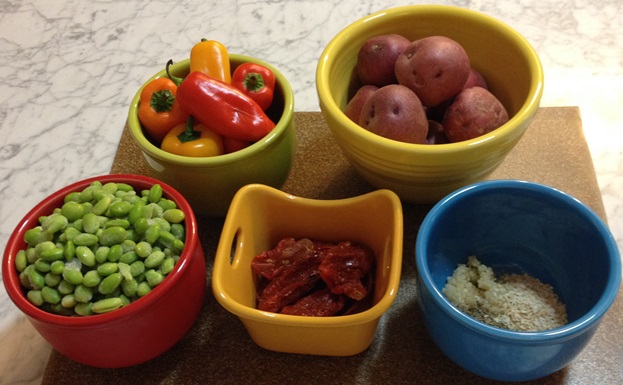
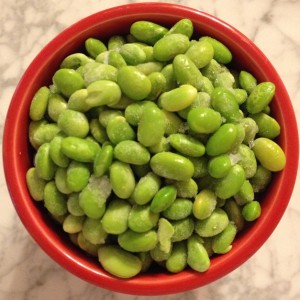
I wanted to make a Chicken Vesuvio that offered a healthier option by using a healthier cut of chicken (skinless) and lower-sodium broth, as well as replacing some of the potatoes with other nutrient-rich vegetables that pack a real flavor punch, like edamame, sun-dried tomatoes and sweet peppers. And by using a crock pot to cook the dish instead of the oven, it uses far less oil, chicken broth and wine. That makes this Crock Pot Chicken Vesuvio more moist and delicious.
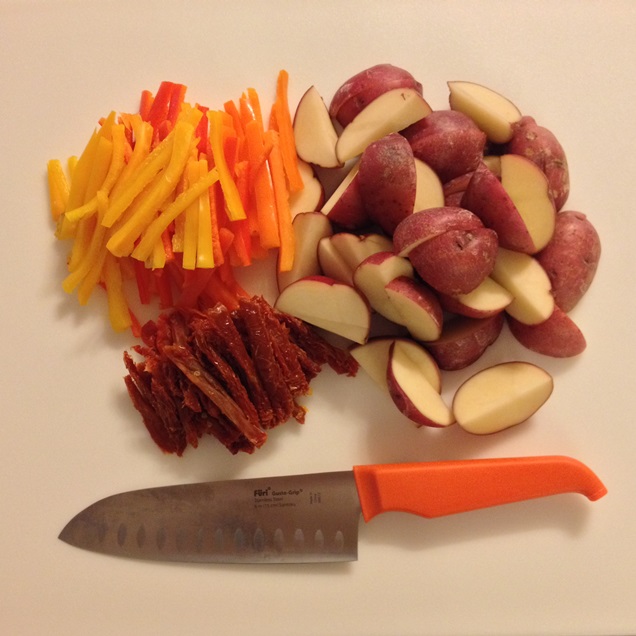
I always find it easier to execute a new recipe by getting all of my ingredients in order: mise en place. “Mise en place” is a French phrase which means literally “putting in place,” as in set up. In addition to the protein-rich, all-natural chicken, the other star ingredients of Crock Pot Chicken Vesuvio are:
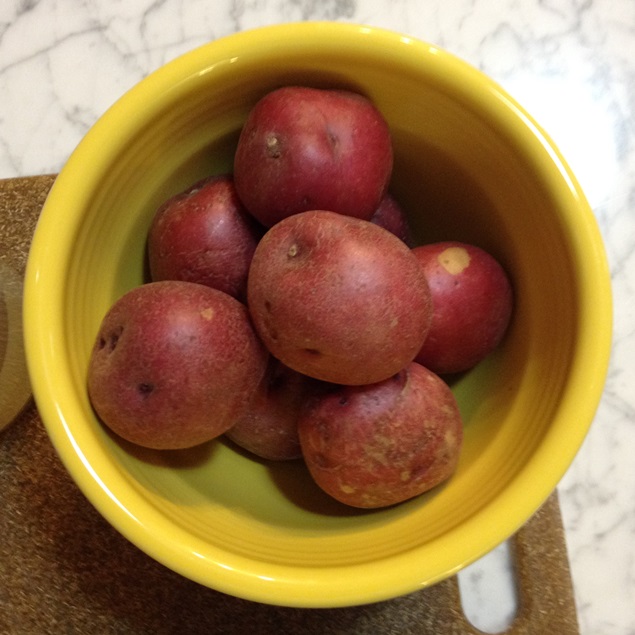
new, red potatoes
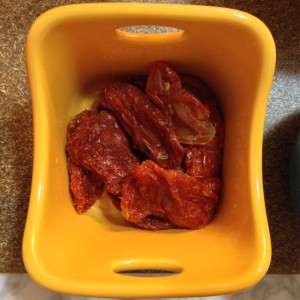
sun-dried tomatoes
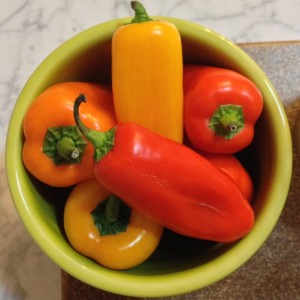
sweet red and yellow peppers
and my favorite, edamame!
Use a sharp chef’s knife to Julienne the peppers and sun-dried tomatoes, as well as quarter the potatoes. Julienning is a simple technique that cuts food into short, thin strips. It not only looks great (we eat with our eyes first!) but also reduces the cooking time, while ensuring even cooking.
To get started, preheat a frying pan – lightly brushed with canola oil – on medium high heat. I used the sautée and browning setting on my 3-in-1 slow cooker, so I had one less dirty pan to wash. Score another point for Crock Pot Chicken Vesuvio! Take a barbecue or pastry brush and lightly coat one side of each chicken breast with canola oil. Then season the first side of the chicken breasts with a pinch each of salt, black pepper and Italian seasoning. Put the chicken breasts in the prepared pan, seasoned side down. Then repeat with canola oil and seasonings for the remaining sides of each chicken breast. Brown both sides of the chicken breasts (about 6 minutes per side).
Place the potatoes, edamame, peppers and sun-dried tomatoes inside the crock pot. Add the onion, garlic and remaining salt, black pepper and Italian seasoning. Pour in the chicken broth and white wine. [Because this dish requires less than a cup of white wine, I recommend picking a bottle of your favorite white wine to pair with this dinner. After pouring the half cup for the recipe, save the rest of the bottle to have with dinner!]
Gently stir until the ingredients are combined. Top the vegetables with the chicken breasts and cook for 3 hours on HIGH. You see, Crock Pot Chicken Vesuvio is really that easy!
Yield: 4 servings (1 chicken breast and approximately 1 cup of vegetables, each)
Ingredients
2 tablespoons Italian seasoning
1 teaspoon sea salt
1 teaspoon ground black pepper
4 chicken breasts, skinless, boneless
1 tablespoon canola oil
1 pound small, red potatoes, scrubbed and cut into 4 or 6 wedges each
12 ounces edamame, shelled
1 cup sweet yellow and red peppers, julienned
1/4 cup sun-dried tomatoes, julienned
3 tablespoons minced onion
4 cloves garlic, minced
1/2 cup low-sodium chicken broth
1/2 cup dry white wine
1/4 cup fresh chopped parsley, optional garnish
Instructions
Lightly coat a frying pan with canola oil and place on a stovetop burner, set at medium high. Warm the pan for a minute; you want it hot to properly sear the chicken breasts.
Pat the chicken breasts dry with a paper towel. Using a barbecue or pastry brush, lightly coat the top of each breast with a thin layer of canola oil. Season with one pinch each of sea salt, black pepper and Italian seasoning. Place the chicken breasts in the hot frying pan, seasoned side down, and cook for about 6 minutes.
Immediately coat the remaining side of each chicken breast with canola oil. Again, season with one pinch each of sea salt, black pepper and Italian seasoning. Cover the pan with its lid until you're ready to turn the chicken breasts. After you turn the chicken breasts, cook for another 6 minutes, or until browned on both sides.
Place the potatoes, edamame, peppers, sun-dried tomatoes, onion, garlic and remaining sea salt, black pepper and Italian seasonings in a 4- to 6-quart slow cooker. Add chicken broth and white wine. Gently stir to immerse vegetables evenly in the broth-wine mixture. This will help the vegetables to properly steam and cook evenly. Top the vegetables with the chicken breasts.
Cover and cook on HIGH for 3 to 3 1/2 hours (or LOW for 6 to 7 hours), or until chicken and potatoes are tender.
Transfer the chicken and vegetables to a serving plate. Top with juices from the slow cooker. Sprinkle with fresh parsley, if desired.
I reckon we’ve had between 6 inches and 8 inches of snow so far today. I’ve shoveled the front steps and sidewalks 3 times – as well as the back deck and walkway to the garage. And with 4 pugs who can’t walk in deep snow, I even shoveled some paths for them in the back yard so they could maneuver the snow drifts. No more shoveling, at least for today!
Tomorrow and the coming days will be another story, as we’re expecting another 6 inches and the projected high temperature for early next week will be -4 degrees F. Yes, a negative four degrees!
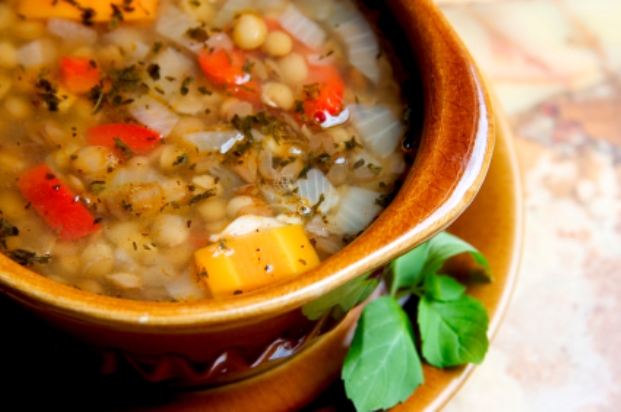
It is definitely soup weather — and a hearty sweet potato and lentil soup is on the menu. It’s both really satisfying on a cold winter’s day (or night) and SO EASY to make in a crock pot. Or do you say slow cooker? I find I go back-and-forth, so forgive me that. I guess it could be worse if I called it a ‘crock cooker’ or a ‘slow pot.’ The latter might be understandable if I lived in Colorado!
1 medium sweet red pepper, cut into 1/2-inch pieces
1 medium onion, cut into 1/2-inch pieces
1 cup dried red lentils
1 teaspoon ground ginger
1 teaspoon kosher salt
2 cloves garlic, minced
Instructions
Combine all ingredients in a 6-quart slow cooker. Add 6 cups of water and stir.
Cover and cook on high for 4 hours (or on low for 8 hours). Stir the soup with a whisk to make a rough puree. Thin with hot water, if needed. Great to serve with fresh-baked bread.
Notes
Lightly adapted from a recipe in Food Network magazine.
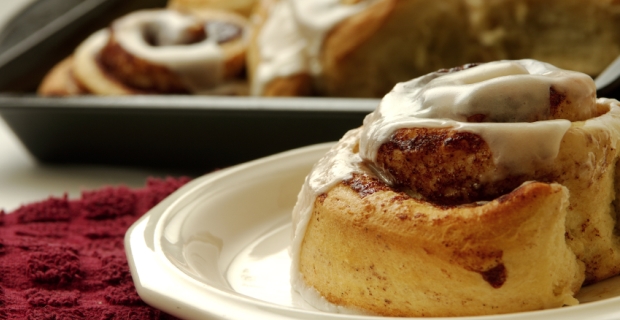
The Perfect New Year’s Breakfast For The Family: Sour Cream Cinnamon Rolls
The beginning of each new year gives pause for reflection, both for blessings received and for losses borne during the past year.
And no matter if 2013 was among the best or hardest years for you and your family, there’s always hope that the upcoming year will be better. Having faith, believing in the possibility of a better future can be a powerful beacon of light to guide you into the new year.
One way to start 2014 on a solid footing is to make and share a quality breakfast as a family. This recipe for sour cream cinnamon rolls is quite basic, but so very satisfying.
‘Nourish, to me, is nourishing food, nourishing your family, nourishing your life.’ — Jamie Oliver
Great food should nourish the body and the soul. And making sour cream cinnamon rolls together as a family is a great way to nourish the family unit, create cherished memories and establish a family tradition to welcome in each new year.
Sour Cream Cinnamon Rolls, With Orange Cream Cheese Frosting
Cook Time: 20 minutes
Yield: 12 servings
Ingredients
For Rolls:
1 package active dry yeast
1/2 cup water
1 teaspoon granulated sugar
3 cups all-purpose flour
1 cup sour cream
1 teaspoon vanilla extract
3 tablespoons dark brown sugar
1/4 teaspoon baking soda
2 tablespoons butter, melted
1 tablespoon cinnamon plus 1/2 cup brown sugar mixed
For Icing:
3 ounces cream cheese, softened
2 tablespoons butter, softened
2 1/4 cups confectioners' sugar
1 teaspoon vanilla extract
2 tablespoons orange juice
Instructions
Prepare Rolls:
Generously grease the bottom of a 9x13-inch baking pan. Set aside.
In a medium mixing bowl, combine granulated sugar and water together. Sprinkle with yeast and let stand 10-15 minutes or until dissolved.
Add the flour, salt, sour cream, vanilla, and 3 tablespoons of dark brown sugar. Make into a soft dough. Roll out on lightly floured surface to within 1/2 inch thickness. Brush dough with melted butter. Sprinkle liberally with cinnamon and brown sugar mixture. Roll up, jelly roll fashion, and cut into 12 slices.
Place on the prepared baking pan. Let rise until doubled in size, about 45 to 60 minutes.
In meantime, preheat your oven to 350F degrees. When rolls have doubled in size, bake for about 20 minutes or until lightly browned. Removed from oven and let cool while you prepare the cream cheese icing.
Prepare Icing:
Beat the softened cream cheese and butter on medium speed with an electric mixer until creamy. Gradually add in the powdered sugar, beating at low speed until blended. Stir in the vanilla and 1 tablespoon of orange juice. Add the remaining tablespoon of orange juice slowly, stirring until icing is smooth and creamy.
Frost the cinnamon rolls and serve while still warm.
Notes
To make this recipe gluten-free, swap out the all-purpose flour with a gluten-free multi-purpose flour. Then add 1 teaspoon of xanthan gum, which acts as a binding agent, thickener. All other ingredients in this recipe are typically gluten-free; most national brands (e.g. Daisy Sour Cream) are gluten-free but some brands may have additives so it's always important to read labels to confirm any processed product is free of gluten.
Breakfast is great any time of the day. One of my favorite breakfasts to make for visiting family during the holidays is pancakes, which are sometimes also called:
flapjacks
skillet cakes
hotcakes
griddle cakes
crepes blintzes
latkes
johnny cakes
No matter what you call them, they are delish. The sour cream makes these blueberry pancakes extra fluffy and light, and they will melt in your mouth. What’s your favorite garnish for the top of a big ‘ole stack of hotcakes?
3 tablespoons unsalted butter, melted and cooled slightly
1 to 2 teaspoons vegetable oil, for the pan
1 cup fresh blueberries for garnish
maple syrup
Instructions
Whisk together flour, brown sugar, cinnamon, baking powder, baking soda and kosher salt in a medium bowl. In another medium bowl, whisk together buttermilk, sour cream, eggs and melted butter.
Make a well in the center of the dry ingredients and pour in the wet ingredients. Gently stir until just combined (batter should remain lumpy with a few streaks of flour). Do not overmix.
Heat vegetable oil in a nonstick skillet over medium heat until shimmering. Using a paper towel, carefully wipe out the oil, leaving a thin film of oil on the bottom of the pan. Using ¼ cup to measure, portion batter for 3 to 4 pancakes in the pan. Cook until the edges are set, first side is golden brown, and bubbles on surface are just beginning to break (about 2 to 3 minutes).
Flip pancakes and continue to cook until second side is golden brown (about 1 to 2 minutes more). Serve pancakes immediately with syrup and blueberries on top. Repeat with remaining batter.
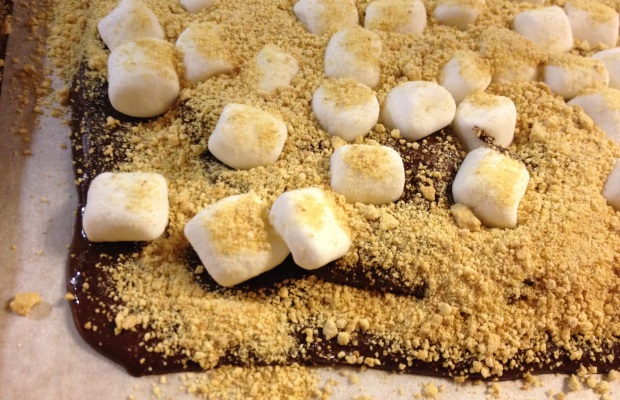
If you ever went camping as a kid, you probably made s’mores with the classic Hershey’s milk chocolate bars, graham crackers and toasted marshmallows. And if you did, you probably became (like me) addicted to the iconic flavor combination. So much so that anytime you can recapture that flavor, that special feeling in a recipe you can make in your own kitchen that you jump at the chance. Am I right?
S’mores remind any of us over the age of 35 of a simpler time. Food manufacturers know that, which is why you see so many s’mores flavored versions of products and those gigantic store displays that put all three key ingredients together conveniently. I know I immediately reach for them, even though I haven’t been camping in decades! And I doubt many of us are still going camping, so I’m assuming we’re all just toasting the marshmallows in the fireplace or over the top of our gas cook tops – quietly enjoying s’mores in the “virtual campgrounds” inside our homes.
This recipe for cinnamon s’mores bark captures the core ingredients of a traditional s’more and adds a pinch of cinnamon for a modern twist. I will admit that using un-toasted marshmallows means that it cannot truly capture the smoky flavor of a burnt marshmallow inside a gooey, sticky s’more that you remember eating in front of the camp fire. But it’s still quite delicious. And if I can figure out how to toast the marshmallows without melting the chocolate bark holding it all together, I will share that with all of you. Or if you discover a way, please share as well. Until then, we’ll just have to bear the burden (not!) of un-toasted marshmallows in our s’mores bark.
Gently melt the bittersweet chocolate over very low heat, just until it barely melts. You can do this over a hot water bath or in a skillet. I prefer the microwave, heating the chocolate in 30-second intervals just until it starts melting. Then stir with spatula (chocolate will continue to melt as you stir) until completely smooth.
Spread the chocolate on a parchment-lined baking sheet into (approximately) an 8' by 12' rectangle. Allow the chocolate to set, but not harden completely.
Melt the milk chocolate in the same way. Then mix half of the crushed graham crackers thoroughly in the milk chocolate. Spread the chocolate-graham cracker mixture over the bittersweet chocolate layer.
Sprinkle marshmallows and remaining graham cracker crumbs on top, gently pressing them in before they set. Allow the candy to cool until hardened.
Break or cut into chunks. Store in an airtight container for up to 1 week (or freeze for longer storage).
Notes
Adapted from a recipe on the King Arthur Flour website.
If like much of the United States right now, you’re experiencing bitter cold and negative wind chills then this drink is what Santa ordered! Here in Chicago, we started this morning at 0 degrees and negative wind chills. Warm drinks in this kind of a weather (without alcohol!) are great to both hydrate the body and comfort the spirit. But it’s the holidays so we’re going to brew up a batch of spiced hot apple cider and give you the option to spike it as well.
This drink is very smooth on the tongue and pleasing to the palate. Drinking spiced (and spiked!) hot apple cider is kind of like giving yourself a hug from the inside. It’s a perfect night cap to prepare you for an evening of holiday dreams. And remember if you want to make a batch for the entire family including the kids, just do so without the peppercorns and the brandy!