I decided to macerate the Bing cherries in some Captain Morgan® 1671 rum. This Caribbean rum has aromas of sweet oak and dark fruit – with hints of chocolate. That makes it perfect for this olive oil cake with Bing cherries and dark chocolate chips. Macerating is just like marinating. I took a canning jar and filled it with pitted Bing cherries. Then I topped it off with Captain Morgan 1671 Rum. I let cherries soak for a few hours, but you could also let it soak overnight in the refrigerator. Just don’t throw out the rum after the cherries are done macerating! By itself it makes for a nice sipping companion while you’re baking – or a great addition to an ice cold Diet Coke. This batter is quite thick, so use a sturdy spatula or spoon when you start to incorporate the chocolate chips. You could also mix the Bing cherries into the batter, but I prefer to layer them evenly on the batter to ensure nearly every bite of this rich cake has a burst of rum-infused cherry in it.
I like to serve this cake while it’s still warm. The chocolate, cherries and rum make for a seriously decadent flavor combination. Fresh Bing cherries and Caribbean spiced rum. Now that’s what summer should taste like!
In a resealable container, soak Bing cherries in 1 cup of rum. Let cherries macerate for at least a few hours, and up to 24 hours.
Preheat your oven to 350 F degrees. Lightly coat a 9" round cake pan with butter; set aside.
In a large mixing bowl, whisk together eggs and brown sugar for a few minutes, letting air incorporate into the mixture. Add vanilla, olive oil, lemon zest and lemon juice.
In a medium mixing bowl, stir together flour, cornmeal, baking powder and salt. Add dry mixture to the wet mixture. Mix until combined; batter will be thick. With a spatula, stir in 1 cup chocolate chips.
Pour half of the batter into your prepared baking pan. Spread about 2 cups of cherries evenly. Save 1/2 cup of macerated cherries for a garnish. Spoon remaining batter over cherries; it's okay if the fruit peeks through the batter.
Bake until lightly golden brown and a toothpick inserted comes out clean, about 35 to 40 minutes in a convection oven. If you use a non-convection oven, baking time will take a bit longer.
Remove from oven and let cool on a wire rack for 10 minutes. Remove cake from cake pan and let cool completely on a wire rack.
Cut cake and serve with reserved Bing cherries as garnish. Put remaining chocolate chips in microwave-safe bowl; heat on HIGH for 60 to 90 seconds or until melting process has just started. Remove from microwave and stir with teaspoon until completely melted. Drizzle warm chocolate over slices and Bing cherry garnish; serve immediately.
Happy International Stout Day! You don’t have to be Irish to appreciate these stout-glazed brownies. Many people aren’t familiar with stout, which is simply a strong, dark beer brewed with roasted malt or barley. If a beer is a stout, it’s considered to have a strong or the strongest flavor.
There are several kinds of stout beers: dry (Irish), imperial (Russian), porter, milk, oatmeal, coffee, oyster and even chocolate! Chocolate and beer often makes for a great combination in recipes. These stout-glazed brownies will have you dancing an Irish jig with each bite.
Want to share these stout-glazed brownies with the kids? Here are some things to consider when baking or cooking with alcohol:
alcohol boils at 172° F, so almost any kind of baking or cooking with alcohol won’t leave any in the food once it’s done. It evaporates quickly.
there’s not much alcohol in beer to begin with. It’s mostly water.
there’s not enough alcohol in beer for it to burn.
12 ounces plus 4 ounces dark chocolate, chopped, divided
1 1/4 teaspoons and 1/4 teaspoon salt, divided
Instructions
Preheat your oven to 350° F. Lightly grease the bottom of a 9x9-inch baking pan with butter or shortening. In a medium saucepan, bring the stout to a boil and cook until reduced to 1/2 cup (about 10 minutes). Let cool and set aside.
In a medium heatproof bowl set on a small saucepan of simmering water, melt 12 ounces of dark chocolate and 1 cup butter. Stir constantly, until smooth. Remove from heat and cool slightly.
Whisk the sugar, eggs and vanilla in a large bowl. Gradually whisk in the chocolate mixture and 1/4 cup stout, reserving the remaining stout. Fold in the flour and 1 1/4 teaspoons salt.
Spread the batter in the prepared baking pan. Bake for 35 to 40 minutes, or until the brownies surface begins to crack. Toothpick inserted in the center should come out with moist crumbs. Cool for 20 minutes.
Stir the remaining 4 ounces of dark chocolate in a medium heatproof bowl, set on top of small saucepan of simmering water, until melted and smooth. Add the reserved 1/4 cup stout, remaining 2 tablespoons butter and remaining 1/4 teaspoon salt. Whisk until well blended.
Pour the warm glaze over the brownies. Let stand until glaze is set (about 40 minutes). Cut into 4 rows by 4 rows to make 16 stout-glazed brownies.
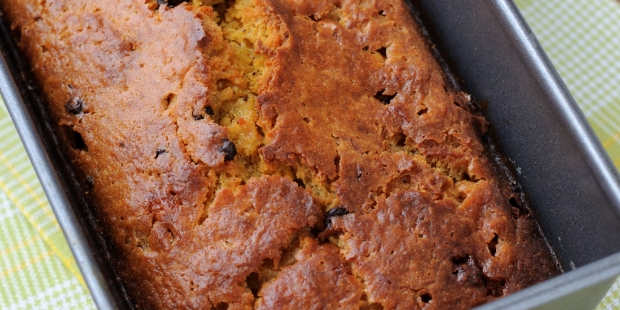
Does your family love the holidays? Make them merry with this decadently delicious (and oh-so-easy) dark chocolate-pumpkin holiday cake.
When the holiday season rolls around, I make sure my pantry is stocked up with all the staples needed for holiday baking: all-purpose flour, baking powder, baking soda, butter, cocoa powder, and every kind of chocolate you can think of!
Pumpkin is a great seasonal ingredient to showcase in holiday baked goods, but I decided to add a twist to this dark chocolate-pumpkin holiday cake: chopped pistachios! Just the right crunch to make this rich holiday cake even merrier for the tongue. I think this is going to become a new family favorite for Christmas morning (if it lasts that long).
Dark Chocolate-Pumpkin Holiday Cake Ingredients
Like every recipe, it’s always easier to bake or cook when you have all your ingredients ready to go (aka mise en place). I use the best ingredients I can find.
Like rich, dark chocolate with a high cocoa content.
Raw, shelled pistachios. Organic free-range eggs — and Bob’s Red Mill flour.
Bob’s Red Mill products have always stood for quality, so it’s one of my go-to ingredients when I get into high gear for my annual holiday baking bonanza. And while I do like to experiment in the kitchen with flavors and textures, I don’t want to experiment with key ingredients – like all-purpose flour – that are essential to baking success. I trust Bob’s Red Mill products and I really like that they have several options for a wide variety of flours, including organic and gluten free.
Every baker has to have all-purpose flour on hand; it’s a kitchen staple and can be used for virtually every baking need. I like that Bob’s Red Mill’s All-Purpose Flour is unbleached and organic. It’s freshly milled from organic hard red wheat – and both the bran and the germ are removed. That leaves the endosperm, which is then made into white flour.
And it’s not enriched with any additives. That means you can trust it to produce high, well-textured loaves of bread equally as well as it produces light, airy baked goods. (It’s the same high-protein flour used by professional bakers!) Click here to download a $1 off coupon for any Bob’s Red Mill product!
When you use quality ingredients in your baking and cooking, you can see it and taste it. I know I can depend on Bob’s Red Mill to deliver every time I open my oven door.
I was selected for this opportunity as a member of Clever Girls Collective and the content and opinions expressed here are all my own.
Preheat your oven to 350F degrees. Coat a 9x5-inch loaf pan with non-stick cooking spray with flour. Set aside.
In a large bowl, whisk together Bob's Red Mill Organic Unbleached All-Purpose White Flour, pumpkin pie spice, baking powder, baking soda and salt. Set aside.
In a medium bowl, whisk together eggs and brown sugar. Add melted butter, buttermilk and vanilla extract. Whisk until combined. Fold in pumpkin.
Add wet ingredients to the dry ingredients. Whisk until there are no lumps. Fold in dark chocolate chunks and chopped pistachios. Pour batter into prepared baking pan. Level with spatula.
Bake for 50-60 minutes, until cake has risen, crackled and a toothpick inserted near the center comes out clean. Remove and let cool for 20 minutes. Invert onto a wire rack and cool completely.
Store in airtight container for a few days. Makes about 12 servings.
Growing up, I remember visiting relatives who lived on this massive farm. At least to a young kid, it seemed like the farm was so huge that it could have been a country all to its own. The one thing I remember most from those visits was the fun I had climbing a cherry tree in the back yard.
Not being much of an outdoorsman at age 10, I was proud that I could climb the tree on my own and hold court among the cherry blossoms. I thoroughly enjoyed picking fresh cherries from the tree and savoring their natural sweetness.
I’m sure if I had actually lived on that farm, I would have had the daily chore of cleaning up fallen cherries off the ground. And that might have ruined what was to become my life long love affair with cherries.
To this day, I love anything with dark, sweet cherries. So when cherries are at their peak, I get swept away walking through the produce aisles at the grocery store. Just luck at these cherries! Can you blame me? I actually bought a bag of sweet, dark Bing cherries and some Ranier cherries. I washed and pitted the cherries, freezing the Ranier cherries for a recipe on another day. I decided to macerate the Bing cherries in some Captain Morgan® 1671 rum. It’s a new, limited edition rum blend that commemorates Captain Morgan’s last flag ship, The Satisfaction. This Caribbean rum has aromas of sweet oak and dark fruit – with hints of chocolate. That makes it perfect for this olive oil cake with Bing cherries and dark chocolate chips. Macerating is just like marinating. I took a canning jar and filled it with pitted Bing cherries. Then I topped it off with Captain Morgan 1671 Rum. I let cherries soak for a few hours, but you could also let it soak overnight in the refrigerator. Just don’t throw out the rum after the cherries are done macerating! By itself it makes for a nice sipping companion while you’re baking – or a great addition to an ice cold Diet Coke. This batter is quite thick, so use a sturdy spatula or spoon when you start to incorporate the chocolate chips. You could also mix the Bing cherries into the batter, but I prefer to layer them evenly on the batter to ensure nearly every bite of this rich cake has a burst of rum-infused cherry in it.
I wonder what cherry-inspired desserts Martha Washington made for George? This cake is definitely good enough for even the most presidential guests at your dinner table. I like to serve this cake while it’s still warm. The chocolate, cherries and rum make for a seriously decadent flavor combination. Fresh Bing cherries and Caribbean spiced rum. Now that’s what summer should taste like!
In a resealable container, soak Bing cherries in 1 cup of rum. Let cherries macerate for at least a few hours, and up to 24 hours.
Preheat your oven to 350 F degrees. Lightly coat a 9" round cake pan with butter; set aside.
In a large mixing bowl, whisk together eggs and brown sugar for a few minutes, letting air incorporate into the mixture. Add vanilla, olive oil, lemon zest and lemon juice.
In a medium mixing bowl, stir together flour, cornmeal, baking powder and salt. Add dry mixture to the wet mixture. Mix until combined; batter will be thick. With a spatula, stir in 1 cup chocolate chips.
Pour half of the batter into your prepared baking pan. Spread about 2 cups of cherries evenly. Save 1/2 cup of macerated cherries for a garnish. Spoon remaining batter over cherries; it's okay if the fruit peeks through the batter.
Bake until lightly golden brown and a toothpick inserted comes out clean, about 35 to 40 minutes in a convection oven. If you use a non-convection oven, baking time will take a bit longer.
Remove from oven and let cool on a wire rack for 10 minutes. Remove cake from cake pan and let cool completely on a wire rack.
Cut cake and serve with reserved Bing cherries as garnish. Put remaining chocolate chips in microwave-safe bowl; heat on HIGH for 60 to 90 seconds or until melting process has just started. Remove from microwave and stir with teaspoon until completely melted. Drizzle warm chocolate over slices and Bing cherry garnish; serve immediately.
Disclosure: I was given a free sample of Captain Morgan® 1671 Commemorative Blend to review. I get no additional benefits for talking about this product or company. All opinions about this product are 100% my own.
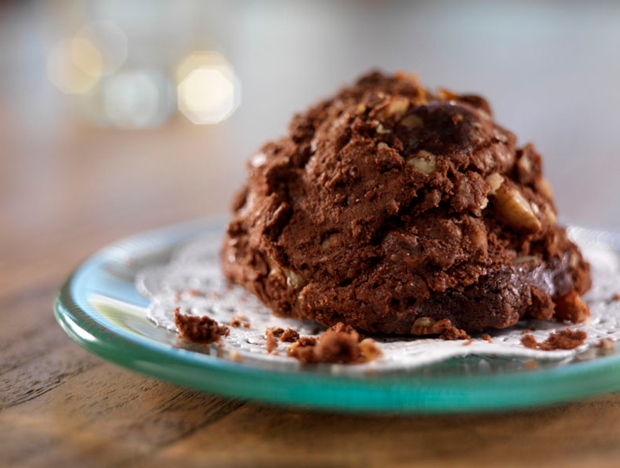
Ina Pinkney’s Blobbs Brownie Cookies Recipe Revealed
Chicago’s very own Ina Pinkney, aka The Breakfast Queen, invented “Blobbs” in response to the gourmet brownie craze of the 1980s. What are Blobbs?
“A mounded cookie/brownie with 2 kinds of chocolate, walnuts, pecans and chocolate chips,” Pinkney writes in Taste Memories: Recipes for Life and Breakfast. “When baked, they held the domed shape created by the ice cream scoop I used to measure them out. They became firm on the outside and amazingly soft on the inside.”
Over the course of 33 years, Ina’s became one of Chicago’s most beloved restaurants; it closed its doors on December 31, 2013. Blobbs was the recipe requested most by Ina’s customers. Pinkney never divulged the recipe, until now.
Ina dishes out some fascinating stories and some of her most delicious recipes in her memoir/cookbook, Taste Memories.
Melt butter and chocolates slowly in a bowl in a microwave or in a saucepan on the stove top; cool to room temp.
Combine flour, baking powder and salt in a mixing bowl; stir vigorously. Set aside.
Whip eggs in a mixer on medium/high speed until lighter and creamy.
Add superfine sugar slowly to eggs; continue whipping until very light and creamy. Add vanilla to egg mixture.
Combine chocolate chips and nuts in a bowl; set aside.
When the egg mixture is ready, change the whip to a paddle. Add chocolate-butter mixture, combining on low. Then gradually add the flour mixture on low.
Add the nut mixture and mix well. Finish by hand to be sure it's all combined at the bottom.
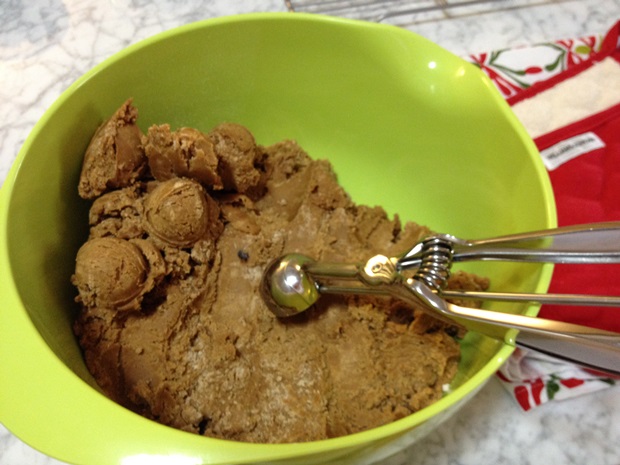
Pack mixture into a 2-inch ice cream scoop, scraping off excess. When released from the scoop, the mixture should hold its shape. Place mounds on a parchment paper lined cookie sheet, about 2 inches apart.
Bake at 350 degrees for 17 to 20 minutes. The tops should look a little dry and lighter in color. You also can freeze the unbaked blobbs and bake them from frozen.
The Great Food Blogger Cookie Swap brings together food bloggers from all over the world in celebration of all things cookie. This is my first year participating; last year the Great Food Blogger Cookie Swap had nearly 600 participants and raised $4,400. For 2013, there were 619 confirmed participants in 8 countries, and together with our phenomenal partners (OXO, Dixie Crystals, Gold Medal Flour and Grandma’s Molasses) we raised over $13,000 for Cookies for Kids’ Cancer.
The premise is simple: bake 3 dozen cookies using a new recipe that you’ve not tried before. You’re matched up with three other food bloggers to whom you’ll send one dozen cookies. The food bloggers get to stretch their creative muscles by trying out a new recipe and in return get one dozen cookies from three other food bloggers. In the process of learning and sharing, you also get to know (perhaps for the first time) three other incredible food bloggers who share you passion for baking and blogging.
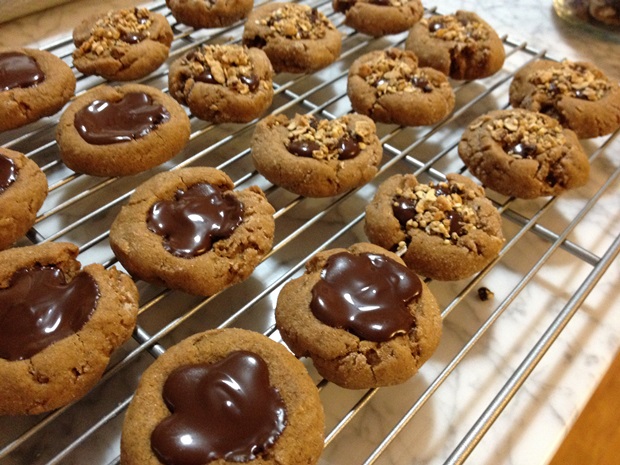
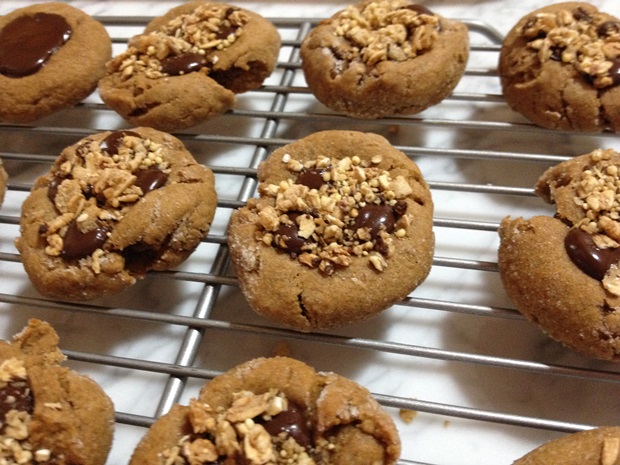
I found my inspiration for my cookie recipe from one of my favorite blogs, Sally’s Baking Addiction. I’ve done crunchy gingersnap and molasses cookie recipes galore, but (to my surprise) I’ve never done a soft-based gingersnap molasses cookie. When I got Sally’s recipe for soft-baked gingersnap molasses cookies 4-ways, I had to try it – giving it my own stamp of individuality with some of my favorite cookie garnishes. I decided to do the recipe three ways:
Original
Topped with Bittersweet Chocolate
Topped with Bittersweet Chocolate and Dark Chocolate-Cranberry Granola Clusters
This recipe makes about 5 dozen cookies. If you don’t need that many, simply halve all of the ingredients to get about 2 1/2 dozen cookies. I recommend getting all of your ingredients in place, measured first to make execution easy and seamless. You’ll want to work with the dough chilled to make it easier to shape and manipulate. And you’ll want to work quickly when adding toppings after the baking process because you want the heat of the cookies fresh out of the oven to melt the chocolate.
Start by whisking together all of the dry ingredients in a large mixing bowl. Set aside. Cream the butter in the bowl of your stand mixer. Then add the brown sugar and beat until fluffy. Add molasses, egg and vanilla, beating well. Slowly add dry ingredients, on low-speed. DO NOT OVERMIX. Cover the bowl with plastic wrap and chill for at least 2 hours.
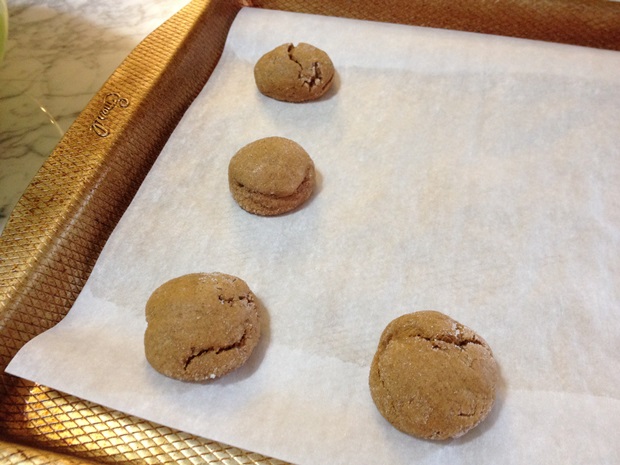
Preheat your oven to 350F degrees. Using a cookie scoop for consistent cookie sizing, shape the dough into 1-inch balls. Roll cookie balls in granulated sugar. Place on prepared baking sheets and flatten with your thumb, leaving a slight indentation.
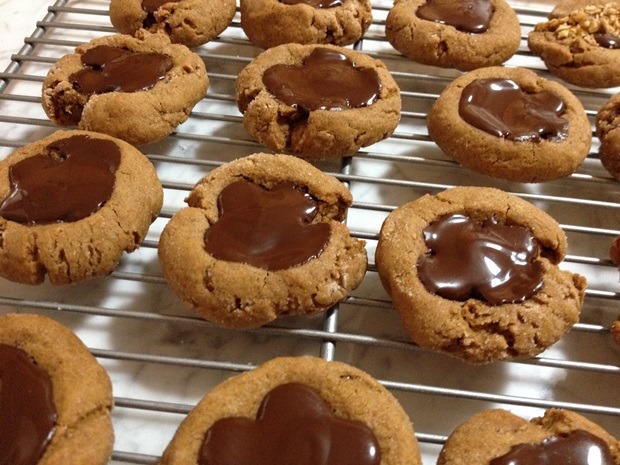
Bake one sheet of cookies at a time for about 12 minutes, or until edges are brown. Cookies will be puffy and appear soft in the middle. Remove from the oven and immediately press four chocolate chips into the center of the cookie and allow them to melt.
After a few minutes, transfer to a wire rack to cool completely. With the back of a teaspoon, smooth out the melted chocolate. Add one heaping teaspoon of the granola on top of the melted chocolate. Let cool completely before storing in an airtight container.
In a large mixing bowl, combine the flour, baking soda, ginger, cinnamon, cloves, nutmeg and salt. Set aside.
In the bowl of a stand mixer, cream the butter for about 1 minute on medium speed. Add the brown sugar and beat until fluffy. Scrape down sides of the bowl, as needed. Add the molasses, egg and vanilla. Beat well.
Slowly add the dry ingredients to the wet ingredients, on low speed. Be careful not to overmix. Cover the dough with plastic wrap and chill for at least 2 hours (and up to overnight).
Preheat your oven to 350F degrees. Line two large baking sheets with parchment paper.
Take cookie dough out of refrigerator. Shape the cookie dough into 1 1/2-inch balls. I use a cookie scoop for consistent cookie sizing. Roll the cookie balls in granulated sugar. Place on the prepared baking sheet, about 2 inches apart. Lightly flatten cookies with your thumb, leaving a slight indentation to hold topping (applied after baking).
Bake for about 12 minutes, or until edges are just turning brown. The cookies will be puffy and appear soft in the middle. Remove from the oven and immediately add topping(s), as desired. Press 4 chocolate chips into the center of the cookie and allow to melt.
After a few minutes, transfer to a wire rack to cool completely. At this point, take a teaspoon and use the back of the spoon to smooth out the melted chocolate. Add about 1 heaping teaspoon of the granola, if desired, on top of the melted chocolate.
Store in an airtight container for about one week at room temperature.
I am known to have sudden, overwhelming and (often) uncontrollable cravings for chocolate. Let’s be honest. The craving is for almost anything sugary-sweet! And a warm, dark chocolate dessert like a chocolate lava cake fits that description quite well.
Usually my chocolate cravings lean toward brownies or slice of cake. But you know what happens if you make an entire pan of brownies or cake – you end up eating the entire thing. Or at least I often do. And then that warm gooey chocolate feeling turns to cold shame because I have trouble turning “off” the sweet tooth switch.
Not everyone has impulse control issues, but I do with food. But I’ve learned that ignoring a craving can often make it worse. So sometimes you just have to say “yes” to chocolate. But you have to do that with purpose and parameters. The best parameter that works for me is portion control. If I only make one serving, I am less likely to over-indulge. So I’m giving you permission (and me, too!) to say “yes” to this chocolate lava cake for one.
Why I love chocolate lava cake for one
it’s lightning fast (you can make it in under 2 minutes in most microwaves)
it’s satisfyingly decadent
it’s actually a large single serving so there’s enough to share without feeling like you’re depriving yourself
the calories can be dialed down by substituting some of the simple sugars (e.g. dark brown sugar) with sugar substitutes (e.g. Splenda) or reducing the amount of chocolate chips and squares
Reminders for making the most of any microwave-in-a-mug recipe
use a large (at least 16 ounces) microwave-safe mug
spray the inside of the mug with non-stick cooking spray for easier clean up
don’t overcook recipes; remember that ingredients will continue to cook inside the mug after the microwaving is done. If you’re unsure how long to cook something based on your microwave’s wattage, cook in 30-second intervals and closely monitor the progress
handle containers with care inside the microwave; use an oven mitt or hot pad to avoid burning your hands
Spray the inside of a microwave-safe mug with non-stick cooking spray. Place 2 chocolate squares in the bottom of the mug.
In a small microwavable mixing bowl, add butter and brown sugar. Heat in microwave on high for 45 seconds. Remove from microwave and stir with a fork. Mix in the egg and vanilla. Stir in cocoa powder.
Add flour, vegetable oil, baking powder, salt and stir until combined. Mix in the chocolate chips. Pour mixture into prepared mug.
Microwave on high for 1 minute 30 seconds to 2 minutes (times may vary based on microwave wattage; do not overcook). Cake will appear lightly moist and will continue to cook in mug.
Invert onto a place. Chocolate lava will flow when mug is removed. Serve immediately, but be careful when eating the hot "chocolate lava."
Notes
Photo by Madison Myers; used with permission. Baked Chicago copyright 2013.
With November’s arrival, it’s hard to deny that the holiday season will soon be here. I love everything about fall: the flavors, the cool weather. So before I get caught up in the frenzy of the holidays, I like to appreciate this transition between summer and winter before it’s done.
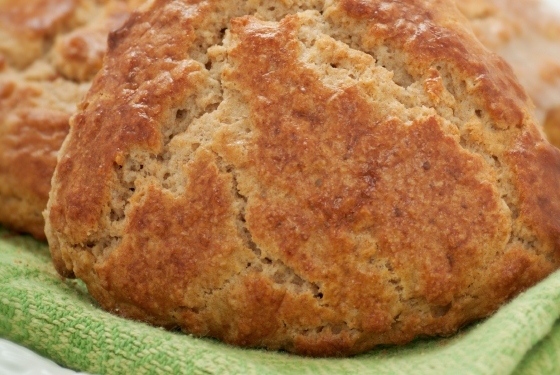
One of my favorite ingredients to bake with is ginger – which to me is a go-to fall flavor. These gingerbread scones are great for breakfast or a special treat. You can make them with or without the dark chocolate chunks, depending on your sweet tooth. Or you could substitute the chocolate for banana or caramel. The flavor combinations with ginger are almost limitless. What’s your favorite flavor to combine gingerbread?
Preheat your oven to 375F degrees. In a large mixing bowl, whisk the flours, brown sugar, baking powder, ground ginger, salt, cinnamon and baking soda. Using a pastry blender, cut in the butter until the mixture resembles coarse crumbs. Fold in the chocolate chunks and crystallized ginger. Make a well in the center and set aside.
In a small mixing bowl, stir together the egg, whipping cream and molasses. Add the wet ingredients at once to the flour mixture. Using a fork, stir until ingredients are just combined.
Onto a lightly floured surface, turn the dough. Knead for about 12 strokes or until nearly smooth. Divide the dough in half. Lightly pat each portion into a 5-inch circle about 3/4" thick. Cut each circle into 6 wedges.
Place the wedges about 2 inches apart on a large baking sheet lined with parchment paper. In another small bowl, combine the egg white and water. Brush the tops of the scones with egg white mixture.
Bake for 12 to 15 minutes, or until a toothpick inserted into the top of a scone comes out clean. Serve warm or at room temperature. Makes 12 scones.
[December 23, 2013 Update: This recipe was a finalist in the BEST DESSERT category of Safeway’s Tastier Holiday Recipe Contest, 2013. Thank you, voters and judges!]
Preheat your oven to 350F degrees. Coat a 6-cup Bundt pan with non-stick cooking spray.
Combine flours, pumpkin pie spice, baking powder, baking soda, and salt in medium bowl. Whisk to mix well. Combine butter and brown sugar in large bowl and beat at medium speed until mixed well. Beat in pumpkin and egg. Reduce to low speed and beat in flour mixture. Beat in buttermilk and 2 teaspoons vanilla, just until moistened. Pour batter into prepared pan.
Bake 25 to 30 minutes or until toothpick inserted comes out clean. Cool the cake in pan on wire rack for 10 minutes. Remove cake from pan and cool completely on wire rack.
Melt the bittersweet chocolate slowly in a microwave-safe bowl. Add the juice, a teaspoon at a time, while mixing well with a whisk. Drizzle over the cooled cake.
1 tablespoon raspberry liqueur (such as Chambourd®)
1 1/4 cups granulated sugar, divided
2 eggs
1 teaspoon vanilla extract
1/3 cup dark cocoa
1/2 cup whipping cream
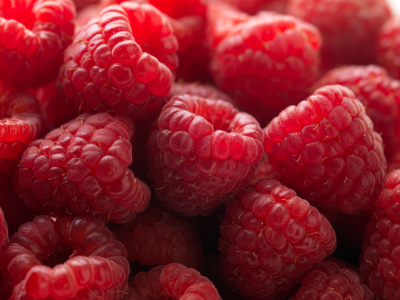
1 1/2 cups fresh raspberries
Preheat oven to 350F degrees. Line 9-inch round baking pan with parchment paper, then grease. Stir together flour, baking soda and salt. Stir in chocolate chips.
Melt butter in medium saucepan over low heat. Remove from heat. Stir in 1 cup sugar, eggs, raspberry liqueur and vanilla. Add cocoa, blending well. Stir in flour mixture. Spread mixture in prepared pan.
Bake 20 to 25 minutes or until wooden pick inserted into center comes out slightly sticky. Cool in pan on wire rack 15 minutes. Invert onto wire rack, removing parchment paper. Turn right side up and cool completely.
Beat whipping cream and remaining 1/4 cup sugar until sugar is dissolved and stiff peaks form. Spread over top of brownie and top with berries. Refrigerate until ready to serve.
Preheat oven to 350F degrees. Line a 12-cup muffin pan with paper liners.
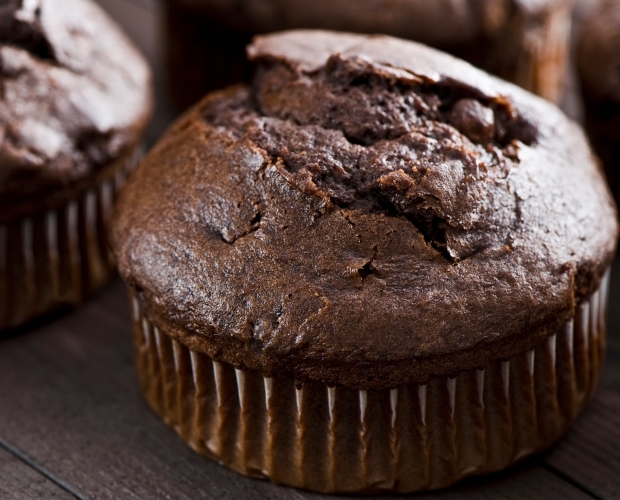
Whisk together, in a large bowl, flour, cocoa powder, baking powder and salt. In a medium bowl, whisk together eggs, buttermilk, oil, sugar and vanilla. Stir wet ingredients into dry mixture, just until blended. Fold in the chocolate chunks.
Pour batter evenly into prepared muffin pan, filling each paper liner no more than 2/3 full. Bake for 18 to 20 minutes. Let cool at least 10 minutes before serving. Makes 1 dozen.
Eat your coffee! These cappuccino brownies are rich, dark and flavorful. And don’t worry if you don’t have instant espresso powder in your pantry; you can substitute instant coffee powder instead – preferably a dark roast.
These cappuccino brownies are rich, dark and flavorful. And don't worry if you don’t have instant espresso powder in your pantry; you can substitute instant coffee powder instead – preferably a dark roast.
Ingredients
1/2 cup butter
4 ounces unsweetened chocolate, chopped
1 1/2 cups granulated sugar
1 cup all-purpose flour
2 teaspoon vanilla
3/4 cup dark chocolate chips
4 eggs
1 tablespoon instant espresso powder
3/4 teaspoon ground cinnamon
1/2 teaspoon ground nutmeg
1/4 teaspoon salt
Instructions
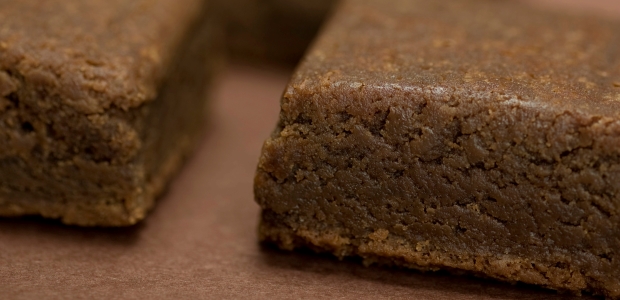
Preheat your oven to 325° F. Lightly grease the bottom of a 9x9-inch square baking pan with butter or shortening. Set aside.
In a large saucepan, melt the unsweetened chocolate and butter over very low heat. Stir constantly until the chocolate and butter are completely melted. Remove the saucepan from the heat and whisk in the sugar, espresso powder and vanilla. Add the eggs after the mixture has slightly cooled.
In a medium bowl, whisk together the flour, cinnamon, nutmeg and salt. Add the flour mixture to the chocolate mixture. Stir until just combined and then fold in the dark chocolate chips.
Spread the batter in the prepared baking pan. Bake for about 30 to 35 minutes, or until a toothpick inserted in the center comes out almost clean. Cool completely, about 1 hour. Cut into 4 rows by 4 rows to make 16 cappuccino brownies.
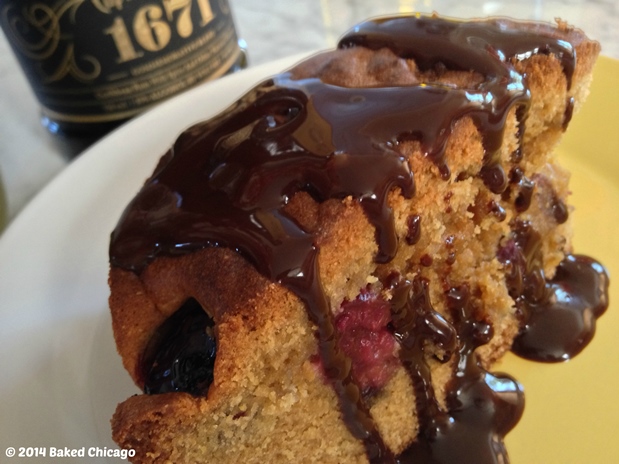
 I decided to macerate the Bing cherries in some Captain Morgan® 1671 rum. This Caribbean rum has aromas of sweet oak and dark fruit – with hints of chocolate. That makes it perfect for this olive oil cake with Bing cherries and dark chocolate chips.
  Macerating is just like marinating. I took a canning jar and filled it with pitted Bing cherries. Then I topped it off with Captain Morgan 1671 Rum. I let cherries soak for a few hours, but you could also let it soak overnight in the refrigerator. Just don’t throw out the rum after the cherries are done macerating! By itself it makes for a nice sipping companion while you’re baking – or a great addition to an ice cold Diet Coke.
  This batter is quite thick, so use a sturdy spatula or spoon when you start to incorporate the chocolate chips. You could also mix the Bing cherries into the batter, but I prefer to layer them evenly on the batter to ensure nearly every bite of this rich cake has a burst of rum-infused cherry in it.
 I like to serve this cake while it’s still warm. The chocolate, cherries and rum make for a seriously decadent flavor combination. Fresh Bing cherries and Caribbean spiced rum. Now that’s what summer should taste like!


 I actually bought a bag of sweet, dark Bing cherries and some Ranier cherries. I washed and pitted the cherries, freezing the Ranier cherries for a recipe on another day.