Browsing Category

Breakfast

Breakfast/ Desserts/ Snacks & Candies

Remember your ‘Little Valentines’ with Chocolate-Raspberry Heart Tarts

chocolate-raspberry heart tarts

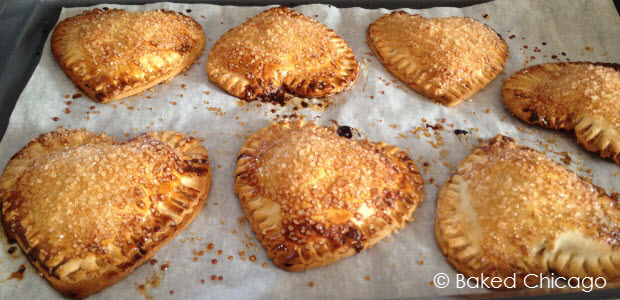
Valentine’s Day isn’t just for lovers anymore. It’s evolved to where we’re encouraged to also show those closest to us how much we care. That might include your mom and dad, brothers and sisters, and sometimes your best girlfriend or even your pet. But don’t forget the ‘littlest Valentines’ living under your roof – aka the kids! They’ll greatly appreciate even a small gesture of how much you love them. This recipe for Chocolate-Raspberry Heart Tarts is a perfect Valentine’s Day breakfast or after-school treat for your rug rats. It’s so easy to make and you can change-up the ingredients to reflect your favorite flavor combinations.

Hershey's spreads chocolate and Bonne Maman raspberry preserves

I love the combination of chocolate and raspberry, so I used my favorite raspberry preserves and a new chocolate spread product from Hershey’s. But you could use peanut butter and jelly, banana and chocolate, or just about any flavor combo that your kids will love. And if you go the non-chocolate route, like peanut butter and banana, you could even share a heart tart with your furry, four-legged kids. My four pugs LOVE banana and peanut butter, so I’m going to make one special heart tart for them to share (remembering portion control for my svelte puggies!). That comes down to one heart chamber per pug!

chocolate-raspberry heart tarts

Use a heart-shaped cookie cutter (about 3.5- to 4-inches wide) to cut out your hearts from store-bought pie crust. Arrange them on a parchment paper-lined baking sheet.

fill the center of each chocolate-raspberry heart tart

Put 1 level teaspoon each of preserves and chocolate spread in the center of each heart. Don’t overfill, or the contents will just burst out during the baking process giving your heart tart a heart attack. Not pretty. Use egg wash to seal the hearts, and crimp the edges with a fork. Brush the egg wash on top of each heart and sprinkle with turbinado sugar.

let the chocolate-raspberry heart tarts cool slightly before serving

Bake for about 16 minutes or until golden brown and puffy. Remove from oven and let cool slightly before serving. What a great way for you and your kids to start off Valentine’s Day!

Influencer Disclosure: I was given a free sample of Hershey’s spreads chocolate because I’m a Klout influencer. I am under no obligation to receive this sample or talk about this company. I get no additional benefits for talking about this product or company. All opinions about this product are 100% my own.

Chocolate-Raspberry Heart Tarts

Rating: 51

Cook Time: 16 minutes

Yield: 8 servings

Chocolate-Raspberry Heart Tarts

Ingredients

2 sheets refrigerated pie dough, room temperature
1 egg
turbinado sugar

Instructions

Preheat oven to 400 F degrees. Line a baking sheet with parchment paper; set aside.

Beat the egg in a small bowl. Unroll 2 sheets of store-bought pie dough. Using a 3.5-inch heart cookie cutter, cut out about 8 heart shapes from each sheet of pie dough.

Arrange half of the hearts on the prepared baking sheet. Fill the center of each heart with 1 level teaspoon of raspberry preserves and 1 level teaspoon of chocolate spread.

Moisten the edges of the remaining hearts with the beaten egg. Align each heart on top of a heart on the baking sheet. Press firmly around all edges to seal the fillings inside each tart. Crimp the edges with a fork.

Brush the tops with the remaining egg and sprinkle generously with turbinado sugar.

Bake until golden brown and puffed, about 16 to 18 minutes. Do not overbake or the turbinado sugar will burn.

Let cool slightly before serving.

https://bakedchicago.com/chocolate-raspberry-heart-tarts/
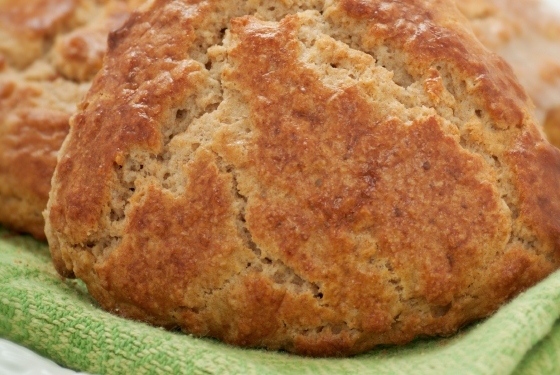
Breakfast

Coconut-Mango Upside Down Baked French Toast, inspired by Disney’s The Jungle Book

featured image of coconut-mango upside down baked french toast #shop #JungleFresh

Collective Bias Social Fabric

I was 5 years old when Disney’s The Jungle Book premiered; it was the first movie I remember seeing in a theater as a child. It was a magical experience and the beginning of a life-long love of great cinema.

Like every kid who saw the movie, I wanted the happy-go-lucky Baloo to be my new best friend in much the same way he befriended Mowgli on his journey into the jungle. I remember singing “The Bare Necessities” so much that it  — or I? — became annoying to everyone around me. And there were so many interesting characters, like Kaa the sneaky snake or King Louie, a crazy orangutan. [I have an older brother Louis, so I could totally relate to that character.]

I was thrilled to learn that Disney is releasing a special Blu-Ray/DVD combo Diamond Edition of The Jungle Book on February 11, 2014, and you can get a free Jungle Book Lunch Box with the purchase of the Diamond Edition (exclusively at Walmart). So I headed off to my local Walmart to pick up some #JungleFresh produce for this #CollectiveBias #shop; I’m planning to make Coconut-Mango Upside Down Baked French Toast that my nieces and nephews are going to love when we watch The Jungle Book together for the first time.

Walmart has fresh, quality produce #shop #JungleFresh

fresh citrus at Walmart #shop #JungleFresh

mangos at Walmart #shop #JungleFresh

JungleFresh Shop Walmart papaya closeup

plantains at Walmart #shop #JungleFresh fresh produce

pummelos at Walmart #shop #JungleFresh

Walmart has really expanded its produce selections; I was surprised to see a strong variety of tropical fruits – including some I’ve never heard of before. I was focusing on mangos and coconut for this recipe but I also picked up a pummelo. I’d never seen one and didn’t know what it was or what it might be used for. Walmart has easy-to-ready signs for its produce that calls out some of the features and benefits of the ingredient, so I learned that pummelos are used in baking. Who knew? So that’s going to be an ingredient for a future recipe challenge!

organizing ingredients for coconut-mango upside down baked French toast #shop #JungleFresh

I got all my ingredients organized, including non-dairy coconut milk and orange-mango juice, to use in the recipe. I’ll also serve these beverages along with the Coconut-Mango Upside Down Baked French Toast.

toasting coconut for the coconut-mango upside down baked French toast #shop #JungleFresh

Toasting coconut flakes in a skillet takes only a few minutes, and the aroma is intoxicating.

slicing mango for the coconut-mango upside down baked French toast #shop #JungleFresh

If you’ve never done it before, slicing a mango can be a bit confusing. This video from the National Mango Board shows you how to cube or slice a mango. It’s surprisingly easy.

http://youtu.be/WkCYV7v7P3M

coconut-mango upside down baked French toast about to go into the oven #shop #JungleFresh

This is what all of the ingredients will look like inside the prepared pan before you pop it in the oven.

coconut-mango upside down baked french toast #shop #JungleFresh

And here’s what Coconut-Mango Upside Down Baked French Toast looks like on your plate! Topped with the toasted coconut flakes, sliced mango, and honey, the dish is plenty sweet without any additional condiments for me. But you may wish to dust it with some confectioners’ sugar. Any way you serve it up, it is soooooo good.

top the coconut-mango upside down baked French toast with confectioners' sugar, if desired, #shop #JungleFresh

Coconut-Mango Upside Down Baked French Toast

Rating: 51

Cook Time: 20 minutes

Yield: 4 servings

Coconut-Mango Upside Down Baked French Toast

Ingredients

1 cup unsweetened flaked coconut, toasted
4 tablespoons butter
4 tablespoons honey
1 teaspoon ground cinnamon
2 mangos, thinly sliced
3 eggs
1 teaspoon vanilla extract
1/8 teaspoon sea salt
1/2 cup mango-orange juice
1 cup unsweetened coconut milk
8 slices French bread, sliced 1-inch thick

Instructions

Preheat your oven to 400 F degrees. Generously grease a 13x9-inch baking pan. Set aside.

Place the flaked coconut in a large skillet. Cook over medium heat, stirring frequently, until the flakes are mostly golden brown. Do not overcook.

In a small microwavable bowl, melt the butter. Then mix in the cinnamon, honey and toasted coconut. Pour this mixture into the prepared baking pan, spreading it to evenly coat the bottom of the pan. Space the sliced mango evenly over the coconut mixture.

In a shallow bowl, whisk together the eggs, vanilla, salt, juice and milk. Dip both sides of the French bread into the egg mixture, letting it soak up the liquid. Then place it in the prepared pan.

Bake for 20 minutes, or until golden brown. Invert onto a serving platter and serve immediately.

The coconut-mango upside down baked French toast is mildly sweet without any garnishes, but you may prefer to sprinkle confectioners' sugar on top or use your favorite syrup.

Notes

You could also prepare this the night before, all the way up through placing the French bread slices dipped in egg batter into the prepared pan. Securely wrap with plastic wrap overnight. Remove from the refrigerator while you're preheating the oven. Continue cooking as directed.

https://bakedchicago.com/coconut-mango-upside-down-baked-french-toast/

Breakfast/ Desserts

Peanut Butter-Banana Nut Pound Cake

2014-01-22_13-17-55

peanut butter banana nut pound cake

I love discovering new products at the grocery store. So when I found I Can’t Believe It’s Not Butter® Deliciously Simple™ on the shelves, I was excited to try it out in a recipe.

When trying an ingredient in a recipe for the first time, it’s important to review the basics like taste and texture in order to understand how those will work in the final product. What I liked about Deliciously Simple™ is that it’s made with simple ingredients I recognize and frequently use in my baking, like non-fat yogurt and vegetable oil. So I first tried it on my morning toast. The taste was buttery and the texture was creamy – even straight out of the refrigerator. Deliciously Simple™ has no artificial ingredients, and that’s something I look for in every product I bring into my home.

So I decided to incorporate Deliciously Simple™ into a new recipe for peanut butter-banana nut pound cake. The buttery taste and creamy texture would work well with either sweet or savory foods, and this pound cake straddles that line well because of the balance of the peanut butter, banana and pistachios. Together, this pound cake is slightly sweet and slightly savory.

pb-banana-bread-mise-en-place-41

It’s always easier to execute a recipe by getting all of your ingredients organized first.

pb-banana-bread-mise-en-place-12

Then measure out each ingredient and sort by the order you’re going to use the ingredient in executing the recipe. This process, called ‘mise en place’ – which means everything in its place, will save you so much time and possible heartache. It’s like the law of gravity. It just works, so you gotta do it! Let’s get started.

You’re going to preheat your oven and preparing your baking pan. You can go traditional and grease-flour your pan but I’ve found that non-stick cooking spray, when applied correctly, works just as well and is much easier.

Sift together your dry ingredients: flour, salt, baking soda, baking powder and cinnamon. Next you’ll cream the Deliciously Simple™ with the brown sugar and peanut butter. Be sure to incorporate lots of air into this mixture; it will help the pound cakes rise properly.

artisan-mixer1

Add your eggs, as instructed, followed by the mashed banana and vanilla.Then add the flour mixture and sour cream, alternately. Then you’ll fold in the pistachios by hand with a spatula. Pour the batter into your prepared baking pan and smooth out the top with the spatula.

pb-banana-bread-two-loaves1

Bake for 50 to 65 minutes. I recommend checking at the 45-minute mark, because the baking process accelerates toward the end. It is very easy to over bake a pound cake, unless you are monitoring closely. The top should be golden brown and an inserted toothpick should come out clean.

pb banana bread 2

After cooling in the pan for about 10 minutes, remove and let cool complete on a wire rack. You can freeze a whole loaf for up to 2 months in an airtight container. But I recommend enjoying it warm fresh out of the oven!

deliciously simple 3

Peanut Butter-Banana Nut Pound Cake

Rating: 51

Cook Time: 50 minutes

Yield: 1 loaf

Peanut Butter-Banana Nut Pound Cake

Ingredients

1 1/2 cups all-purpose flour
1/4 teaspoon kosher salt
1/4 teaspoon baking soda
1/4 teaspoon baking powder
2 teaspoons ground cinnamon
1/2 cup butter, softened
1 1/2 cups brown sugar
1/2 cup peanut butter (crunchy or smooth)
3 eggs
1/2 cup ripe banana, mashed (about 2 small or 1 large banana)
1 tablespoon vanilla extract
1/2 cup sour cream
1/4 cup pistachios, chopped (optional)

Instructions

Preheat your oven to 350 F degrees. Generously coat a 9x5-inch loaf pan with non-stick cooking spray. Set aside.

In a medium bowl, sift together the flour, salt, baking soda, baking powder and cinnamon. Set aside.

In the bowl of a stand mixer, cream together the butter, brown sugar and peanut butter until light and fluffy (at least 5 minutes).

Add the eggs, one at a time, beating well after each addition. Scrape down the sides of the bowl, as needed, between additions. Add the mashed banana and vanilla.

Continuing on low speed, add the sifted flour mixture and sour cream, alternately; begin and end with the flour mixture. Beat just until combined. Fold in the pistachios with a spatula by hand.

Pour the batter into the prepared baking pan. Smooth out the top with your spatula.

Bake for about 50 to 65 minutes. The top should be gold brown and a toothpick inserted in the center should come out clean. If the top is browning too quickly, cover loosely with aluminum foil. I recommend checking your pound cake at the 45-minute mark. The baking process accelerates toward the end and it can be easy to over bake your cake.

Cool for at least 10 minutes in the pan before removing. The sides should start to come away from the pan to make removal easier. Then remove the loaf and cool completely on a wire rack.

Slice while still warm and enjoy with butter on top. Store any remaining slices in the refrigerator. The whole loaf may be frozen for up to 2 months.

https://bakedchicago.com/peanut-butter-banana-nut-pound-cake/

Breakfast

Glazed Apple Cinnamon Pecan Oatmeal Muffins

Glazed Apple Cinnamon Pecan Oatmeal Muffins

Cook Time: 20 minutes

Yield: 24 muffins

Ingredients

For Muffins:
1 cup boiling water
2 1/2 cups all-purpose flour
1 cup dark brown sugar
2 teaspoons baking powder
1 tablespoon ground cinnamon
1/2 teaspoon baking soda
1/2 teaspoon kosher salt
2 eggs
2 cups buttermilk
1/2 cup vegetable oil
For Glaze:
1 1/4 cups confectioners’ sugar
2 tablespoons milk

Instructions

Preheat oven to 400 F degrees. Grease two standard muffin tins or line with paper cups.

In a medium bowl, pour boiling water over oatmeal. Stir to moisten and set aside.

In a large bowl, combine flour, sugar, baking powder, cinnamon, baking soda and salt. In another bowl, combine eggs, buttermilk and oil. Stir wet mixture into the flour mixture, just until combined.

Spoon batter into prepared muffin pans. Fill each about 2/3 full. Bake for 20 minutes or until a wooden toothpick inserted in centers come out clean. Cool in pans on a wire rack for five minutes, then remove from pans.

Whisk together confectioners’ sugar and milk to form a glaze. Drizzle over muffins and serve.

https://bakedchicago.com/glazed-apple-cinnamon-pecan-oatmeal-muffins/

Breakfast

Sour Cream Cinnamon Rolls With Orange Cream Cheese Icing

sour cream cinnamon rolls

The Perfect New Year’s Breakfast For The Family: Sour Cream Cinnamon Rolls

The beginning of each new year gives pause for reflection, both for blessings received and for losses borne during the past year.

And no matter if 2013 was among the best or hardest years for you and your family, there’s always hope that the upcoming year will be better. Having faith, believing in the possibility of a better future can be a powerful beacon of light to guide you into the new year.

One way to start 2014 on a solid footing is to make and share a quality breakfast as a family. This recipe for sour cream cinnamon rolls is quite basic, but so very satisfying.

Nourish, to me, is nourishing food, nourishing your family, nourishing your life.’ — Jamie Oliver

Great food should nourish the body and the soul. And making sour cream cinnamon rolls together as a family is a great way to nourish the family unit, create cherished memories and establish a family tradition to welcome in each new year.

Sour Cream Cinnamon Rolls, With Orange Cream Cheese Frosting

Cook Time: 20 minutes

Yield: 12 servings

Ingredients

For Rolls:
1 package active dry yeast
1/2 cup water
1 teaspoon granulated sugar
3 cups all-purpose flour
1 cup sour cream
1 teaspoon vanilla extract
3 tablespoons dark brown sugar
1/4 teaspoon baking soda
2 tablespoons butter, melted
1 tablespoon cinnamon plus 1/2 cup brown sugar mixed
For Icing:
3 ounces cream cheese, softened
2 tablespoons butter, softened
2 1/4 cups confectioners' sugar
1 teaspoon vanilla extract
2 tablespoons orange juice

Instructions

Prepare Rolls:

Generously grease the bottom of a 9x13-inch baking pan. Set aside.

In a medium mixing bowl, combine granulated sugar and water together. Sprinkle with yeast and let stand 10-15 minutes or until dissolved.

Add the flour, salt, sour cream, vanilla, and 3 tablespoons of dark brown sugar. Make into a soft dough. Roll out on lightly floured surface to within 1/2 inch thickness. Brush dough with melted butter. Sprinkle liberally with cinnamon and brown sugar mixture. Roll up, jelly roll fashion, and cut into 12 slices.

Place on the prepared baking pan. Let rise until doubled in size, about 45 to 60 minutes.

In meantime, preheat your oven to 350F degrees. When rolls have doubled in size, bake for about 20 minutes or until lightly browned. Removed from oven and let cool while you prepare the cream cheese icing.

Prepare Icing:

Beat the softened cream cheese and butter on medium speed with an electric mixer until creamy. Gradually add in the powdered sugar, beating at low speed until blended. Stir in the vanilla and 1 tablespoon of orange juice. Add the remaining tablespoon of orange juice slowly, stirring until icing is smooth and creamy.

Frost the cinnamon rolls and serve while still warm.

Notes

To make this recipe gluten-free, swap out the all-purpose flour with a gluten-free multi-purpose flour. Then add 1 teaspoon of xanthan gum, which acts as a binding agent, thickener. All other ingredients in this recipe are typically gluten-free; most national brands (e.g. Daisy Sour Cream) are gluten-free but some brands may have additives so it's always important to read labels to confirm any processed product is free of gluten.

https://bakedchicago.com/sour-cream-cinnamon-rolls/

Breakfast

Cinnamon-Sour Cream Pancakes with Blueberries

Breakfast is great any time of the day. One of my favorite breakfasts to make for visiting family during the holidays is pancakes, which are sometimes also called:

  • flapjacks
  • skillet cakes
  • hotcakes
  • griddle cakes
  • crepes blintzes
  • latkes
  • johnny cakes

No matter what you call them, they are delish. The sour cream makes these blueberry pancakes extra fluffy and light, and they will melt in your mouth. What’s your favorite garnish for the top of a big ‘ole stack of hotcakes?

Cinnamon-Sour Cream Pancakes with Blueberries

Cook Time: 15 minutes

Yield: about 16 four-inch pancakes

Ingredients

2 cups all-purpose flour
2 tablespoons dark brown sugar
1 tablespoon ground cinnamon
1 teaspoon baking powder
½ teaspoon baking soda
½ teaspoon kosher salt
2 cups buttermilk
¼ cup sour cream
2 eggs
3 tablespoons unsalted butter, melted and cooled slightly
1 to 2 teaspoons vegetable oil, for the pan
1 cup fresh blueberries for garnish
maple syrup

Instructions

Whisk together flour, brown sugar, cinnamon, baking powder, baking soda and kosher salt in a medium bowl. In another medium bowl, whisk together buttermilk, sour cream, eggs and melted butter.

Make a well in the center of the dry ingredients and pour in the wet ingredients. Gently stir until just combined (batter should remain lumpy with a few streaks of flour). Do not overmix.

Heat vegetable oil in a nonstick skillet over medium heat until shimmering. Using a paper towel, carefully wipe out the oil, leaving a thin film of oil on the bottom of the pan. Using ¼ cup to measure, portion batter for 3 to 4 pancakes in the pan. Cook until the edges are set, first side is golden brown, and bubbles on surface are just beginning to break (about 2 to 3 minutes).

Flip pancakes and continue to cook until second side is golden brown (about 1 to 2 minutes more). Serve pancakes immediately with syrup and blueberries on top. Repeat with remaining batter.

Notes

Recipe adapted from Brown Eyed Baker

https://bakedchicago.com/cinnamon-sour-cream-pancakes-blueberries/

Breakfast

Cinnamon Caramel Apple Coffee Cake

cinnamon caramel apple coffeecake

This recipe for cinnamon caramel apple coffee cake was inspired while I was surfing Facebook and came across Krusteaz‘s Seize the What If Virtual Bake-Off. It allowed you to mix and match ingredients to create your own recipe using one of their boxed mixes as the canvas. While I usually bake from scratch, Krusteaz is a “go to” brand for me to whip up a quick coffee cake. Their virtual bake-off had you select one of their mixes, so I chose my favorite Cinnamon Swirl Crumb Cake & Muffin mix.

Then it asked you to pick three ingredients to add to the mix.  Normally, I’d add some cherry pie filling to this mix for a satisfying cherry cinnamon coffee cake. But my second ingredient was going to be a new product, Kraft Premium Caramel Bits. I had recently used them in a Salted Caramel & Pretzel Brownies recipe, and I had a bag left over. So I went with the apple pie filling to pair with the caramel. Remembering the Salted Caramel & Pretzel Brownies gave me “salt on the brain.” So I thought I’d attempt one of my all-time favorite flavor combinations: caramel apple with peanuts.

I recommend eating this while it’s still warm from the oven (or reheat in the microwave) and pairing it with a mug of rich, hot cocoa (using milk, not water!) or a strong cup of coffee. Cinnamon Caramel Apple Coffee Cake is true comfort food on a day like today: the winter solstice and both the shortest day [and longest night] of the year.

Cinnamon Caramel Apple Coffee Cake

10 minutes

Cook Time: 40 minutes

Yield: 9 servings

Cinnamon Caramel Apple Coffee Cake

Ingredients

2/3 cup water
1 egg
2 cups
1 cup (approximately half of an 11 oz bag) Kraft Premium Caramel Bits
1/2 cup dry roasted peanuts, chopped

Instructions

Preheat your oven to 350F degrees. Lightly grease an 8x8-inch baking pan.

In a medium mixing bowl, stir together the water, egg and cake mix until moistened. Do not overmix. Batter will be slightly lumpy. Set aside.

In a small mixing bowl, thoroughly combine the apple pie filling, caramel and chopped peanuts. Set aside.

Spoon half of the batter into the prepared baking pan and spread evenly. Drop the apple-caramel mixture by tablespoonfuls evenly over the batter.This mixture will be thick and clumpy. As needed, gently spread it out so every piece of coffeecake will have elements of the apple-caramel filling.

Drop the remaining batter in small spoonfuls over the apple-caramel mixture. Spread the batter to the edges of the pan. Sprinkle the cinnamon topping evenly over the batter.

Bake for 40 minutes, or until a toothpick inserted in the center comes out almost clean. Cool for at least 10 minutes before cutting.

https://bakedchicago.com/cinnamon-caramel-apple-coffee-cake/

Breakfast/ Gluten-Free

Blueberry Coconut Muffins [gluten-free]

gluten-free blueberry coconut muffins

As the holiday season kicks into high gear, it’s easy to “fall off the wagon” with so many butter-rich, delicious baked goods surrounding you at office parties, family gatherings and such.  One of the strategies I use to combat this potential problem is to volunteer to bring baked goods from my kitchen. That way I can control the quality of ingredients, especially their nutritional value, and ensure that there will be something delicious and nutritious available for me to snack on and for others to enjoy.

Blueberry coconut muffins are a satisfying breakfast option during the holidays or a weekend brunch. Or you could easily turn it into a dessert option for the office or family party by making bite-sized blueberry coconut mini muffins.

One of the things I like about this recipe is the use of coconut flour, coconut oil and coconut milk to achieve a flavor-upon-flavor layering that is subtle enough to let the fresh blueberries be the star of the show. I had not used coconut flour a great deal in the past, but I find that I’m using it more and more because sweet baked goods just taste better and lighter with coconut flour. The coconut flour also has a mild sweetness that elevates and pairs well with the blueberries. Did you know that coconut flour is naturally gluten-free? Every ingredient in this recipe is gluten-free. Yea!

Even though winter is nearly here, it’s still easy to find fresh blueberries in local markets. My local Mariano’s always has a great variety of berry harvests throughout the year and blueberries are available right now in Chicago.

Blueberry Coconut Muffins [gluten-free]

Cook Time: 22 minutes

Yield: 12 muffins

Blueberry Coconut Muffins [gluten-free]

Ingredients

1 1/2 cups coconut flour
2 teaspoons baking powder
1 teaspoon baking soda
1 cup dark brown sugar
1/2 teaspoon kosher salt
1/2 cup unsweetened shredded coconut
2 eggs
1/3 cup coconut oil
2 cup coconut milk
1 teaspoon vanilla extract
1 1/2 cups blueberries

Instructions

Preheat your oven to 350 F degrees. Lightly grease a standard 12-muffin tin and set aside.

In a large mixing bowl, combine the flour, baking powder, baking soda, brown sugar, salt and coconut.

In a separate medium bowl, whisk together the eggs, coconut oil, coconut milk and vanilla. Pour the wet ingredients into the dry ingredients and mix just until combined. Fold in the blueberries.

Pour the batter into the prepared muffin pan with each tin about 1/2 to 2/3 full.

Bake for 22 to 25 minutes, or until a toothpick inserted in the center comes out clean.

https://bakedchicago.com/blueberry-coconut-muffins-gluten-free/

Breakfast

Cheesy Double The Bacon Breakfast Casserole

Two of my favorite culinary credos are: 1) breakfast food is delicious for any meal and 2) if bacon is good, then twice the bacon is better! This cheesy bacon breakfast casserole has two (2) pounds of hearty, delicious bacon.

I started by cooking the bacon. Everyone has a different method (by skillet or oven) for cooking perfectly crisp bacon. But my favorite is the microwave, especially for thick-cut bacon (which holds up well). It utilizes a lot of paper towels, but I find the cleanup so much easier. My microwave method for perfectly crisp bacon is pretty simple:

  • Put 10 paper towel sheets on a microwaveable plate, spread 6 to 8 bacon slices evenly on the paper towel.
  • Cover with 6 paper sheets and cook on HIGH in a microwave for 6 minutes to start. If needed, cook in additional :30 second intervals to get desired crispness.
  • Remove from microwave and set cooked bacon strips on another paper towel to cool. Throw away greasy paper towels. Repeat until all bacon is cooked.

The hardest part about this method is resisting the temptation to eat the bacon before you’re ready to serve.

I preheated my oven to 350F degrees. I greased a 9 x 13-inch baking pan generously with non-stick spray. Then I spread the hash browns evenly inside the pan. Sprinkle the hash browns with salt and pepper. Then I took the bacon and crumbled it as I spread it evenly over the hash browns.

can there ever be too much bacon?

In a large mixing bowl, I beat the eggs and milk until blended. I use a 1% milk but you can also use skim milk. I recommend a lower fat milk because of the fat content from the cheese.

Then stir in the Italian seasoning and minced onion. Pour the egg mixture over the hash browns. Layer the baby Swiss cheese slices for even coverage, and bake uncovered for 45 minutes or until fully set.

IMG_1118

This recipe makes 8 large servings, which also keeps well in the fridge. So far this week, I’ve had this bacony-good dish for breakfast, lunch and dinner. A bacon trifecta!

cheesy double the bacon breakfast casserole 2

Cheesy Double The Bacon Breakfast Casserole

Cook Time: 44 minutes

Yield: 8 servings

Cheesy Double The Bacon Breakfast Casserole

Ingredients

2 pounds thick-cut bacon, cooked and crumbled
20 ounces frozen shredded hash brown potatoes, thawed (I use Simply Potatoes® Shredded Hash Browns)
10 slices (about 7 ounces) baby Swiss cheese (I prefer Sargento® Deli-Style Sliced Baby Swiss Cheese)
12 large eggs
2 cups 1% milk
1 tablespoon Italian seasoning
1 tablespoon minced onion
1 teaspoon kosher salt
1 teaspoon ground black pepper

Instructions

Preheat your oven to 350F degrees. Generously spray a 13-inchx9-inch baking pan with non-stick spray.

In the prepared pan, spread the hash browns evenly. Sprinkle with salt and black pepper. Evenly layer the crumbled bacon.

In a large mixing bowl, beat the eggs and milk until blended. Stir in the Italian seasoning and minced onion. Pour over the hash brown mixture. Layer the baby Swiss cheese slices for even coverage.

Bake uncovered for 45 minutes or until fully set. Serve warm. Yields 8 servings.

https://bakedchicago.com/cheesy-double-bacon-breakfast-casserole/


Breakfast

Gingerbread Scones

With November’s arrival, it’s hard to deny that the holiday season will soon be here. I love everything about fall: the flavors, the cool weather. So before I get caught up in the frenzy of the holidays, I like to appreciate this transition between summer and winter before it’s done.

One of my favorite ingredients to bake with is ginger – which to me is a go-to fall flavor. These gingerbread scones are great for breakfast or a special treat. You can make them with or without the dark chocolate chunks, depending on your sweet tooth. Or you could substitute the chocolate for banana or caramel. The flavor combinations with ginger are almost limitless. What’s your favorite flavor to combine gingerbread?

Gingerbread Scones

Cook Time: 12 minutes

Yield: 12 scones

Ingredients

1 cup all-purpose flour
1 cup whole wheat flour
1/3 cup dark brown sugar
2 teaspoons baking powder
3/4 teaspoon ground ginger
1/2 teaspoon kosher salt
1/2 teaspoon ground cinnamon
1/4 teaspoon baking soda
1/4 cup butter, cold
1/2 cup dark chocolate chunks
1 tablespoon crystallized ginger, finely chopped
1 egg, slightly beaten
1/2 cup whipping cream
1/4 cup molasses
1 egg white, lightly beaten
1/2 teaspoon water

Instructions

Preheat your oven to 375F degrees. In a large mixing bowl, whisk the flours, brown sugar, baking powder, ground ginger, salt, cinnamon and baking soda. Using a pastry blender, cut in the butter until the mixture resembles coarse crumbs. Fold in the chocolate chunks and crystallized ginger. Make a well in the center and set aside.

In a small mixing bowl, stir together the egg, whipping cream and molasses. Add the wet ingredients at once to the flour mixture. Using a fork, stir until ingredients are just combined.

Onto a lightly floured surface, turn the dough. Knead for about 12 strokes or until nearly smooth. Divide the dough in half. Lightly pat each portion into a 5-inch circle about 3/4" thick. Cut each circle into 6 wedges.

Place the wedges about 2 inches apart on a large baking sheet lined with parchment paper. In another small bowl, combine the egg white and water. Brush the tops of the scones with egg white mixture.

Bake for 12 to 15 minutes, or until a toothpick inserted into the top of a scone comes out clean. Serve warm or at room temperature. Makes 12 scones.

https://bakedchicago.com/gingerbread-scones/

Breakfast

Honeycrisp Apple-Cinnamon Upside Down, Baked French Toast

I subscribe to the credo that breakfast is just too good to limit it to AM hours. A great breakfast dish is satisfying any time of the day. And there’s something irresistible about a simple breakfast packed with bold flavors.

That’s why I’m a big fan of this “turned-on-its-head” French toast recipe. It’s easier to make in the oven for a small group and you can mix-and-match your favorite seasonal fruits and whatever bread is handy from your pantry.

Honeycrisp Apple-Cinnamon Baked French Toast

Cook Time: 15 minutes

Yield: 3 servings

Honeycrisp Apple-Cinnamon Baked French Toast

Ingredients

4 tablespoons butter
2 tablespoons honey (I like to use locally produced honey from Chicago Honey Co-Op)
1 teaspoon ground cinnamon
3 eggs
1/8 teaspoon kosher salt
2 Honeycrisp apples, thinly sliced
6 slices of Challah bread

Instructions

Preheat your oven to 400 degrees F. Grease a 13x9-inch baking pan; set aside.

In a small microwaveable bowl, melt the butter on medium-high setting. Mix the cinnamon and honey into the butter. Pour the mixture into the prepared baking pan. Spread the mixture so it evenly coats the bottom of the pan. Space the sliced Honeycrisp apples evenly in the pan.

In a shallow bowl, whisk the eggs, apple cider and salt. Dip both sides of the Challah bread in the egg mixture before placing in the prepared pan.

Bake for 15 to 20 minutes, or until golden brown. Invert onto a serving platter and serve immediately with your favorite garnishes and condiments.

https://bakedchicago.com/honeycrisp-apple-cinnamon-french-toast/

Breakfast

Frittata Italiano

This is a great dish to make on a Saturday morning when you have left over spaghetti from Friday night’s dinner.  It’s a simple, upscale twist on pasta for a unique breakfast dish that you can make in less than 10 minutes.

Frittata Italiano

Ingredients

6 eggs
1/4 cup milk
1 cup leftover spaghetti
kosher salt
ground black pepper
1/2 cup cherry tomatoes, cut in half
parsley for garnish
grated Parmesan cheese

Instructions

Whisk together eggs, milk, spaghetti, a dash of salt and pepper. Pour into a skillet and cook over medium heat for up to 8 minutes or until eggs are set. Garnish with cherry tomatoes, parsley and Parmesan cheese.

https://bakedchicago.com/frittata-italiano-2/