Do you love a good Twitter Party? You know I do, and I’m excited to host a party about outdoor entertaining and summer events! On Monday, June 9, at 8:00 pm CT, please join me for the #MyMarianos Twitter Party where we’ll be discussing how Mariano’s can help with summer fun, AND of course, giving you a chance to win prizes!
For me, summer means more picnics, relaxing outdoors with friends and family, and exploring all the festivals and special events that Chicago has to offer. That means less time that I want to spend in the kitchen and finding new menu ideas that take advantage of all the fresh produce that’s in season. Mariano’s offers a great variety of summer meal options, from gourmet-on-the-gofreshly prepared foods to easy recipes that don’t keep you in the kitchen longer than needed.
During this Twitter Party, we’ll share ideas for making your next picnic stress free, and talk about the iconic Chicago summer events you’re most excited about, like Taste of Chicago and the Grant Park Music Festival.
Join me and RSVP for #MyMarianos Twitter Party on SoFabChats!
How To Participate In A Twitter Party on SoFabChats!
TIP: How to join a Twitter Party – sign in! Before party starts, click on the green “Sign In On Twitter” bar at the top of the page!
TIP: Who to follow at a Twitter Party? Follow the Party Team by clicking on the Twitter handle links on the RSVP page!
TIP: Want to win Twitter Party prizes? RSVP by clicking on RSVP button before you join the party, follow everyone on the Party Team, and tweet with the party hashtag during the party to be eligible!
TIP: How to win the Early Bird prize? Watch for chance to share a tweet when you RSVP for chance to win!
TIP: Special deals and brand coupons? Keep that options checked when you RSVP for the party!
TIP: New to Twitter parties? Watch your column and Party Team tweet columns – they are slower paced and easier to follow!
TIP: Where to find Twitter Parties? Check out the SoFabChats Twitter Party Calendar to find more fun parties to attend!
When you think about classic American foods, the cheeseburger definitely ranks among the top of the list. There’s something so satisfying about biting into a juicy, perfectly cooked burger on a toasted bun.
Even plain, a burger is delicious. But with a bun in hand, everybody can be a Picasso and ‘paint the canvas’ with the perfect combination of toppings. For most, that includes cheese, cheese and more cheese, please!
On this #shop for #CollectiveBias, I was faced with the challenge of creating a new, unique spin on a classic cheeseburger. A challenge I was ready to take on at full speed.
What came to mind immediately was the patty melt, which is a cross between a grilled cheese sandwich and a burger. But the patty melt is so uniquely its own that it almost defies classification.
The patty melt is deceptively simple. Aside from the seasonings and butter, there are only about four ingredients: meat, onion, cheese and bread. It’s the preparation and how these ingredients are combined that give the patty melt its sizzle.
Sometimes a patty melt will be served with only sautéed onions and sometimes with a “secret sauce” – which is usually Thousand Island dressing. That tangy, creamy flavor is a great pairing with the sautéed onions.
For my Ranch Patty Melt recipe, I’m substituting the Thousand Island dressing with Kraft Classic Ranch dressing as a topping and with extra on the side for dipping.
During a trip to my local Walmart, I picked up all of the ingredients – including Kraft Natural Swiss Cheese (the BIG slices!) and Kraft Classic Ranch Dressing. I prefer ground turkey for my burgers, but you could also easily use lean hamburger.
Ranch Patty Melt
After getting my ingredients in place, I mixed together the ground turkey, salt, pepper and Worcestershire sauce. Don’t skimp on the Worcestershire!
Form four oval patties with the meat, matching the relative shape of the crusty rye bread. Set the patties aside as we prepare the onions.
Slice up a yellow onion and sauté it in a skillet with butter over medium-low heat. It takes about 25 minutes to properly brown the onions, but be patient. If you rush the process, the onions could easily burn.
Can you see the buttery steam rising from the pan in the photo below? It smells sooooo goooood.
Next up, cook the patties in a skillet over medium heat until done in the middle and browned on the outside. When the patties are cooked, you’re ready to start the final assembly.
In another skillet, melt 2 tablespoons butter over medium heat. You’re going to assemble each Ranch Patty Melt as follows:
slice of crusty rye bread
slice of Kraft Swiss cheese
turkey burger patty
one-fourth of the sautéed onions
two tablespoons Kraft Classic Ranch dressing
another slice of Kraft Swiss cheese
another slice of crusty rye bread
Grill the sandwiches in the skillet until golden brown on one side. Add the remaining butter to the skillet and flip the Ranch Patty Melt sandwiches over. Cook until golden brown and crisp.
The cheese should be all melted and gooey. Cut in half and serve immediately.
Doesn’t this look like absolute burger perfection? After you bite into it, you’ll think you went to burger heaven. How can it get any better?
When you serve it with your favorite chips or fries and – most importantly – a side of Kraft Classic Ranch dressing for dipping!
With the summer grilling season in full swing, you’ve got to try creating your own version of a cheeseburger classic.
How do you #SayCheeseburger? What are your favorite toppings for crafting the ultimate classic cheeseburger?
Organize your ingredients and cooking instruments. You'll need a medium bowl and three skillets (one small, one medium and one large) to prepare the onions, burgers and the completed patty melts.
In a medium bowl, mix together ground turkey, Worcestershire sauce, salt and pepper. Form into 4 oval-shaped patties, similar to the size of the rye bread slices. Put patties on a plate; set aside.
In a small skillet, melt 2 tablespoons butter over medium-low heat. Toss in the onions and cook for 25 to 30 minutes. Stir occasionally. Onions are done when they are golden brown and soft. Remove from heat and set aside.
In a large skillet, melt 2 tablespoons butter over medium heat. Cook the turkey burger patties on both sides, until done in the middle and browned on the outside. Set aside.
In the medium skillet, melt 2 tablespoons butter over medium heat. Assemble the patty melts first with a slice of rye bread topped with a slice of Swiss cheese. Add the turkey burger patty and one-fourth of the cooked onions. Cover the patty with 2 tablespoons ranch dressing followed by another slice of Swiss cheese. Top with another slice of rye bread, and grill the sandwiches until golden brown.
Repeat until all 4 sandwiches are in the skillet. When browned on one side, add the remaining 2 tablespoons butter in the skillet. Carefully flip each sandwich over, and cook until golden brown, crisp and cheese has melted.
Cut in half and serve immediately. Serve with additional ranch dressing on the side for dipping.
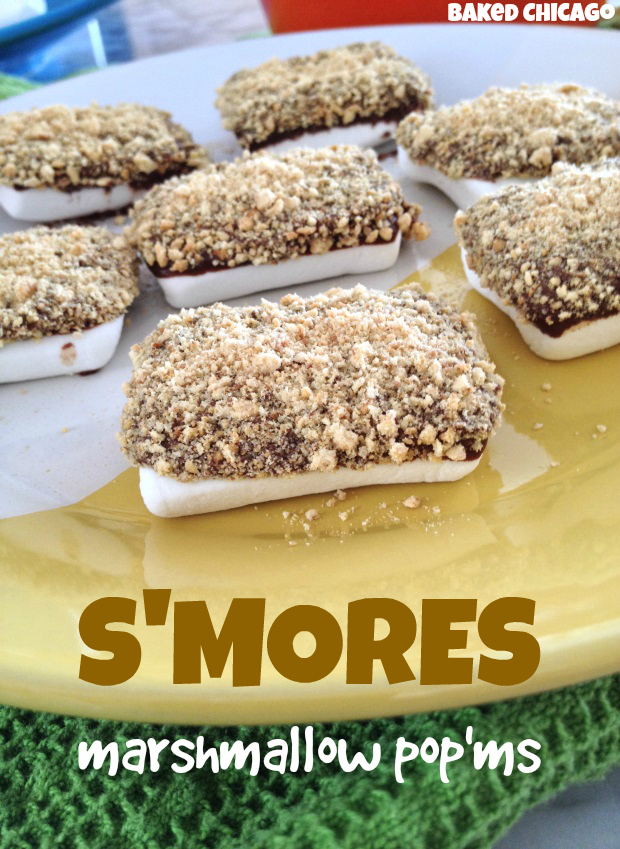
The arrival of summer means that s’mores season is in full bloom. It’s almost impossible to ignore the grocery store end-cap displays stacked with Hershey bars, marshmallows and graham crackers. No one ever said s’mores were subtle!
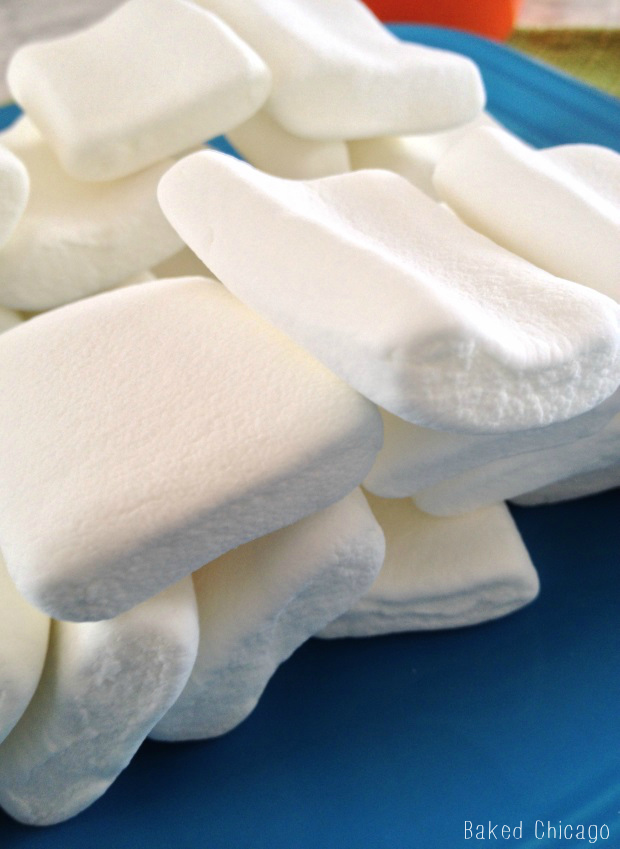
I don’t think I’ve been near a real camp fire since I was a teenager. But that doesn’t mean I don’t enjoy the iconic foods you can make with an open flame. This recipe was inspired by the new stackable, flat marshmallows. You’ve seen them; they’re marketed as an easier way to make s’mores any time of the year. A marketing message I can get behind!
All you need is three ingredients (chocolate chips, graham crackers and marshmallows) and 90 seconds in the microwave to feed that childhood craving for a sweet treat.
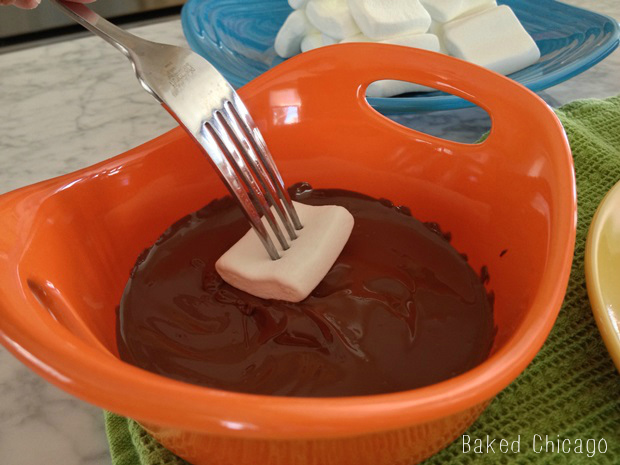
Start by melting a cup of Hershey’s milk chocolate chips in a microwavable ramekin. After 90 seconds, stir the chocolate chips to facilitate the melting. If needed, heat in additional 30-second increments and stir until melted and smooth.
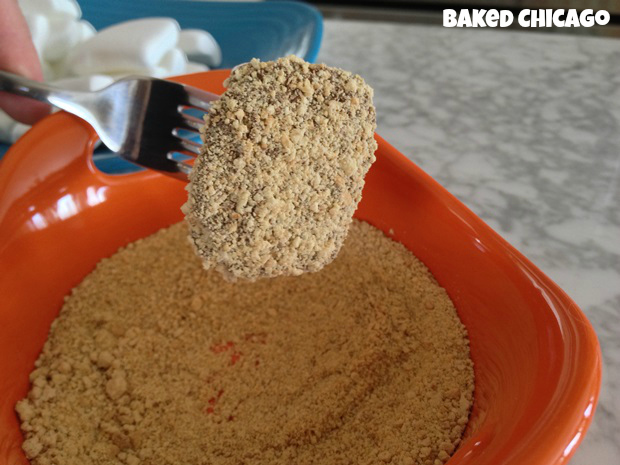
You could use your fingers, but I’ve found that to be really messy. So I recommend taking a small fork and piercing a marshmallow, then dipping it in the chocolate until the bottom is coated.
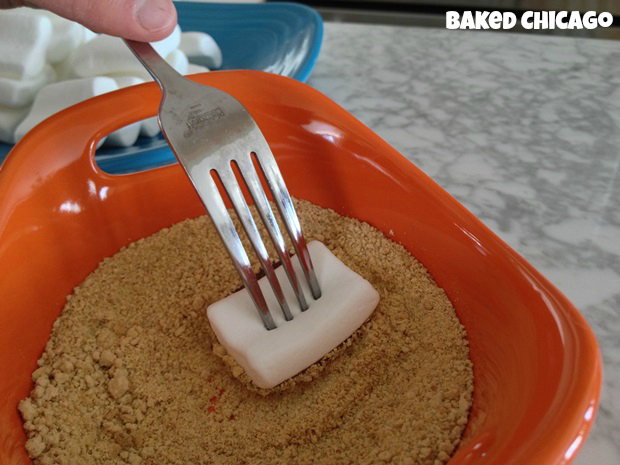
Then dip the marshmallow, chocolate side down, in the graham cracker crumbs.
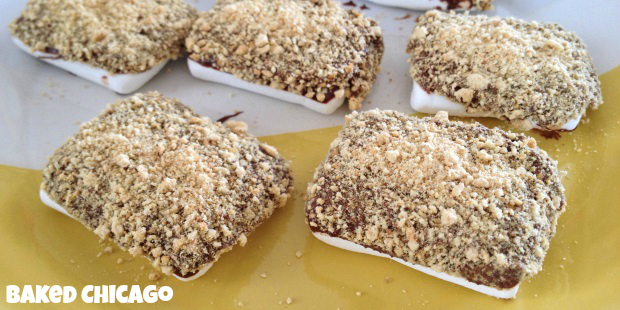
Shake off the excess crumbs, and set the s’mores marshmallow pop’ms on a plate with the chocolate side facing up. Repeat the process with remaining marshmallows.
Before you know it, you’ve got 2 dozen bite-sized portions of s’mores goodness to share with your family. Or not. That’s totally your call.
Pour the graham cracker crumbs in a ramekin or small plate for dredging. Set aside.
Pour the chocolate chips in a microwavable ramekin. Cook on HIGH for 90 seconds in the microwave. Stir the chocolate chips to facilitate the melting process.
If needed, cook in additional 30-second increments, followed by stirring, until chocolate is melted and smooth.
Using a fork, pierce a marshmallow on one side. Then dip the other side of the marshmallow in the chocolate, followed by dredging in graham cracker crumbs. Shake off loose crumbs, and put on a plate.
Repeat with remaining marshmallows to make 24 s'mores marshmallow pop'ms.
This is a Sponsored post written by me on behalf of Hershey’s®. All opinions are 100% mine.
In the early 1900’s, Chicago was known as the Candy Capital of the World. With so much rich – and decadent – confectionery history, I’m always eager to learn the stories behind some of the most popular candy brands.
I was amazed to learn that the Lancaster Caramel Company of Lancaster, Pennsylvania, was founded by Milton Hershey in 1886. It was his FIRST successful candy company and established him as a successful businessman.
He would later launch the Hershey Chocolate Company – the one most of us know today – as a subsdiary of the Lancaster Caramel Company. When he sold the Lancaster Caramel Company in 1900, he kept the Hershey Chocolate Company because he thought there was a large market for chocolate confections. Ol’ Milton was indeed a candy genius!
Now Hershey’s® has launched a new line of soft caramels, Hershey’s® LANCASTER Soft Crèmes, inspired by Milton’s original recipe. They come in three flavors: Caramel, Vanilla and Caramel, and Vanilla and Raspberry.
I sampled both the Vanilla and Raspberry and Caramel flavors. The Vanilla and Raspberry cremes are great right from the package, but I decided to try the Caramel cremes featured in a recipe for Caramel Blondie Bars. I made a few minor modifications, but the recipe is very straightforward and makes it easy to whip up a fun treat for the family.
Caramel Blondie Bars
Ingredients
20 LANCASTER Caramel Soft Cremes, cut and quartered
1 tablespoon plus 1 1/4 cups all-purpose flour, divided
6 tablespoons butter, room tempterature
3/4 cup packed dark brown sugar
1 egg
1 tablespoon milk
1 teaspoon vanilla extract
1/2 teaspoon baking soda
1/8 teaspoon sea salt
Directions
Preheat your oven to 350 F degrees. Line an 8-inch square baking pan with parchment paper. Spray with non-stick spray to ensure easy removal. Set aside.
Remove the wrappers from caramel candies. Cut each caramel into quarters. Toss the caramel pieces with 1 tablespoon flour to keep the pieces from sticking together.
Beat the butter and brown sugar in a large bowl until fluffy. Add the egg, milk, and vanilla. Beat well.
In a medium bowl, stir together the remaining flour, baking soda and salt. Add the dry mixture to the web mixture. Beat until well blended. Fold in the caramel pieces.
Spread the batter into your prepared baking pan. Using a spatula, ensure the batter is evenly spread in the pan.
Bake for 25 to 30 minutes, or until lightly browned.
Cool in the pan for 15 minutes, then remove and cool completely on a wire rack. Cut into 16 bars.
Overall, I really liked this recipe. Folding the caramels throughout the batter gave every bite a delicious burst of caramel. My only suggestion for improvement would be to add a cup of Hershey’s® Milk Chocolate Chips to balance the decadent caramel flavor. YUM!
If your kitchen cupboards are like mine, sometimes you’re afraid to open up a cabinet door for fear of what might come falling out.
And as much as I try to keep my kitchen clutter to a minimum, it’s hard to organize little spice bottles on a shelf (that are sometimes too high to reach) or in a drawer. When I got the opportunity to review YouCopia’s Classic SpiceStack® product, I was genuinely excited because – with so many spices as a baker – I have trouble keeping track of what I have and where it is.
First let me share the story of how I discovered YouCopia. I was attending the International Home + Housewares Show at McCormick Place, where global companies showcase what’s new in the industry for the home. Companies from over 2 dozen countries, and I got the chance to meet Lauren Greenwood, one of YouCopia’s founders.
After seeing the range of cool storage solutions they have, I learned they were a Chicago company. Go Chicago! And they are exactly 1.7 miles from my house. Small world, huh!
http://youtu.be/DTfe1_rG5Tk
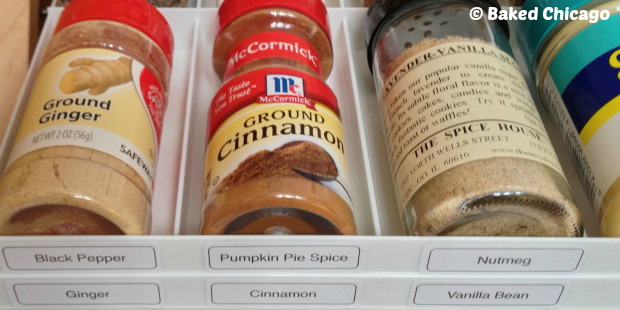
Here’s a shot of the cupboard next to my stove and kitchen sink. It’s the portion of my kitchen counter where I tend to do the most mixing, prepping. I have two very narrow shelves (my house was built in 1892 so everything is narrow and small by today’s standards) where I keep the majority of my spices. I use two Lazy Susans so I don’t have to grab blind – because I’m too short to see what’s in the back.
As you can see, it’s not awful but it’s hardly easy to find things. I’m constantly having to readjust labels so I can read them from their position on the turntable. And I’ve got too many spices for the turntable, so some jars get put to the side and other small jars get stacked on one another.
So I emptied the shelf with the most spice jars to make room for YouCopia’s Classic SpiceStack®, which holds 24 full-size or 48 half-size spice bottles (round or square). Wouldn’t you know I found I had duplicate bottles of ground cinnamon because I thought I’d run out. One of the bottles fell off the turntable and landed at the back of the shelf; I wouldn’t have known it was there except when I removed all the spice jars.
Currently the Classic SpiceStack® comes in either white or silver/black. Two things I liked immediately out of the box: NO ASSEMBLY REQUIRED (yeah!) and units are stackable. The package comes with 96 removable drawer labels (48 printed and 48 blank), so I quickly matched the labels to the spices I had. In less than 4 minutes, I had a compact, neatly organized spice caddy that stored more spice jars in one shelf than I could previously store on a turntable.
As I mentioned before, being short makes it hard to reach upper shelves so I used to be forced to pile on all the often-used spices inside the lowest shelf – just to reach ingredients I cook with frequently. But the YouCopia Classic SpiceStack® has the ability to slide out a tray of spices and lower it to an easily reachable height.
With the labels on each compartment of each shelf within the YouCopia Classic SpiceStack®, I can quickly find what spice I need without having to “spin the wheel” or guess where it is.
By assigning a space to a specific spice, I was able to group like spices together to make it easy to get multiple spices together for any recipe.
If you’ve got tons of spices like me (I’ve got to buy another Classic SpiceStack® for the shelf below), they do make larger models, including the Chef’s Edition SpiceStack® which holds 30 full-size or 60 half-size spice bottles.
I think this product, as simple as it is, is quite genius. It’s really functional and easy to implement, use. My only recommendation to YouCopia would be to consider extending the number of colors the SpiceStack® comes in. White and silver/black are great for most kitchens, but I always enjoy a pop of color so I wouldn’t mind this in a tangerine or Caribbean blue.
In addition to the SpiceStack®, YouCopia has stack products for coffee, tea and baking accessories. You can find YouCopia at traditional bricks-and-mortar stores, like Target, The Container Store and Bed, Bath & Beyond. It’s also available online at Amazon.com. Click here for a complete list of where to buy YouCopia products. Coming this fall are some exciting, new products, including YouCopia’s version of a Lazy Susan that looks like a real winner.
You should also check out their website, where they have a fun blog with organization tips from an industry expert, a free e-book “30 Days of Organizing,” and a forum where product fans called YouCopians share their organizational stories.
Now that my spices are neatly organized, I think I need to work on the loose lids and pans that I pile into the cupboard next to the stove. What part of your kitchen needs to the most help to control the chaos?
Disclosure: I was given a free sample of YouCopia’s Classic SpiceStack® to review. I get no additional benefits for talking about this product or company. All opinions about this product are 100% my own.
I must admit for most of my adult life I’ve never made spaghetti sauce from scratch. With so many good pre-made sauces on the market, I usually stock up when there’s a sale and (occasionally) doctor it up with some fresh herbs or tomatoes. Can I get an “amen?” Browsing through one of my favorite slow cooker cookbooks – Better Homes and Gardens Year-Round Slow Cooker Recipes – I found a recipe for arrabbiata sauce. I was intrigued because I’d never heard of arrabbiata sauce. After a little research, I discovered that “arrabbiata” is Italian for “angry.” The sauce gets its name from the burn of the crushed red peppers. Most everything about this recipe sounded great, but of course I had to add my own twists to make it more of something I’d want to eat. So I exchanged pancetta for bacon and I added a cup of Cabernet Sauvignon wine to the recipe. I thought if the sauce was going to be “angry,” then being a little “boozy” couldn’t hurt!
Arrabbiata Sauce with Turkey Meatballs
The arrabbiata sauce is extremely easy to make. Your slow cooker does most of the heavy lifting. To start the recipe, I browned the onion, bacon and garlic in a skillet – then transferred the contents to my slow cooker. You add all the rest of the ingredients (except for the pasta and meatballs – those come later!) into your slow cooker and give it a good stir. Set it on HIGH and put on the lid. Walk away for 4 to 5 hours and the sauce will be “perfetto!” About 45 minutes before your arrabbiata sauce is done, you’ll want to start making the turkey meatballs. I used pre-seasoned panko breadcrumbs with Italian seasoning spices, but you can use standard panko breadcrumbs and add in the Italian seasoning by hand. The mixture of the panko, butter and egg help bind the ingredients, and make for a great carmelized “crust” on the outside of the meatballs. I tend to like larger meatballs, so that requires even cooking. The trick is not to rush the browning process, so never go higher than medium-high heat. I don’t make homemade meatballs that often. Usually, I’ll just brown ground turkey into my sauce and make whatever sauce I’m using a meat sauce. But these turkey meatballs were to die for! Well worth the effort. You may want to make a double batch; they freeze well. Cook your pasta according to package directions. I used rotini pasta, but you can easily substitute your favorite pasta or what you have in your pantry. If you’re only having pasta for a meal, I like to use a bowl. It makes it easier to cover the pasta with sauce, without wasting a lot covering the entire length of a plate. Then pile on the meatballs and pour a healthy serving of arrabbiata sauce over it all. Top it with shredded Parmesan cheese and you’ve got a great weekday dinner or weekend lunch that’s good enough for company. I ended up adding Cabernet Sauvignon to this arrabbiata sauce recipe to make it “less angry.” What’s your favorite ingredient to add to spaghetti sauce?
56 ounces diced tomatoes with basil, garlic and oregano, undrained
15 ounces tomato sauce
2 teaspoons dried parsley
1 teaspoon dried oregano, crushed
1/2 teaspoon sea salt
1/2 teaspoon dried basil, crushed
1/2 teaspoon crushed red pepper
1 cup Cabernet Sauvignon, or any dry red wine
8 servings cooked rotini pasta
1/4 cup shredded Parmesan cheese
For Meatballs:
1 cup panko breadcrumbs
20 ounces ground turkey, 93% lean
1 tablespoon Italian seasoning
1 tablespoon dried parsley
2 medium onions, minced
2 eggs
1 tablespoon butter, room temperature
1 teaspoon sea salt
1 teaspoon ground black pepper
Instructions
For Sauce:
In a skillet, cook the onion, bacon and garlic over medium heat until onion is tender and bacon is browned.
Transfer mixture to a 5-quart slow cooker. Set skillet aside to use when cooking meatballs later.
Stir in the tomatoes, tomato sauce, parsley, oregano, basil, salt, and crushed red pepper. Cover and cook on HIGH for 4 hours (or on LOW for 8 to 10 hours).
Serve over pasta and turkey meatballs. Sprinkle each serving with Parmesan cheese, if desired.
For Meatballs:
In a large bowl, thoroughly combine ground turkey, breadcrumbs, Italian seasoning, dried parsley, mined onions, eggs, butter, salt and pepper.
By hand, form golf ball-sized meatballs and place in cooled skillet (used when browning onion and bacon mixture earlier). Makes about 16 meatballs, or 2 per serving. Feel free to make your meatballs smaller or larger, based on your preference. But make all meatballs uniform in size so they cook evenly.
Place skillet with meatballs on burner at medium-high heat. Every 5 minutes or so, turn meatballs so that all sides will eventually brown and meatballs will be evenly cooked. Watch carefully and remove meatballs from skillet when done. Set aside to serve with arrabbiata sauce and pasta.
Notes
Sauce portion of this recipe lightly adapted from Better Homes & Gardens "Year-Round Slow Cooker Recipes"
I’ve been an Amazon.com customer since January, 2001. That’s more than 13 years – longer than a lot of other relationships in my life. I’ve never really enjoyed the ceremony of traditional shopping…the traffic…crowded parking lots…busy checkout lanes…and (usually my luck) the store being out of the one item I needed most. Amazon changed the ceremony of shopping for me and now I shop at Amazon.com at least once a week.
I’ve purchased nearly every kind of goods and services that Amazon offers, including a Herman Miller desk chair, an electric snow blower, a lawn mower, and countless grocery care packages to surprise my mom or nieces away at college. To say I was super excited when Collective Bias (#cbias) approached me to review the new #AmazonCart collaboration between Amazon and Twitter would be a serious understatement.
https://www.youtube.com/watch?v=iAm6pa9hPKA
#AmazonCart
Getting started was easy. Once I connected my @BakedChicago Twitter account to my Amazon Prime membership, I was ready to go.
My daytime schedule is quite hectic, so I usually grab my iPad after dinner to browse Twitter and other social networks while watching the evening news. I already follow @Amazon, so now when I see an interesting product featured in a Tweet with an Amazon product link – like the spiral vegetable cutter below – I can simply hit REPLY to that Tweet with the hashtag #AmazonCart.
Then just moments after, I receive an email confirmation that I’ve successfully put this product in my #AmazonCart. I can review my shopping cart at my leisure and finalize the purchase when I’m ready.
I have been known to sometimes forget if I’ve responded to a Tweet. I accidentally hit REPLY twice, but #AmazonCart caught that and sent me an email after the second Tweet letting me know that I had already put the item in my cart – and if I wanted two of product I could simply edit the quantity when I made the purchase.
I admit it. I’m a bit of a kitchen gadget-aholic. And there have been times when I’ll buy an item that looks cool, but that I really don’t need. You’ve been there, too, right!
What I really like about #AmazonCart is that I get the satisfaction (and convenience) of the impulse buy, but I’m not forced to make the final purchase right then and there.
I’ve gotten into the routine of shopping with #AmazonCart after dinner and then going online the next day to review the contents of my shopping cart. That gives me time to fully consider my purchase, as well as research other color options. The black spiral slicer featured in the Tweet was cool, but I opted for the ocean blue version to add a pop of color to my kitchen. Good call, don’t you think!
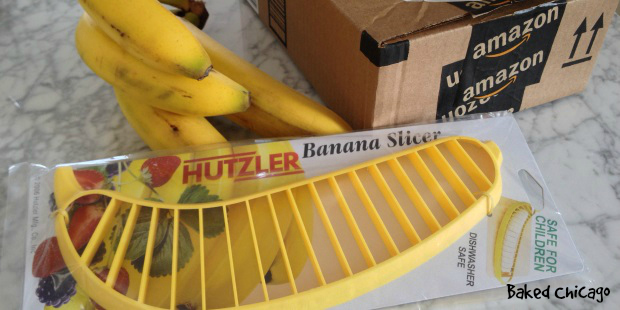
Because I don’t do much traditional window shopping, somtimes I don’t know a better product exists until I see it somewhere like an Amazon featured product Tweet. This “low-tech” banana slicer is a great example.
I buy about 8 bananas a week, minimum. I don’t eat bananas, but my four pugs – Bing, Baxter, Della and Marlo – eat them everyday with their breakfast. I slice up one banana and divide it among their dishes. At first I used a simple table knife to slice the bananas, but getting even slices that are divisible by four takes too much brain work and hand-eye coordination for first thing in the morning. Then I tried a banana slicer gadget that had very sharp blades. So sharp that even gently touching them with the back of my finger cut my skin and drew blood.
Then I saw this plastic banana slicer in an Amazon Tweet, so I hit REPLY with #AmazonCart and decided to check it out. I liked that it was dishwasher safe, but there were no sharp edges for me to cut myself. Now my pugs enjoy fresh sliced bananas on their breakfast and I don’t have to worry about slicing myself if I’m still not quite awake.
So far, I’m really enjoying the new #AmazonCart. I can’t wait to see how both Amazon and Twitter collaborate to expand this service and if they introduce others.
If you have a Twitter account and Amazon Prime, then all you have to do to get started with the new #AmazonCart service is connect them at Amazon.com.
Social shopping just got way easier and a lot more fun!
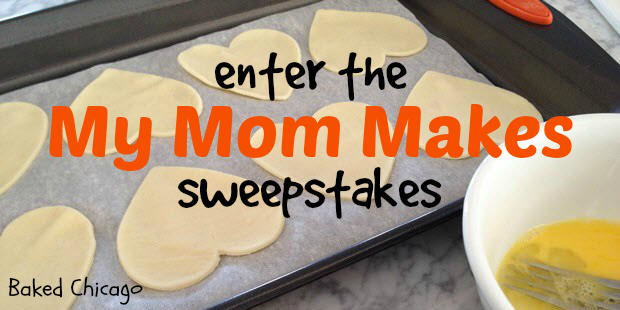
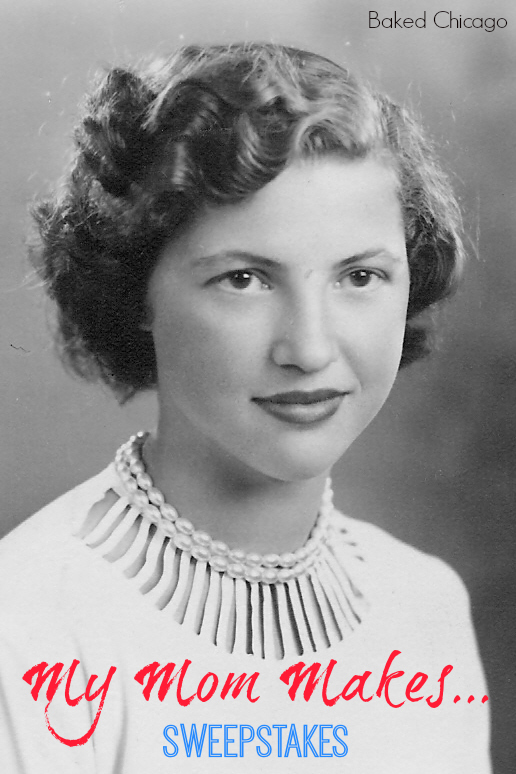
In honor of Mom, Baked Chicago is kicking off its 1st Annual “My Mom Makes” Sweepstakes. Share your Mom’s best dish in the comments section below. You can even add a picture of your Mom and her signature dish (optional), as well as tell us why this dish is so darn good!
The top 3 entries with the most votes from the public will be placed in a random drawing for a special prize package from Hamilton Beach and YouCopia. Invite your family and friends to vote for your Mom’s dish below. One vote per entry per registered user.
So go ahead and brag about your Mom. You know she’s been bragging about you for years, so now it’s your turn to tell the world by describing her best recipe or signature dish. a Rafflecopter giveaway
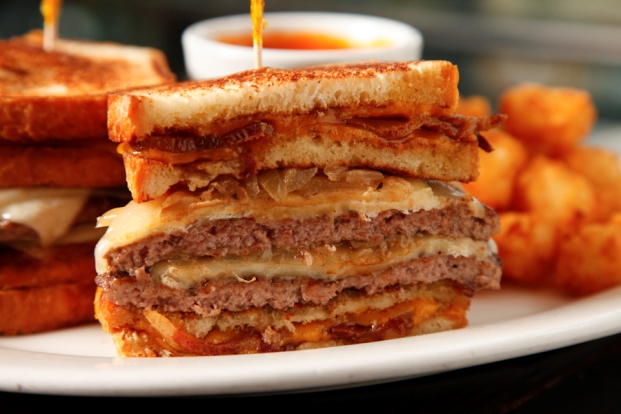
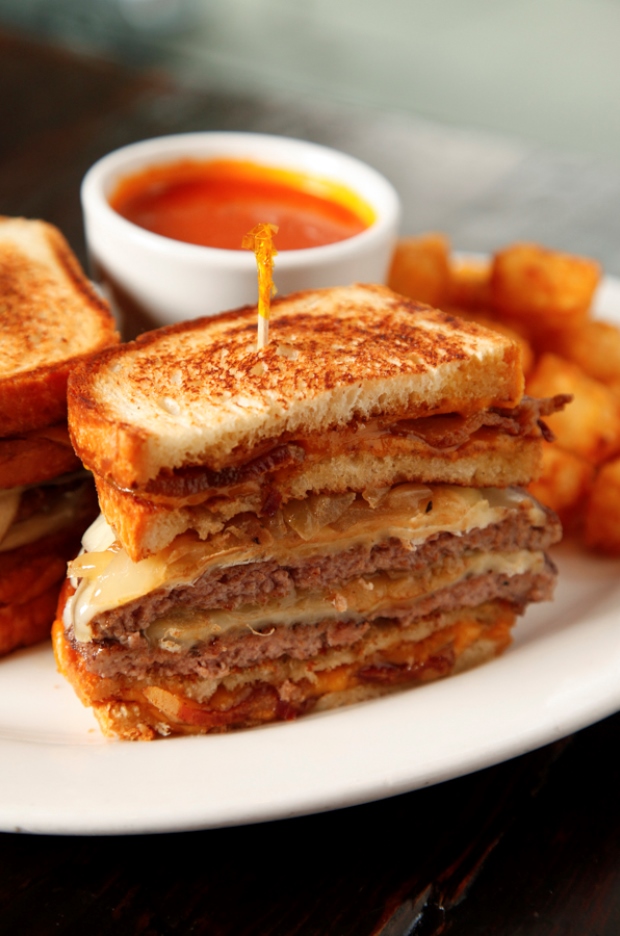
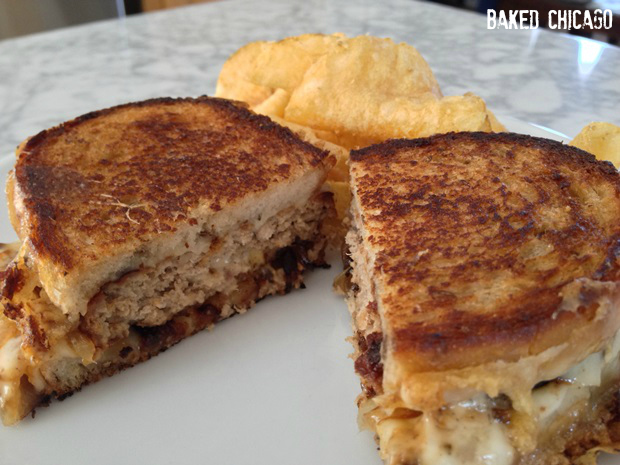
To celebrate National Burger Month, Rockit Bar & Grill and Rockit Burger Bar are hosting their 9th Annual Burger Fest from May 12 – 16. Each day a different over-the-top burger is featured on the special menu, created by Executive Chef Amanda Downing.
My personal favorite is the Bacon Grilled Cheese Patty Melt Burger, which Chef Amanda has kindly allowed me to share with you. It’s a double quarter-pound Black Angus beef pattie burger, topped with Gruyere cheese, caramelized onions, applewood-smoked bacon and served on a cheddar grilled cheese bun along with a side of tomato soup for dipping and tater tots. Yum!
Heat a medium sauté pan to high heat, add in about a tablespoon of vegetable oil. Add in the onions and lightly season with salt and pepper. Stir onions occasionally until golden, reduce heat slightly and continue to cook until onions are very golden and tender. Remove from heat.
Heat grill to medium-high heat, make sure grill is clean.
Lightly season each burger patty with salt and pepper. Place patties on grill and cook for approximately 2 minutes per side or until desired doneness. Add one slice of Gruyere to each patty.
Heat a large non-stick pan or griddle to medium heat, add about half of the butter, add the bread slices (do in batches if there’s not enough space to lay out all eight pieces), top each slice of bread with a slice of cheddar cheese, allow for bread to toast and cheese to melt.
Lay a piece of bacon on four of the slices, top with the other slices of bread to build the grilled cheese sandwiches. Add more butter and flip sandwiches until evenly toasted.
To assemble, place on patty on top of a grilled cheese sandwich, top with half of the caramelized onions, top with the second patty and then with another grilled cheese sandwich. Cut burger in half. Repeat with remaining set up and serve!
Finding the right gift for mom on any occasion can feel like an impossible mission for some guys (me included!). And when it comes to Mother’s Day, the pressure seems to grow exponentially.
How do you say a proper “thank you” to that person who changed your diapers, wiped your runny nose when you were sick and basically made sure that you and your siblings didn’t kill yourself or each other through the course of growing up?
A big bouquet of flowers or a huge box of chocolates? My mom would consider both extravagant. She’d eat one chocolate and share the rest, suggesting she has to watch her sugar and calorie intake.
Jewelry or a gift certificate for a massage? She usually only wears her wedding ring, and she’d much rather take a hot bath in her own tub than go to a stranger for a massage. Fancy perfume? Ivory soap is good enough for her.
On the surface, my mom might seem like a hard person to buy a present for. So what’s a son to do? The answer for me is NOT to buy a present, but rather to create the gift of an experience we can both enjoy.
I found my muse for the perfect Mother’s Day gift for my mom at Mariano’s on this #shop for #CollectiveBias. It hit me as I was exploring the delectable deli and bountiful bakery departments at the Jefferson Park #MyMarianos: a Mother’s Day picnic.
When Mariano’s asked me to share a story about what inspires me about my mom, I didn’t know where to begin because my mom is inspiring in many ways. But the thing that is most amazing is that she’s always giving of herself and her time to others, to the point where she rarely takes time just for herself. She’d rather spend her money and time on her grandchildren or to help others in greater need.
To understand my mom, it helps to know where she came from. She was the 2nd youngest of 11 kids, and grew up right after the Depression. Money was always tight for her family, and some of the simplest things today were considered great luxuries back then.
One of her fondest memories growing up was when she and her mom (my grandmother) would eat ice cream right out of the carton. Back then, ice cream was a rare treat if you were poor. And they didn’t have the kind of refrigerator-freezers we have today, so storing ice cream was a challenge.
But my mom and grandmother had a solution for that: grab a spoon and eat it quick. When you’re one of 11 kids, you share everything so you just grab a spoon and dig in until it’s gone!
Pulling together a picnic doesn’t have to be complicated. In fact, a successful picnic menu should be simple. All the food and drink need to be portable, easy-to-consume. Where most guys get it wrong is either by over-thinking it, or not giving it any thought at all. Success lies somewhere in the middle, so I wanted to share my tips for The Guy’s Guide for the Perfect Mother’s Day Picnic.
The Guy’s Guide for the Perfect Mother’s Day Picnic
Tip #1: Show that you’ve been listening (at least some of the time).
Growing up, mom cooked for you. Now it’s your turn to make the meal. That doesn’t mean you have to make everything from scratch. Pick a menu from all the great prepared foods you can find in the deli and bakery aisles, and be sure to include your mom’s favorite foods. Show her that you’ve been paying attention all these years!
My mom absolutely L-O-V-E-S fresh tomatoes and cold vanilla milkshakes. [Hold the whipped cream and cherry so there’s room for more milkshake in the glass!]. For as long as I can remember, my mom has planted tomatoes and cantaloupe (and sometimes watermelon) in her garden. Some days, she’ll go out to her garden and pick a fresh tomato for her lunch or dinner. She cuts up the tomato and uses a little salt and pepper. Bam! She’s got a simple, yet satisfying, meal that she loves.
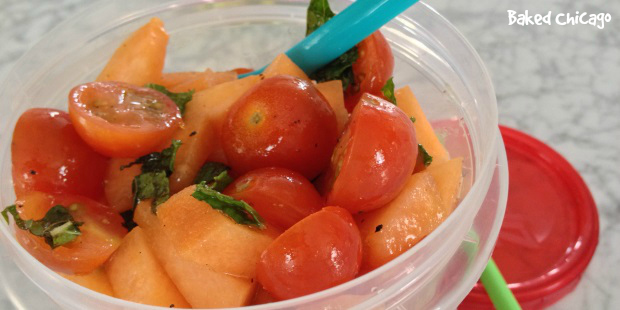
For this Mother’s Day picnic menu, I’ve selected a few special items from Mariano’s bakery, deli and fresh produce section that make up the majority of the menu. I am going to make one simple dish that combines two fresh foods my mom loves: tomatoes and cantaloupe. I call the dish Canta-Mato Salad. The recipe (below) is so simple that anybody who can hold a knife and drizzle olive oil can make it. It’s deliciously simple and making at least one dish demonstrates an honest effort to give of yourself.
Picnic Menu
All-white meat chicken salad on buttery croissants
Crunchy home-style potato chips
Tomato-cantaloupe salad with fresh mint
Vanilla milkshakes
You can find chicken salad in the deli and croissants in the bakery. And select your favorite chips (for crunch) from the snack aisle.
Then pick three ingredients from the fresh product department: a pint of cherry tomatoes, a cantaloupe and some fresh mint.
That’s all I need for a perfect picnic lunch that my mom will love. [I’ll pick up the vanilla milkshakes from the drive-through down the street from mom’s house so they’re good and cold.]
Tip #2: Don’t forget the flowers!
You might be saying, “hey, wait a minute! You said she really didn’t care about flowers!” That’s true. You don’t have to buy a huge flower bouquet, but a simple corsage that she can wear to church is something that would make her feel extra special. When people comment on her flowers, she gets to “brag” that her son gave it to her.
Tip #3: Sometimes, it’s okay to lie.
I don’t mean that it’s alright to tell your mom you’re in Hong Kong on business if you can’t be with her in person on Mother’s Day. Unless you are. Let me explain what I mean with an example of how I sometimes “lie” to my mom about the gift I’m giving her.
My mom is always thinking of others, and I know she really enjoys helping others in thoughtful ways. So I’ll sometimes get her two of something, like two differently colored corsages. Then I’ll say something like “I couldn’t decide which you’d like more” [the lie!] and suggest she give the one she doesn’t wear to a friend or someone at church who’d appreciate it. That could be an aunt, the minister’s wife or the church organist. It’s a chance for me to help my mom spread a little sunshine, because that gives her such joy to help others.
Tip #4: Your Mother’s Day celebration doesn’t have to be on Sunday only.
I’m one of six kids and everyone wants to spend time with Mom on Mother’s Day. Sometimes that’s not logistically possible.
Pick a time when you don’t have to rush around or deal with competing family schedules. In our family, one of my younger brothers always takes our mom out for a Mother’s Day lunch fundraiser at the local fire station. So I’ve chosen to treat mom to a Mother’s Day picnic on Saturday, the day before Mother’s Day. That way mom gets to celebrate a Mother’s Day weekend and I can give her the corsage in time for her to wear on Sunday to church.
Tip #5: The “perfect Mother’s Day” isn’t really about being perfect.
The perfect Mother’s Day is more about being present, being real and spending time with Mom in an authentic way that you both enjoy. Rather than putting your energy into buying a gift, show mom how much you appreciate her by spending time together and making the shared experience the gift.
For my mom, the only thing better than a Mother’s Day picnic with her cutest kid (me!) would be a Mother’s Day picnic with a side of bingo!
How are you planning to make your mom’s Mother’s Day perfect for her? Share your ideas in the comments section below. For other inspiring ideas to help make your mom’s Mother’s Day as perfect as it can be, follow Mariano’s on Twitter, Facebook and Pinterest. And check out the Mariano’s TasteMaker series featuring some of Chicago’s most innovative chefs.
This post brought to you by Private Selection. All opinions are 100% mine.
Burgers are every bit as American as hot dogs or apple pie. Everywhere you travel in these great United States, you’ll find local interpretations on what makes for the best burger toppings and flavor combinations.
Now Private Selection® and the Kroger Family of Stores have teamed up and are inviting customers to share their favorite toppings and taste combinations on their Burger Nation microsite and to “Make Your Grill Mark on the Nation.” Private Selection® offers artisan-inspired gourmet-quality meats, cheeses, desserts and cooking ingredients.
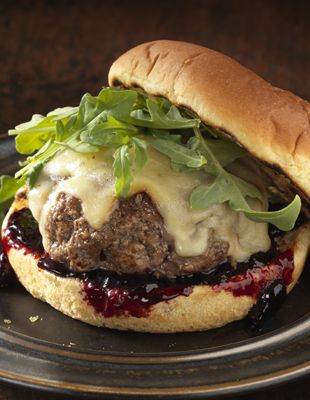
My Burgers Are NEVER Boring
While a burger can be fairly simple, I’ve found that layering and the right combination of ingredients is the secret to burger success. The latest original burger creation to come out of my kitchen is the Turkey Burger with sun-dried tomatoes and minced onions. Pan-fried in Worcestershire sauce, it’s served on a toasted pretzel bun and topped with crispy, thick-cut bacon and crunchy peanut butter.
Out. Of. This. World. Crazy. Good. It has just the right amount of sweet and savory, and overloaded with contrasting textures.
What’s Your Ultimate Burger?
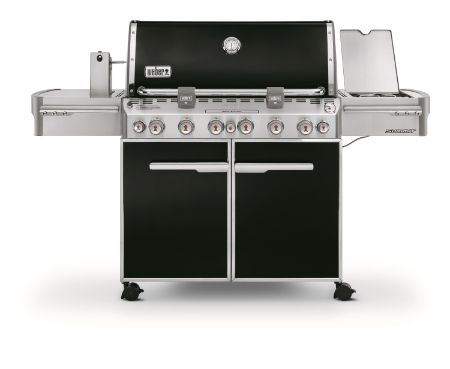
Kroger has launched the Burger Nation Sweepstakes to help customers create the ultimate burger at home. One lucky winner will win a brand new Weber® Summit® E-670™ Gas Grill so you can create your own delicious flavorings of the nation’s best burgers using Private Selection® products — right in your own backyard! Private Selection® culinary ingredients offer premium quality without a premium price.
The Private Selection® brand is available exclusively at the Kroger Family of Stores and affiliated stores, including Baker’s, City Market, Dillons, Fry’s, Gerbes, Pay Less, QFC, JayC, King Soopers, Owen’s, Ralphs, Smith’s and Fred Meyer. Live discovery sampling events, including sampling a signature burger, will take place at select stores across the nation. Find your nearest local store using the Store Locator.
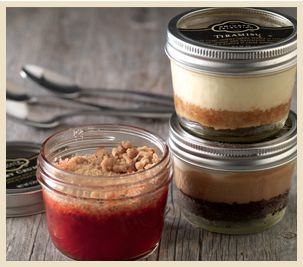
Save Room For Dessert
Every recipe, quick tip or Burger Nation sweepstakes submission earns a coupon for a free Mason Jar Dessert. Mason Jar Desserts are available in 10 flavors, including Cherry Crumble, Peanut Butter and Chocolate Brownie, and Salted Caramel Cheesecake. I want to try them all!
NO PURCHASE NECESSARY TO ENTER OR WIN. Offered only to legal residents of the 50 U.S. including D.C. (except FL, NY, RI, AK and HI), 18 or older. Void in and to residents of FL, NY, RI, AK and HI, and where prohibited by law. Participants must have a participating Kroger Shopper Card which may be obtained without cost. Begins on or about 9:00 a.m. ET April 28, 2014 and ends on or about 8:59 p.m. ET June 6, 2014. Limit 1 entry per person/Shopper Card account/household per day, across all banners. Limit 30 total Sweepstakes entries per person/Shopper Card account/household during the Promotion Period. For prize details, odds of winning, and limitations, see complete Official Rules.
It’s rainy and damp, and hardly festive right now. But Cinco de Mayo is almost here, so I’m hopeful that spring will decide to return soon…and stay for while!
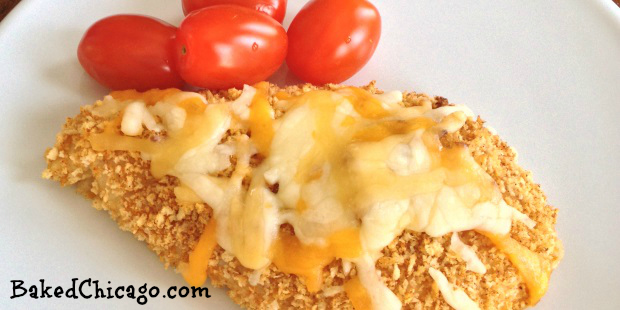
To get into the celebratory spirit, I wanted to add some spice to a traditional baked chicken recipe featuring panko breadcrumbs. I love the crunchy texture of the panko so much that I’ll use it in turkey meatloaf and I’ve been known to eat them right from the bag.
With this Crunchy Fiesta Chicken, I’ve simply blended store-bought taco seasoning with panko breadcrumbs for my breading mixture.
Some recipes have you mix the shredded cheese with the breadcrumb mixture, but I prefer to put the cheese on last in the baking process. That allows the breadcrumbs to stay crunchy and for most of the cheese to stay on the chicken breast.
After dipping in an egg/water mixture, you dredge the chicken breasts in the glorious panko breadcrumbs on both sides. Then it’s ready to pop in an oven.
Turn once in the baking cycle for both sides to crisp up. Then top with 4-blend Mexican cheese a few minutes before the baking is done; just enough to let the cheese lightly melt. And you’ve got a crunchy, lightly spicy chicken breast that would be perfect for your Cinco de Mayo dinner. Pair it with a taco side salad and a great Mexican beer or tequila. Now that’s a meal worth celebrating!
Preheat oven to 400 F degrees. Line a baking pan with parchment paper, lightly coat with nonstick spray or olive oil. Then set aside.
In a pie pan, whisk together breadcrumbs and taco seasoning. Set aside.
In another pie pan, beat the eggs and incorporate 2 tablespoons of water. Take each individual chicken breast and dip (one side at a time) into the egg mixture, then the breadcrumb mixture. In some cases, you may need to dip each side twice to ensure full coverage.
Lay the chicken breast in the prepared baking pan, and repeat for the remaining chicken breasts.
Bake for 25 to 30 minutes, or until chicken is tender. Turn the chicken breasts halfway in the cooking time to ensure a crispy texture on both sides of the chicken.
During the last 3 minutes of baking, add about 1/4 cup of Mexican cheese on top of each chicken breast. Return to the oven and let it melt completely. Remove from the oven and serve immediately.


 I must admit for most of my adult life I’ve never made spaghetti sauce from scratch. With so many good pre-made sauces on the market, I usually stock up when there’s a sale and (occasionally) doctor it up with some fresh herbs or tomatoes. Can I get an “amen?” Browsing through one of my favorite slow cooker cookbooks –
  The arrabbiata sauce is extremely easy to make. Your slow cooker does most of the heavy lifting. To start the recipe, I browned the onion, bacon and garlic in a skillet – then transferred the contents to my slow cooker. You add all the rest of the ingredients (except for the pasta and meatballs – those come later!) into your slow cooker and give it a good stir. Set it on HIGH and put on the lid. Walk away for 4 to 5 hours and the sauce will be “perfetto!”
  About 45 minutes before your arrabbiata sauce is done, you’ll want to start making the turkey meatballs. I used pre-seasoned panko breadcrumbs with Italian seasoning spices, but you can use standard panko breadcrumbs and add in the Italian seasoning by hand. The mixture of the panko, butter and egg help bind the ingredients, and make for a great carmelized “crust” on the outside of the meatballs. I tend to like larger meatballs, so that requires even cooking. The trick is not to rush the browning process, so never go higher than medium-high heat. I don’t make homemade meatballs that often. Usually, I’ll just brown ground turkey into my sauce and make whatever sauce I’m using a meat sauce. But these turkey meatballs were to die for! Well worth the effort. You may want to make a double batch; they freeze well.
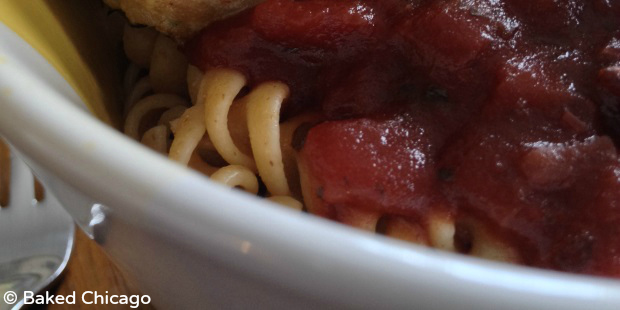
  Cook your pasta according to package directions. I used rotini pasta, but you can easily substitute your favorite pasta or what you have in your pantry. If you’re only having pasta for a meal, I like to use a bowl. It makes it easier to cover the pasta with sauce, without wasting a lot covering the entire length of a plate. Then pile on the meatballs and pour a healthy serving of arrabbiata sauce over it all. Top it with shredded Parmesan cheese and you’ve got a great weekday dinner or weekend lunch that’s good enough for company.
  I ended up adding Cabernet Sauvignon to this arrabbiata sauce recipe to make it “less angry.” What’s your favorite ingredient to add to spaghetti sauce?