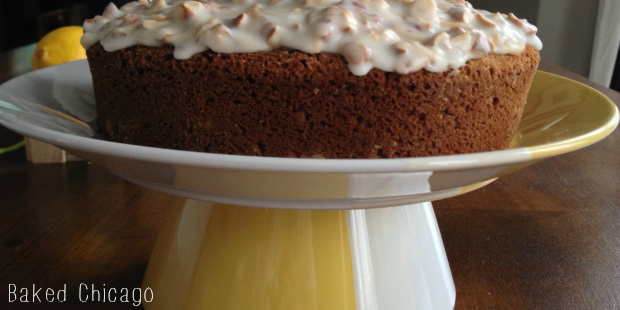
I was shopping in my local Target, getting ready for Easter. I came across some cake stands and I thought it would be nice to have one for a special cake I was making for the holiday. Normally, I’m “no fuss” and I would simply slice and serve a cake right from the pan I baked it in. Call me barbaric! And cheap.
Just as I was about to make a decision to spend $15 to $25 for a cake stand, that I’d maybe use twice a year, I saw this “fancy” cake stand-punch bowl combo. I read the back of the box and saw that by simply inverting the cover to the cake stand that it became a punch bowl. Not quite the Transformers, but still clever. Then I thought to myself that I could use the same principle with a simple plate and matching bowl to create my own DIY cake stand.
The size of the plate and depth of the bowl were critical, so I first found a large plate that had a very modern, spring-like design using yellow and white color blocking. And the matching bowl was very deep. The best part: together they were less than $7. So I easily saved at least $10.
To make this cake stand, all you need is some hot glue or a quick-drying epoxy. Because the plate and bowl are ceramic, be sure to use glue appropriate for that material and surface. Turn the bowl upside down and apply the gluing agent. Then carefully center the bottom of the plate to the bottom of the bowl. Press down to secure, then let dry.
And you have a deliciously simple DIY cake stand to showcase your culinary creations.
It’s nearly 60 degrees and mostly sunny in Chicago on this last Sunday of March. Earlier this afternoon, it felt so good to absorb the sun while watching the dogs play in the backyard. Almost good enough to forget what a polar vortex feels like…almost.
April starts this week and that means Easter is not too far off. As a kid, I enjoyed coloring eggs and – of course – all the candy-filled Easter baskets.
Have you noticed how artsy dyeing Easter Eggs has gotten over the years? I can appreciate the talent, and patience, it requires to decorate an egg. But rather than mess with boiling, dyeing, drying, displaying, hiding and finding real eggs, I’m moved into the plastic egg camp. When you have 13 nieces and nephews like I do, it’s definitely easier and simpler to use plastic Easter eggs. Especially if you miss an egg under the coach for a few weeks. There’s only so much you can blame on the dogs before you realize that funny smell is your fault.
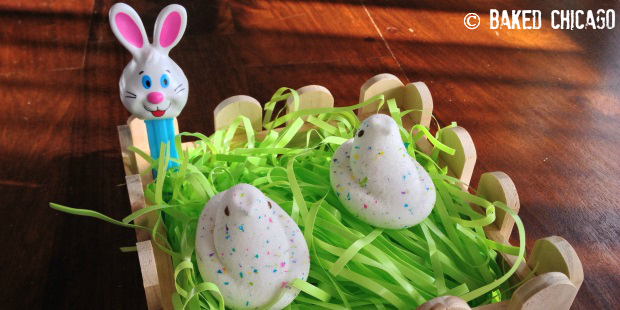
I’ve adopted this no-nonsense, take-no-prisoners approach to holiday centerpieces, too. Normally, I’d use a traditional Easter basket for creating a table centerpiece. But last week when I walked into my local Target, I found this really adorable plain picket fence basket in the $1-$3 bins section at the front of the store. That was the inspiration for this DIY Easter centerpiece that cost less than $8. And it’s (mostly) edible. Win, win.
I got some neon light green shredded paper grass to put inside the fence basket, a cute bunny PEZ dispenser and the new vanilla creme PEEPS chicks.
Confession time: I also bought a bag Hershey’s Easter Candy Coated Milk Chocolate Eggs. They were “under” the PEEPS for about 4 days before I ate them all. If they hadn’t been half covered up by the shredded paper grass, they wouldn’t have lasted as long as they did. They were in pastel pink, blue and green colors – and quite yummy. A minimalist at heart (and a pragmatist), I decided that less was more in this case so I was happy with how it turned out. Having all those candy-coated milk chocolate eggs just laying in the grass would have made the centerpiece “too busy.” That’s the story I’m sticking with.
The PEEPS will get hard as they are exposed to the air. But that’s my brother-in-law’s favorite way to eat PEEPS. When he gets a package, he’ll open it up and let the air harden them for at least a few days. It’s kind of like eating a semi-hard meringue cookie – if you can hold off for that long.
If you noticed in the last photo that there are only two PEEPS left in the basket, you might ask “what happened to the other?” Mind your own business, please! Sometimes PEEPS need privacy.
And – hypothetically – if someone were curious about what the new PEEPS vanilla creme-flavored chicks tasted like, you wouldn’t begrudge that search for knowledge. Right!?!
Share your favorite PEEPS shapes and flavor in the comments below and enter Baked Chicago’s drawing for a $50 PEEPS AND COMPANY® e-gift card. Just in time for Easter, the winner will be chosen on April 12.
The Chicago Flower & Garden Show, presented by Mariano’s, is a much-needed reminder that spring will (eventually) get here. The Chicago Flower & Garden Show, which dates back to 1847, is all about inspiring people to “think green.” That may be to plant a vegetable garden or simply spend more time outdoors every day enjoying nature. The theme of this year’s show (March 15 – 23, 2014, at Navy Pier) is Do Green. Do Good.
The show is HUGE with over 20 inspirational gardens, a kids’ activities garden, culinary demonstrations, and the Marketplace filled with over 100 vendors. #MyMarianos is the official Flower Market at the Chicago Flower & Garden Show. But I was ready to explore the vast indoor landscape on this #shop for #CollectiveBias; I had on my sneakers and took my antihistamine/decongestant at breakfast. Let the hunt for floral inspiration begin!
One of my favorite flowering plants is an orchid. And there were so many beautiful colors on display. Orchids look very delicate, very simple – yet they make a big statement to any decor. If my pugs didn’t have impulse control issues (especially with anything that could be perceived to be food), I’d have orchids galore throughout my house.
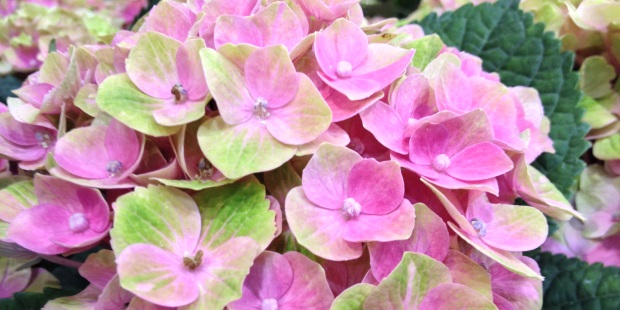
The colors of all the flowers on display were so vibrant, even indoors under artificial lighting. I guess there’s no way to hide nature’s true beauty.
I didn’t do an official count, but I think I saw more tulips at the Chicago Flower & Garden Show than I did during my entire trip to Amsterdam.
And who knew roses could get to be 5 feet tall!?!
5-foot tall roses at the Chicago Flower & Garden Show!
This may shock you. [insert dramatic pause] But as a food blogger, I like talking with and learning from chefs and cooks. Each year, the Chicago Flower & Garden Show has a Garden Gourmet program with over 24 Chicago chefs sharing their best recipes that feature fresh-from-the-garden ingredients. Kicking off this year was Chef Bill Kim, the owner of Urbanbelly, bellyQ and Belly Shack. Chef Kim is also one of Mariano’s TasteMakers. He shared a recipe for Edamame Hummus that takes less than 10 minutes to make. Click for a complete list of participating chefs and Garden Gourmet demonstration dates/times.
Chicago Flower & Garden Show Tips
After a great morning at the Chicago Flower & Garden Show and with fresh flowers from Mariano’s Flower Market in hand, I headed home to see if I could put into practice what I learned. Here are some of the best tips I picked up from the floral design experts at the Chicago Flower & Garden Show:
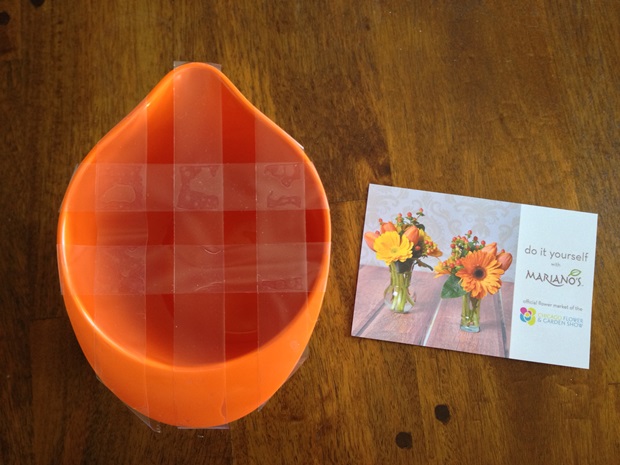
Reduce, Reuse: No space is too small to benefit from fresh flowers and plants. And there’s no need to purchase fancy vases; you can reuse everyday containers from your kitchen or pantry. I used my tall mixing bowl that came with my immersion blender (see image below) to add a pop of contemporary color for the arrangement I made for my dining room table.
Get On The Grid: Place scotch tape over the top of the vase in a grid format. This helps to keep flowers in place and guide you in creating a more evenly spaced arrangement. No need for marbles or foam in the bottom of the vase.
It’s Okay to Ask For Help: You’re not expected to know everything, and there are plenty of professionals who are glad to help. The staff at Mariano’s Flower Market inside the Chicago Flower & Garden Show were helpful and knowledgeable. Admittedly, I’m more confident in working with plants over fresh flowers – but they encouraged me to give a try at my own fresh flower arrangement. My insurance policy: I walked away with a palm-sized “do it yourself with Mariano’s” card with tips and instructions for how to create this look at home.
Make a grid with scotch tape across the top of your vase to make arranging much easier.
After cutting the stems to similar heights and prepping the vessel, here’s what I came up with. What do you think? Not too bad for a newbie, if I say so myself. I obviously still have more to learn about flower arrangements, but I was proud of the effort. And the ambiance created by fresh flowers really makes a difference: my morning coffee and every meal is now so much more enjoyable.
In the past, I would periodically get flowers at Mariano’s while on a shopping adventure. I think they’ve got the best produce in town and – not to scare you, but – I’d live inside their bakery if the Health Department allowed such a thing. But my day at the Chicago Flower & Garden Show reminded me that it’s important to appreciate beauty and to let beauty into your life each day. That doesn’t always “just happen;” you have to take responsibility to make it happen for yourself. And flowers at Mariano’s is an easy way to regularly bring nature’s beauty into my home and onto my table.
The Chicago Flower & Garden Show runs through Sunday, March 23. You can purchase tickets online or at the Navy Pier box office. If you’ve never been, I highly recommend it. And all the great floral varieties you see at the Mariano’s Flower Market inside the show are also available in your local Mariano’s store. Stay connected with Mariano’s Floral Department via Twitter, Facebook or Pinterest.
This “Super Quick Video Tip” from America’s Test Kitchen shows you how to avoid buying another bottle of olive oil (if you want to) by making regular olive oil with a combination of extra virgin olive oil and canola oil.
Rebecca Morris (no relation) of America’s Test Kitchen shows how easy it is to turn white sugar into brown sugar in just a few seconds. All you need is granulated sugar and molasses.
Have you ever wondered what “exactly” was in vanilla extract? For me, I’ve always been mesmerized by the calming, yet sensual, aroma of pure vanilla extract. And as good bakers know, vanilla is an essential for most recipes (especially, and somewhat ironically, those with chocolate!) – but it can be quite expensive.
I started reading Pure Vanilla: Irresistible Recipes and Essential Techniques by Shauna Sever (a former Chicagoan, so I’m already a fan!) and she does a great job of explaining the many roles vanilla plays in our cuisine and our culture. Because I’ve been on a bit of a DIY kick of late, I wanted to see if making vanilla extract was as simple as it seemed. While I quadrupled the batch, the recipe is from Shauna Sever. [Once you see the “baking time” of the recipe, you’ll understand why I made such a large batch. Time management in the kitchen!]
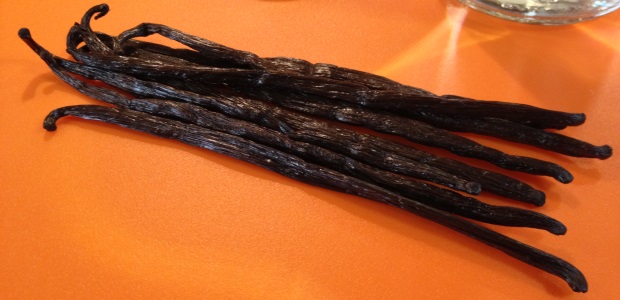
You’ll need only two ingredients to make this homemade vanilla extract (vanilla beans and vodka!), one sealed jar, a paring knife and lots of patience. The vanilla needs to steep for at least 2 months in a cool, dark place before you use it for the first time.
Ingredients:
8 vanilla beans, cut in half (I used Madagascar vanilla beans found on Amazon; they were the highest quality beans I could locate at an affordable price)
32 ounces vodka
sealed glass jar
Pour the vodka into a clean jar, and set aside. With your paring knife, split the vanilla beans down the middle. Insert split beans into the jar and securely seal it.
Shake the bottle to ensure it’s properly sealed and to moisten all of the vanilla beans. Make sure the entire vanilla bean is submerged in the vodka.
Store the jar in a cool, dark place for at least 2 months before using. The liquid should be a dark amber color (see final product below, after 3 months).
Shauna recommends that as you use the extract you can top off the jar with more vodka (or whatever clear alcohol used) for a “nearly never-ending supply.” Mazel!
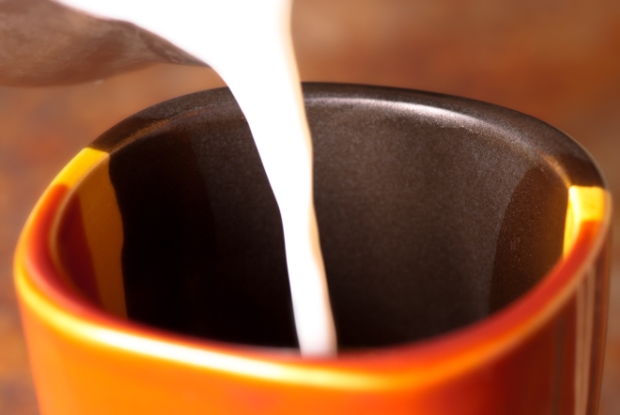
This time of year, you’ll find all sorts of seasonal coffee creamers at the grocery store. It’s one of the signs that the Thanksgiving holiday is not far away. But as my luck usually has it, my favorite fall coffee creamer flavors are in either in a very limited stock or not available at all. So rather than run around to multiple stores in hopes that you’ll find what you want, I’ve found it’s much easier to make it myself. And that way I can control the quality of ingredients used and – more importantly – when I want to enjoy a fall flavored coffee.
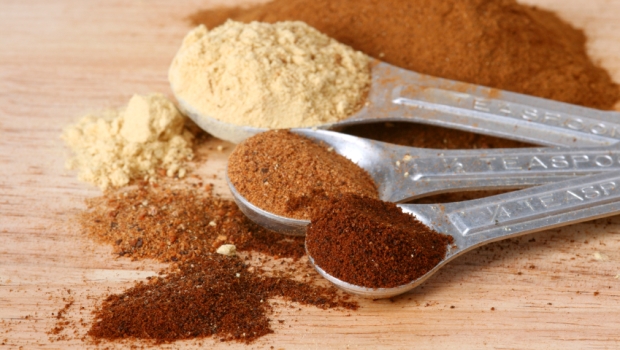
This recipe is a DYI for pumpkin spice coffee creamer, which is perfect for welcoming fall or for entertaining family, friends at Thanksgiving. And if you don’t happen to have pumpkin pie spice in your pantry, no worries. Use this simple recipe for a DIY pumpkin pie spice blend that you can use throughout the season.
In a medium saucepan over medium-high heat, whisk together the heavy cream, pureed pumpkin, maple syrup and pumpkin pie spice. When it begins to steam, remove from heat and stir in vanilla.
Strain mixture through a fine mesh sieve. Pour into a glass container (with lid) and store in the refrigerator for up to 10 days.
In a small mixing bowl, whisk together the cinnamon, nutmeg, ginger and cloves. Store in an airtight container in a dark, cool space for up to 6 months.
Place 1 cup of berries in 8-quart heavy pot. Crush berries with potato masher. Continue adding berries and crushing until you have 5 cups done. Stir in pectin and butter. Heat on high, stirring constantly, until mixture comes to a full rolling boil.
Add sugar all at once and return to boiling. Boil 1 minute, stirring constantly. Remove from heat and skim off any foam.
Meanwhile prepare canning jars. Ladle into hot, clean half-pint canning jars, leaving 1/4-inch space at the top. Wipe jar rims and adjust lids. Process in a boiling-water canner for 5 minutes. Remove jars and cool on wire racks.
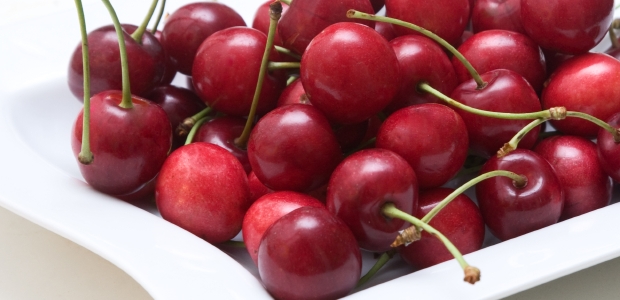
Happy National Pie Day! When it comes to pie, I’m a traditionalist. As a kid, I remember going to my aunt’s farm and climbing up the cherry tree. No, I wasn’t re-enacting any George Washington life story play. The tree was relatively short, and so was I. That made it easier for a kid to climb.
But coincidentally, my favorite pie is cherry. I’ve always been a bit suspicious of all the stuff they put into canned pie filling. Let’s face it: the deep red coloring and thickness are a bit unworldly.
So in honor of National Pie Day, I’m making some cherry mini pies using homemade cherry pie filling.
Let’s set the record straight: My pug Bing is NOT named after the cherry NOR the search engine.
Homemade Cherry Pie Filling
In a large saucepan, combine the sugars, cornstarch and salt. Add the Bing cherries, water and lemon juice. Bring the mixture to a boil. Reduce the heat and let simmer for 10 minutes, stirring regularly until thickened. Remove from heat and let cool for 15 minutes.
Use this homemade cherry pie filling for making up to 8 mini pies (following manufacturer’s instructions for baking) or 1 regular pie.
Ingredients:
1/3 cup granulated sugar
1/2 cup dark brown sugar
1/4 cup cornstarch
1/4 teaspoon kosher salt
4 cups fresh Bing cherries, pitted
1 1/2 cups water
2 tablespoons lemon juice
Preheat oven to 350F degrees. Put all ingredients in large, ovenproof casserole dish. Stir to blend. Place the pan over medium-low heat and bring to boil, stirring regularly. Lower the heat and cook for 5 minutes more, continuing to stir.
Slide casserole into oven and cook, until pumpkin butter has thickened and there is no liquid around sides of pan (1 1/2 to 2 hours). Cool pumpkin butter, then cover and chill. Pack airtight; keep in refrigerator for up to one week.