If your kitchen cupboards are like mine, sometimes you’re afraid to open up a cabinet door for fear of what might come falling out.
And as much as I try to keep my kitchen clutter to a minimum, it’s hard to organize little spice bottles on a shelf (that are sometimes too high to reach) or in a drawer. When I got the opportunity to review YouCopia’s Classic SpiceStack® product, I was genuinely excited because – with so many spices as a baker – I have trouble keeping track of what I have and where it is.
First let me share the story of how I discovered YouCopia. I was attending the International Home + Housewares Show at McCormick Place, where global companies showcase what’s new in the industry for the home. Companies from over 2 dozen countries, and I got the chance to meet Lauren Greenwood, one of YouCopia’s founders.
After seeing the range of cool storage solutions they have, I learned they were a Chicago company. Go Chicago! And they are exactly 1.7 miles from my house. Small world, huh!
http://youtu.be/DTfe1_rG5Tk
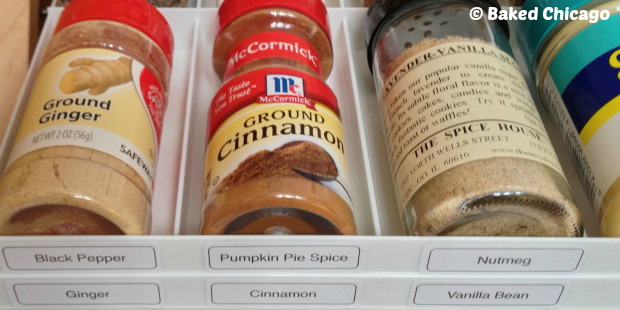
Here’s a shot of the cupboard next to my stove and kitchen sink. It’s the portion of my kitchen counter where I tend to do the most mixing, prepping. I have two very narrow shelves (my house was built in 1892 so everything is narrow and small by today’s standards) where I keep the majority of my spices. I use two Lazy Susans so I don’t have to grab blind – because I’m too short to see what’s in the back.
As you can see, it’s not awful but it’s hardly easy to find things. I’m constantly having to readjust labels so I can read them from their position on the turntable. And I’ve got too many spices for the turntable, so some jars get put to the side and other small jars get stacked on one another.
So I emptied the shelf with the most spice jars to make room for YouCopia’s Classic SpiceStack®, which holds 24 full-size or 48 half-size spice bottles (round or square). Wouldn’t you know I found I had duplicate bottles of ground cinnamon because I thought I’d run out. One of the bottles fell off the turntable and landed at the back of the shelf; I wouldn’t have known it was there except when I removed all the spice jars.
Currently the Classic SpiceStack® comes in either white or silver/black. Two things I liked immediately out of the box: NO ASSEMBLY REQUIRED (yeah!) and units are stackable. The package comes with 96 removable drawer labels (48 printed and 48 blank), so I quickly matched the labels to the spices I had. In less than 4 minutes, I had a compact, neatly organized spice caddy that stored more spice jars in one shelf than I could previously store on a turntable.
As I mentioned before, being short makes it hard to reach upper shelves so I used to be forced to pile on all the often-used spices inside the lowest shelf – just to reach ingredients I cook with frequently. But the YouCopia Classic SpiceStack® has the ability to slide out a tray of spices and lower it to an easily reachable height.
With the labels on each compartment of each shelf within the YouCopia Classic SpiceStack®, I can quickly find what spice I need without having to “spin the wheel” or guess where it is.
By assigning a space to a specific spice, I was able to group like spices together to make it easy to get multiple spices together for any recipe.
If you’ve got tons of spices like me (I’ve got to buy another Classic SpiceStack® for the shelf below), they do make larger models, including the Chef’s Edition SpiceStack® which holds 30 full-size or 60 half-size spice bottles.
I think this product, as simple as it is, is quite genius. It’s really functional and easy to implement, use. My only recommendation to YouCopia would be to consider extending the number of colors the SpiceStack® comes in. White and silver/black are great for most kitchens, but I always enjoy a pop of color so I wouldn’t mind this in a tangerine or Caribbean blue.
In addition to the SpiceStack®, YouCopia has stack products for coffee, tea and baking accessories. You can find YouCopia at traditional bricks-and-mortar stores, like Target, The Container Store and Bed, Bath & Beyond. It’s also available online at Amazon.com. Click here for a complete list of where to buy YouCopia products. Coming this fall are some exciting, new products, including YouCopia’s version of a Lazy Susan that looks like a real winner.
You should also check out their website, where they have a fun blog with organization tips from an industry expert, a free e-book “30 Days of Organizing,” and a forum where product fans called YouCopians share their organizational stories.
Now that my spices are neatly organized, I think I need to work on the loose lids and pans that I pile into the cupboard next to the stove. What part of your kitchen needs to the most help to control the chaos?
Disclosure: I was given a free sample of YouCopia’s Classic SpiceStack® to review. I get no additional benefits for talking about this product or company. All opinions about this product are 100% my own.
I must admit for most of my adult life I’ve never made spaghetti sauce from scratch. With so many good pre-made sauces on the market, I usually stock up when there’s a sale and (occasionally) doctor it up with some fresh herbs or tomatoes. Can I get an “amen?” Browsing through one of my favorite slow cooker cookbooks – Better Homes and Gardens Year-Round Slow Cooker Recipes – I found a recipe for arrabbiata sauce. I was intrigued because I’d never heard of arrabbiata sauce. After a little research, I discovered that “arrabbiata” is Italian for “angry.” The sauce gets its name from the burn of the crushed red peppers. Most everything about this recipe sounded great, but of course I had to add my own twists to make it more of something I’d want to eat. So I exchanged pancetta for bacon and I added a cup of Cabernet Sauvignon wine to the recipe. I thought if the sauce was going to be “angry,” then being a little “boozy” couldn’t hurt!
Arrabbiata Sauce with Turkey Meatballs
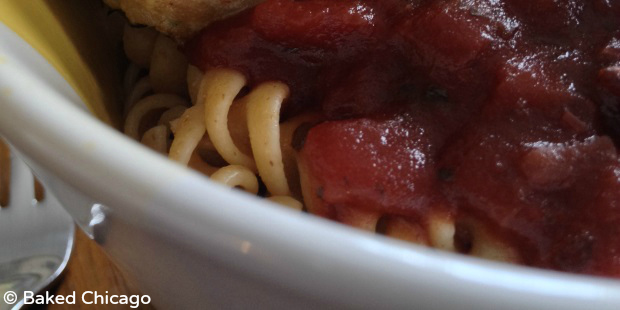
The arrabbiata sauce is extremely easy to make. Your slow cooker does most of the heavy lifting. To start the recipe, I browned the onion, bacon and garlic in a skillet – then transferred the contents to my slow cooker. You add all the rest of the ingredients (except for the pasta and meatballs – those come later!) into your slow cooker and give it a good stir. Set it on HIGH and put on the lid. Walk away for 4 to 5 hours and the sauce will be “perfetto!” About 45 minutes before your arrabbiata sauce is done, you’ll want to start making the turkey meatballs. I used pre-seasoned panko breadcrumbs with Italian seasoning spices, but you can use standard panko breadcrumbs and add in the Italian seasoning by hand. The mixture of the panko, butter and egg help bind the ingredients, and make for a great carmelized “crust” on the outside of the meatballs. I tend to like larger meatballs, so that requires even cooking. The trick is not to rush the browning process, so never go higher than medium-high heat. I don’t make homemade meatballs that often. Usually, I’ll just brown ground turkey into my sauce and make whatever sauce I’m using a meat sauce. But these turkey meatballs were to die for! Well worth the effort. You may want to make a double batch; they freeze well. Cook your pasta according to package directions. I used rotini pasta, but you can easily substitute your favorite pasta or what you have in your pantry. If you’re only having pasta for a meal, I like to use a bowl. It makes it easier to cover the pasta with sauce, without wasting a lot covering the entire length of a plate. Then pile on the meatballs and pour a healthy serving of arrabbiata sauce over it all. Top it with shredded Parmesan cheese and you’ve got a great weekday dinner or weekend lunch that’s good enough for company. I ended up adding Cabernet Sauvignon to this arrabbiata sauce recipe to make it “less angry.” What’s your favorite ingredient to add to spaghetti sauce?
56 ounces diced tomatoes with basil, garlic and oregano, undrained
15 ounces tomato sauce
2 teaspoons dried parsley
1 teaspoon dried oregano, crushed
1/2 teaspoon sea salt
1/2 teaspoon dried basil, crushed
1/2 teaspoon crushed red pepper
1 cup Cabernet Sauvignon, or any dry red wine
8 servings cooked rotini pasta
1/4 cup shredded Parmesan cheese
For Meatballs:
1 cup panko breadcrumbs
20 ounces ground turkey, 93% lean
1 tablespoon Italian seasoning
1 tablespoon dried parsley
2 medium onions, minced
2 eggs
1 tablespoon butter, room temperature
1 teaspoon sea salt
1 teaspoon ground black pepper
Instructions
For Sauce:
In a skillet, cook the onion, bacon and garlic over medium heat until onion is tender and bacon is browned.
Transfer mixture to a 5-quart slow cooker. Set skillet aside to use when cooking meatballs later.
Stir in the tomatoes, tomato sauce, parsley, oregano, basil, salt, and crushed red pepper. Cover and cook on HIGH for 4 hours (or on LOW for 8 to 10 hours).
Serve over pasta and turkey meatballs. Sprinkle each serving with Parmesan cheese, if desired.
For Meatballs:
In a large bowl, thoroughly combine ground turkey, breadcrumbs, Italian seasoning, dried parsley, mined onions, eggs, butter, salt and pepper.
By hand, form golf ball-sized meatballs and place in cooled skillet (used when browning onion and bacon mixture earlier). Makes about 16 meatballs, or 2 per serving. Feel free to make your meatballs smaller or larger, based on your preference. But make all meatballs uniform in size so they cook evenly.
Place skillet with meatballs on burner at medium-high heat. Every 5 minutes or so, turn meatballs so that all sides will eventually brown and meatballs will be evenly cooked. Watch carefully and remove meatballs from skillet when done. Set aside to serve with arrabbiata sauce and pasta.
Notes
Sauce portion of this recipe lightly adapted from Better Homes & Gardens "Year-Round Slow Cooker Recipes"
I’ve been an Amazon.com customer since January, 2001. That’s more than 13 years – longer than a lot of other relationships in my life. I’ve never really enjoyed the ceremony of traditional shopping…the traffic…crowded parking lots…busy checkout lanes…and (usually my luck) the store being out of the one item I needed most. Amazon changed the ceremony of shopping for me and now I shop at Amazon.com at least once a week.
I’ve purchased nearly every kind of goods and services that Amazon offers, including a Herman Miller desk chair, an electric snow blower, a lawn mower, and countless grocery care packages to surprise my mom or nieces away at college. To say I was super excited when Collective Bias (#cbias) approached me to review the new #AmazonCart collaboration between Amazon and Twitter would be a serious understatement.
https://www.youtube.com/watch?v=iAm6pa9hPKA
#AmazonCart
Getting started was easy. Once I connected my @BakedChicago Twitter account to my Amazon Prime membership, I was ready to go.
My daytime schedule is quite hectic, so I usually grab my iPad after dinner to browse Twitter and other social networks while watching the evening news. I already follow @Amazon, so now when I see an interesting product featured in a Tweet with an Amazon product link – like the spiral vegetable cutter below – I can simply hit REPLY to that Tweet with the hashtag #AmazonCart.
Then just moments after, I receive an email confirmation that I’ve successfully put this product in my #AmazonCart. I can review my shopping cart at my leisure and finalize the purchase when I’m ready.
I have been known to sometimes forget if I’ve responded to a Tweet. I accidentally hit REPLY twice, but #AmazonCart caught that and sent me an email after the second Tweet letting me know that I had already put the item in my cart – and if I wanted two of product I could simply edit the quantity when I made the purchase.
I admit it. I’m a bit of a kitchen gadget-aholic. And there have been times when I’ll buy an item that looks cool, but that I really don’t need. You’ve been there, too, right!
What I really like about #AmazonCart is that I get the satisfaction (and convenience) of the impulse buy, but I’m not forced to make the final purchase right then and there.
I’ve gotten into the routine of shopping with #AmazonCart after dinner and then going online the next day to review the contents of my shopping cart. That gives me time to fully consider my purchase, as well as research other color options. The black spiral slicer featured in the Tweet was cool, but I opted for the ocean blue version to add a pop of color to my kitchen. Good call, don’t you think!
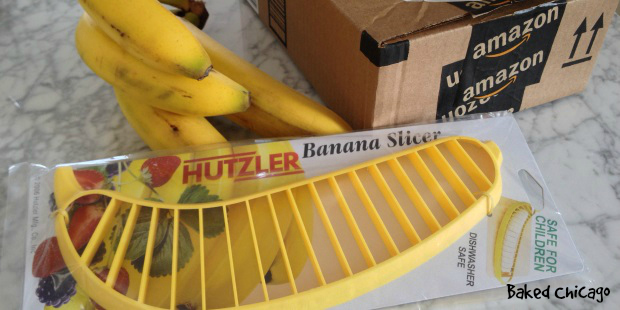
Because I don’t do much traditional window shopping, somtimes I don’t know a better product exists until I see it somewhere like an Amazon featured product Tweet. This “low-tech” banana slicer is a great example.
I buy about 8 bananas a week, minimum. I don’t eat bananas, but my four pugs – Bing, Baxter, Della and Marlo – eat them everyday with their breakfast. I slice up one banana and divide it among their dishes. At first I used a simple table knife to slice the bananas, but getting even slices that are divisible by four takes too much brain work and hand-eye coordination for first thing in the morning. Then I tried a banana slicer gadget that had very sharp blades. So sharp that even gently touching them with the back of my finger cut my skin and drew blood.
Then I saw this plastic banana slicer in an Amazon Tweet, so I hit REPLY with #AmazonCart and decided to check it out. I liked that it was dishwasher safe, but there were no sharp edges for me to cut myself. Now my pugs enjoy fresh sliced bananas on their breakfast and I don’t have to worry about slicing myself if I’m still not quite awake.
So far, I’m really enjoying the new #AmazonCart. I can’t wait to see how both Amazon and Twitter collaborate to expand this service and if they introduce others.
If you have a Twitter account and Amazon Prime, then all you have to do to get started with the new #AmazonCart service is connect them at Amazon.com.
Social shopping just got way easier and a lot more fun!
In honor of Mom, Baked Chicago is kicking off its 1st Annual “My Mom Makes” Sweepstakes. Share your Mom’s best dish in the comments section below. You can even add a picture of your Mom and her signature dish (optional), as well as tell us why this dish is so darn good!
The top 3 entries with the most votes from the public will be placed in a random drawing for a special prize package from Hamilton Beach and YouCopia. Invite your family and friends to vote for your Mom’s dish below. One vote per entry per registered user.
So go ahead and brag about your Mom. You know she’s been bragging about you for years, so now it’s your turn to tell the world by describing her best recipe or signature dish. a Rafflecopter giveaway
To celebrate National Burger Month, Rockit Bar & Grill and Rockit Burger Bar are hosting their 9th Annual Burger Fest from May 12 – 16. Each day a different over-the-top burger is featured on the special menu, created by Executive Chef Amanda Downing.
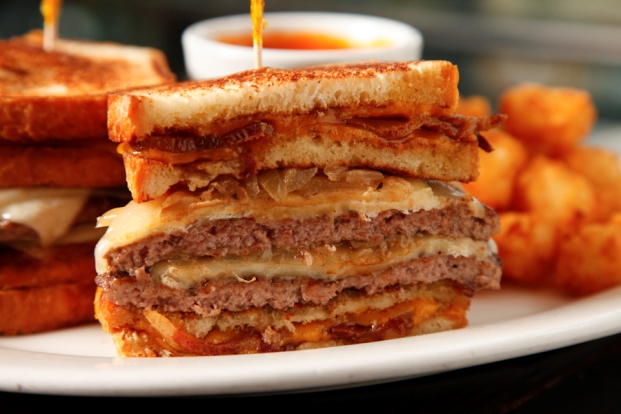
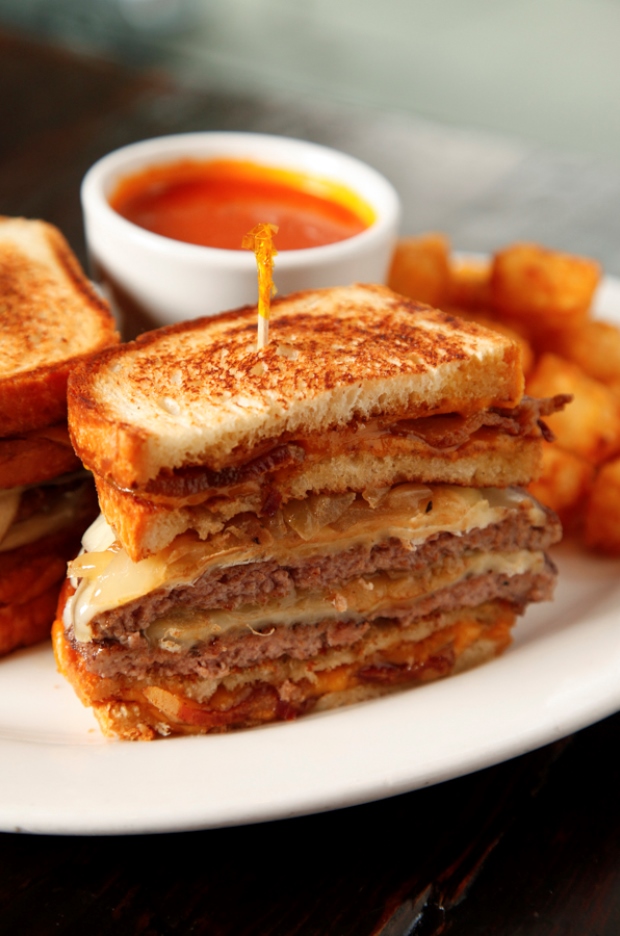
My personal favorite is the Bacon Grilled Cheese Patty Melt Burger, which Chef Amanda has kindly allowed me to share with you. It’s a double quarter-pound Black Angus beef pattie burger, topped with Gruyere cheese, caramelized onions, applewood-smoked bacon and served on a cheddar grilled cheese bun along with a side of tomato soup for dipping and tater tots. Yum!
Heat a medium sauté pan to high heat, add in about a tablespoon of vegetable oil. Add in the onions and lightly season with salt and pepper. Stir onions occasionally until golden, reduce heat slightly and continue to cook until onions are very golden and tender. Remove from heat.
Heat grill to medium-high heat, make sure grill is clean.
Lightly season each burger patty with salt and pepper. Place patties on grill and cook for approximately 2 minutes per side or until desired doneness. Add one slice of Gruyere to each patty.
Heat a large non-stick pan or griddle to medium heat, add about half of the butter, add the bread slices (do in batches if there’s not enough space to lay out all eight pieces), top each slice of bread with a slice of cheddar cheese, allow for bread to toast and cheese to melt.
Lay a piece of bacon on four of the slices, top with the other slices of bread to build the grilled cheese sandwiches. Add more butter and flip sandwiches until evenly toasted.
To assemble, place on patty on top of a grilled cheese sandwich, top with half of the caramelized onions, top with the second patty and then with another grilled cheese sandwich. Cut burger in half. Repeat with remaining set up and serve!
Finding the right gift for mom on any occasion can feel like an impossible mission for some guys (me included!). And when it comes to Mother’s Day, the pressure seems to grow exponentially.
How do you say a proper “thank you” to that person who changed your diapers, wiped your runny nose when you were sick and basically made sure that you and your siblings didn’t kill yourself or each other through the course of growing up?
A big bouquet of flowers or a huge box of chocolates? My mom would consider both extravagant. She’d eat one chocolate and share the rest, suggesting she has to watch her sugar and calorie intake.
Jewelry or a gift certificate for a massage? She usually only wears her wedding ring, and she’d much rather take a hot bath in her own tub than go to a stranger for a massage. Fancy perfume? Ivory soap is good enough for her.
On the surface, my mom might seem like a hard person to buy a present for. So what’s a son to do? The answer for me is NOT to buy a present, but rather to create the gift of an experience we can both enjoy.
I found my muse for the perfect Mother’s Day gift for my mom at Mariano’s on this #shop for #CollectiveBias. It hit me as I was exploring the delectable deli and bountiful bakery departments at the Jefferson Park #MyMarianos: a Mother’s Day picnic.
When Mariano’s asked me to share a story about what inspires me about my mom, I didn’t know where to begin because my mom is inspiring in many ways. But the thing that is most amazing is that she’s always giving of herself and her time to others, to the point where she rarely takes time just for herself. She’d rather spend her money and time on her grandchildren or to help others in greater need.
To understand my mom, it helps to know where she came from. She was the 2nd youngest of 11 kids, and grew up right after the Depression. Money was always tight for her family, and some of the simplest things today were considered great luxuries back then.
One of her fondest memories growing up was when she and her mom (my grandmother) would eat ice cream right out of the carton. Back then, ice cream was a rare treat if you were poor. And they didn’t have the kind of refrigerator-freezers we have today, so storing ice cream was a challenge.
But my mom and grandmother had a solution for that: grab a spoon and eat it quick. When you’re one of 11 kids, you share everything so you just grab a spoon and dig in until it’s gone!
Pulling together a picnic doesn’t have to be complicated. In fact, a successful picnic menu should be simple. All the food and drink need to be portable, easy-to-consume. Where most guys get it wrong is either by over-thinking it, or not giving it any thought at all. Success lies somewhere in the middle, so I wanted to share my tips for The Guy’s Guide for the Perfect Mother’s Day Picnic.
The Guy’s Guide for the Perfect Mother’s Day Picnic
Tip #1: Show that you’ve been listening (at least some of the time).
Growing up, mom cooked for you. Now it’s your turn to make the meal. That doesn’t mean you have to make everything from scratch. Pick a menu from all the great prepared foods you can find in the deli and bakery aisles, and be sure to include your mom’s favorite foods. Show her that you’ve been paying attention all these years!
My mom absolutely L-O-V-E-S fresh tomatoes and cold vanilla milkshakes. [Hold the whipped cream and cherry so there’s room for more milkshake in the glass!]. For as long as I can remember, my mom has planted tomatoes and cantaloupe (and sometimes watermelon) in her garden. Some days, she’ll go out to her garden and pick a fresh tomato for her lunch or dinner. She cuts up the tomato and uses a little salt and pepper. Bam! She’s got a simple, yet satisfying, meal that she loves.
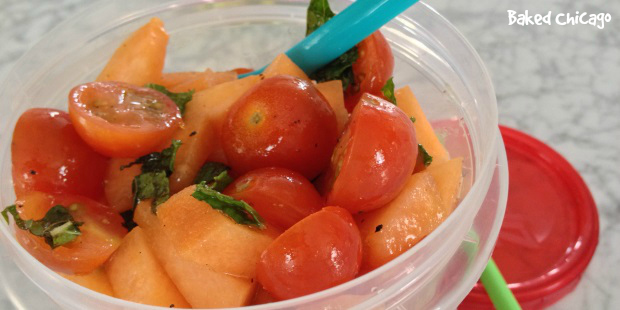
For this Mother’s Day picnic menu, I’ve selected a few special items from Mariano’s bakery, deli and fresh produce section that make up the majority of the menu. I am going to make one simple dish that combines two fresh foods my mom loves: tomatoes and cantaloupe. I call the dish Canta-Mato Salad. The recipe (below) is so simple that anybody who can hold a knife and drizzle olive oil can make it. It’s deliciously simple and making at least one dish demonstrates an honest effort to give of yourself.
Picnic Menu
All-white meat chicken salad on buttery croissants
Crunchy home-style potato chips
Tomato-cantaloupe salad with fresh mint
Vanilla milkshakes
You can find chicken salad in the deli and croissants in the bakery. And select your favorite chips (for crunch) from the snack aisle.
Then pick three ingredients from the fresh product department: a pint of cherry tomatoes, a cantaloupe and some fresh mint.
That’s all I need for a perfect picnic lunch that my mom will love. [I’ll pick up the vanilla milkshakes from the drive-through down the street from mom’s house so they’re good and cold.]
Tip #2: Don’t forget the flowers!
You might be saying, “hey, wait a minute! You said she really didn’t care about flowers!” That’s true. You don’t have to buy a huge flower bouquet, but a simple corsage that she can wear to church is something that would make her feel extra special. When people comment on her flowers, she gets to “brag” that her son gave it to her.
Tip #3: Sometimes, it’s okay to lie.
I don’t mean that it’s alright to tell your mom you’re in Hong Kong on business if you can’t be with her in person on Mother’s Day. Unless you are. Let me explain what I mean with an example of how I sometimes “lie” to my mom about the gift I’m giving her.
My mom is always thinking of others, and I know she really enjoys helping others in thoughtful ways. So I’ll sometimes get her two of something, like two differently colored corsages. Then I’ll say something like “I couldn’t decide which you’d like more” [the lie!] and suggest she give the one she doesn’t wear to a friend or someone at church who’d appreciate it. That could be an aunt, the minister’s wife or the church organist. It’s a chance for me to help my mom spread a little sunshine, because that gives her such joy to help others.
Tip #4: Your Mother’s Day celebration doesn’t have to be on Sunday only.
I’m one of six kids and everyone wants to spend time with Mom on Mother’s Day. Sometimes that’s not logistically possible.
Pick a time when you don’t have to rush around or deal with competing family schedules. In our family, one of my younger brothers always takes our mom out for a Mother’s Day lunch fundraiser at the local fire station. So I’ve chosen to treat mom to a Mother’s Day picnic on Saturday, the day before Mother’s Day. That way mom gets to celebrate a Mother’s Day weekend and I can give her the corsage in time for her to wear on Sunday to church.
Tip #5: The “perfect Mother’s Day” isn’t really about being perfect.
The perfect Mother’s Day is more about being present, being real and spending time with Mom in an authentic way that you both enjoy. Rather than putting your energy into buying a gift, show mom how much you appreciate her by spending time together and making the shared experience the gift.
For my mom, the only thing better than a Mother’s Day picnic with her cutest kid (me!) would be a Mother’s Day picnic with a side of bingo!
How are you planning to make your mom’s Mother’s Day perfect for her? Share your ideas in the comments section below. For other inspiring ideas to help make your mom’s Mother’s Day as perfect as it can be, follow Mariano’s on Twitter, Facebook and Pinterest. And check out the Mariano’s TasteMaker series featuring some of Chicago’s most innovative chefs.
It’s rainy and damp, and hardly festive right now. But Cinco de Mayo is almost here, so I’m hopeful that spring will decide to return soon…and stay for while!
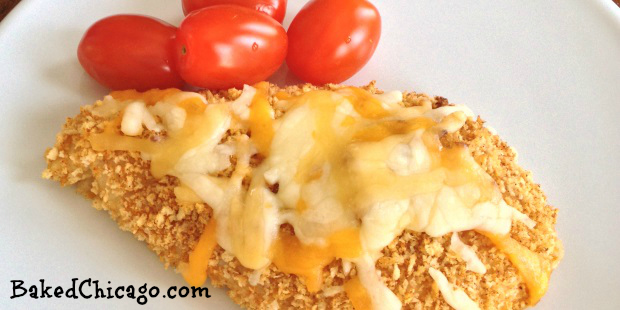
To get into the celebratory spirit, I wanted to add some spice to a traditional baked chicken recipe featuring panko breadcrumbs. I love the crunchy texture of the panko so much that I’ll use it in turkey meatloaf and I’ve been known to eat them right from the bag.
With this Crunchy Fiesta Chicken, I’ve simply blended store-bought taco seasoning with panko breadcrumbs for my breading mixture.
Some recipes have you mix the shredded cheese with the breadcrumb mixture, but I prefer to put the cheese on last in the baking process. That allows the breadcrumbs to stay crunchy and for most of the cheese to stay on the chicken breast.
After dipping in an egg/water mixture, you dredge the chicken breasts in the glorious panko breadcrumbs on both sides. Then it’s ready to pop in an oven.
Turn once in the baking cycle for both sides to crisp up. Then top with 4-blend Mexican cheese a few minutes before the baking is done; just enough to let the cheese lightly melt. And you’ve got a crunchy, lightly spicy chicken breast that would be perfect for your Cinco de Mayo dinner. Pair it with a taco side salad and a great Mexican beer or tequila. Now that’s a meal worth celebrating!
Preheat oven to 400 F degrees. Line a baking pan with parchment paper, lightly coat with nonstick spray or olive oil. Then set aside.
In a pie pan, whisk together breadcrumbs and taco seasoning. Set aside.
In another pie pan, beat the eggs and incorporate 2 tablespoons of water. Take each individual chicken breast and dip (one side at a time) into the egg mixture, then the breadcrumb mixture. In some cases, you may need to dip each side twice to ensure full coverage.
Lay the chicken breast in the prepared baking pan, and repeat for the remaining chicken breasts.
Bake for 25 to 30 minutes, or until chicken is tender. Turn the chicken breasts halfway in the cooking time to ensure a crispy texture on both sides of the chicken.
During the last 3 minutes of baking, add about 1/4 cup of Mexican cheese on top of each chicken breast. Return to the oven and let it melt completely. Remove from the oven and serve immediately.
I would never call a chocolate chip cookie boring to its face…
but I might talk about it behind its back.
Have you ever craved something sweet and decadent but your brain and your mouth weren’t on the same page? Let me explain my predicament.
Yesterday my mouth really wanted to taste a chocolate chip cookie warm from the oven, but my mind was saying “how effin’ boring!” I personally don’t like confrontation, but when it involves my mind vs my mouth I step in to broker the peace.
As much as I really wanted to taste a chocolate chip cookie, I couldn’t muster the excitement to make a “plain ole chocolate chip cookie,” so I decided to browse the pantry for inspiration. That’s when I came across an unopened package of dried tart cherries, which I picked up over the holidays thinking I might make a cherry-banana bread or something equally festive. [I guess I failed to get that done, so I’ll move it onto my 2014 holiday checklist for future consideration!]
Next to the dried cherries was my Sam’s Club-sized Quaker Oats Old-Fashioned Oats. And for a moment, I thought maybe I’ll make a cherry crisp or cherry cobbler. But that wasn’t my mission; I still wanted that chocolate chip cookie. So I thought why not combine them all into a chocolate chip cookie with oats (nice for added chewiness and fiber) AND the dried tart cherries (a nice counterpoint to the semisweet chocolate chips). My mouth was calling my brain “genius” and my mind was congratulating my mouth on having such good taste. Finally my stomach had to break up this mutual admiration society to get the recipe in motion.
Jazzy Oatmeal-Chocolate Chip Cookies
Because the inspiration for this recipe was to break out of the ordinary and try new ingredient combinations, I exchanged the butter I would normally use for some extra virgin olive oil. And I added a heaping tablespoon of ground cinnamon to play off the tart cherries to create a subtle cherry crisp flavor note.
This is a one-bowl recipe that is easy to mix by hand. Simply put all the dry ingredients (except the chocolate chips and dried cherries) in a very large mixing bowl. Whisk together to combine. Then add the wet ingredients. Stir to combine thoroughly, then fold in the chocolate chips and dried cherries.
If you don’t have a cookie scoop, you could take about 1 tablespoon of dough and roll it into a ball. I tested both techniques in the first batch and found that the cookies were more uniform and held together better on the baking sheet when I used the cookie scoop. Another trick for less mess: In addition to lining my baking sheets with parchment paper, I put parchment paper underneath the wire racks. That way any crumbs from the cooling process fall onto the parchment paper.
I also used a food styling trick that I learned watching some Food Network show: reserve some chocolate chips before folding them into the batter. Then put a few chips on top of each dough ball. That way each cookie will have chips on top, making it more visually appealing.
These cookies may look small, but they are dense and chewy. And nearly overflowing with chocolate chips. I rarely recommend “less chocolate” but in this recipe you could easily use half as many chocolate chips as called for in the recipe and you might not notice a difference in the taste.
I decided to call this recipe Jazzy Oatmeal-Chocolate Chip Cookies because with the addition of the dried tart cherries, rolled oats and ground cinnamon, this cookie is anything but boring.
What ingredients would you add to a basic chocolate chip cookie recipe to take it from drab to fab?
Preheat your oven to 350 F degrees. Line a baking sheet with parchment paper. Set aside.
In a very large mixing bowl, combine the oats, flour, brown sugar, baking powder, salt, olive oil, eggs and vanilla. Mix until combined and the dough is moist. The dough will be dense and crumbly. Fold in the cherries and chocolate chips.
Using a cookie scoop, place dough balls (roughly equivalent to 1 tablespoon of dough) on the prepared baking sheets about 1 inch apart.
Bake for 10 to 12 minutes, or until golden. Let cool for a few minutes on the baking sheet before transferring cookies to a wire rack to cool completely.
What do Pussy Riot, Toronto Mayor Rob Ford, Sandra Bullock, The Tonight Show’s Questlove and Pharrell’s big hat have in common? They’re all immortalized in this pop culture “AWE Inspiring Easter Egg Art” video – which totally cracked me up! Pun intended.
I don’t know which of these yolk-filled masterpieces were my favorites. It may be a tie between John Travolta | Adele Dazeem and the always-falling Jennifer Lawrence. Which one is your fave?
Alton Brown, one of my culinary heroes, shows how to perfectly hard cook eggs, no boiling required. This method is especially time-saving when you have a large number of eggs to cook – like when you’re about to color Easter eggs!
Everybunny needs a little extra help and a fresh take in the kitchen when it comes to getting ready for family holiday gatherings, like Easter.
Honestly, I get bored with “traditional Easter” menus. I don’t love ham and I prefer my eggs scrambled or omeletted (yes, that’s a word in my world). Many of the traditional Easter foods I grew up with I just don’t care for as an adult. But that’s not to say that I don’t like to cook with many of the ingredients found in these dishes. I’m simply challenged to find a way to incorporate those ingredients in ways that will excite my palate – and those of the 23 members of my immediate family when we get together for an Easter brunch. [Yes, when the ENTIRE family gets together we have that many in the immediate family, not counting pets!]
So I accepted a challenge to use three varieties of KRAFT #FreshTake Cheese & Breadcrumb mixes to create side dishes for Easter brunch on this #shop for #Collective Bias. But I knew I had to get some help from some bunnies (actually, they’re apricot-fawn pugs) named Baxter and Bing. They are rescues and the MOST FOOD OBSESSED DOGS my vet and dog trainer have ever seen! That’s probably why the universe put us together. Their help in deciding on what to make for an Easter brunch menu is (almost) always invaluable.
Now Baxter and Bing don’t actually help prep any food (I thought I should call that out, as I’ve been told I’m somewhat obsessive when it comes to my dogs). But Bing (the father) and Baxter (the son) may occasionally taste test an ingredient as I cook.
Bing and Baxter aren’t very vocal, unlike their constantly-barking-at-the-wind black pug sisters, Della and Marlo. [Della and Marlo aren’t yet 2 years old, so they’re too young to help out much in the kitchen for now.] But Bing and Baxter can communicate “the world” with a single look, so I pay close attention to their eyes when we “collaborate” on what to make. We “conferred” and decided on using three varieties of KRAFT Fresh Take Cheese & Breadcrumb mixes for our Easter brunch menu:
#FreshTake Italian Parmesan Hasselback Potatoes [Sweden’s version of baked potatoes]
#FreshTake Southwest Three Cheese Stuffed Peppers [hearty enough to be a satisfying entrée on its own]
#FreshTake Cheddar Jack with Bacon Deviled Egg Cups [a modern take on a traditional app]
So it was off to my local Walmart to get the ingredients. You’ll find KRAFT Fresh Take in the refrigerated cheese aisle.
For a limited time, you can save $1.00 on the purchase of any KRAFT Fresh Take Cheese & Breadcrumb Mix and fresh chicken at Walmart. Get your $1.00 coupon here.
Hasselback Potatoes
If you’ve read Baked Chicago before, you may know that I’ve never met a potato I didn’t like. And while I love a good baked potato, it can be kinda boring to serve for a special occasion. But not Hasselback Potatoes, which are Sweden’s version of baked potatoes. They were made popular by the restaurant inside the Hasselbacken Hotel in Stockholm that created the dish.
By using a simple cutting technique (which also helps the potatoes to cook faster) and adding some simple ingredients inside or atop the potatoes while they bake, you have a simply elegant – and unbelievably delicious – potato dish that everyone is going to gobble down at the Easter table. [I guess that’s a better description for the Thanksgiving table, but you know what I mean.]
This dish would also be something that you could cook to impress someone, like a first date, because they look like they would be difficult to make. But they’re not. It’s all in the presentation, and (from where I sit) there’s no need to let them know just how easy it was!
During the cooking process, the potato start to fan out – making for a beautiful presentation on the plate.
Hasselback Potatoes with KRAFT Fresh Take Cheese & Breadcrumb Mix
Rating: 51
Cook Time: 30 minutes
Yield: 6 servings
Ingredients
18 small Yukon Gold potatoes (about 3 pounds), peeled
2 tablespoons unsalted butter, melted
1 package KRAFT Fresh Take Cheese & Breadcrumb Mix, Italian Parmesan Recipe
2 tablespoons extra virgin olive oil
sea salt and ground black pepper, for seasoning
Instructions
Preheat your oven to 400 F degrees. Line a rimmed baking sheet with parchment paper. Set aside.
Place peeled potatoes on a cutting board. Cut a narrow slice from the bottom of each potato to help the potato lie flat; discard the slice.
Place one wooden chopstick (2 total) on each side of the potato, lengthwise. Use a knife to slice each potato crosswise making slices about 1/4-inch apart for the length of the potato. The chopsticks will prevent the knife from cutting through the bottom of the potato. You want to leave about 1/4-inch on the bottom of the potato intact.
After cutting the potatoes, gently rinse them to rid excess starch which can impede fanning. Carefully flex the potatoes while rinsing under cold running water. Dry the potatoes well before baking.
Place the contents of the entire KRAFT Fresh Take Italian Parmesan package in a food processor, along with olive oil. Pulse until well blended.
Brush the potatoes with melted butter. Season lightly with salt and pepper. Pat the prepared KRAFT Fresh Take cheese & breadcrumb mixture on top of each potato.
Place potatoes onto the prepared baking sheet. Cover with aluminum foil and bake for 20 to 25 minutes. Remove the aluminum foil and bake for an additional 5 to 10 minutes, or until they turn crispy and are fork-tender.
Notes
Hasselback potatoes are also known as the Swedish version of baked potatoes, popularized by the restaurant at the Hasselbacken Hotel in Stockholm, Sweden. As the potatoes bake, the slices fan out slightly - making for an elegant presentation.
The next dish I made was a slow cooker version of stuffed peppers. Many cooks use green bell peppers, but I personally think the vibrant colors of the orange, yellow and red bell peppers are much more visually appealing. As a kid, I hated most green vegetables. While my palate grew up, my eyes still find the same green of most vegetables to be quite dull.
Go veggie! You can also turn this into a vegetarian dish by simply eliminating the ground turkey.
What I love best about this recipe is that it’s another slow cooker home run. I have [undiagnosed] adult ADD. So anytime I can put something into the slow cooker and forget it for a few hours, I am so HOPPY…I mean HAPPY!
Ingredients
6 large bell peppers, tops removed and seeded
1 pound ground turkey, browned and crumbled
10 ounces frozen kernel corn
15 ounces black beans, drained and rinsed
14.5 ounces diced tomatoes
1/4 cup chunky salsa
1/4 cup chopped onions
1 cup brown rice, cooked
2 teaspoons Worcestershire sauce
1 package KRAFT Fresh Take Southwest Three Cheese & Breadcrumbs
Directions
In a skillet, cook the ground turkey until browned. Crumble it as you stir. Set aside. Cook the brown rice according to package directions. Set aside. Cut off the tops of each pepper, then core and remove seeds, membranes. Rinse out with cold water. If needed, slice off any uneven portion of the bottoms of each pepper in order for them to lie flat. Set aside.
In a large bowl, combine the ground turkey, corn, black beans, diced tomatoes, salsa, onions, brown rice and Worcestershire sauce until blended. Stuff peppers with mixture and top with KRAFT Fresh Take cheese & breadcrumbs. Stand peppers in a slow cooker. Add 1/2 cup water in the bottom and cover. Cook on low for 6 hours (or on HIGH for 3 hours), or until peppers are tender. Makes 6 servings.
Deviled Egg Cups
The final recipe for my Easter brunch is a twist on deviled eggs. I have always liked the taste of deviled eggs, but I’m not a fan of the rubbery texture that hard-boiled egg whites can sometimes have. Deviled egg cups use phyllo dough for the vessel, so it adds a nice crunchy texture that I find irresistible.
And the filling couldn’t be easier. You essentially puree the hard-boiled eggs (yolks and whites!) and mix in the rest of the ingredients. Then pipe the filling into the phyllo shells and you’ve got a somewhat fancy appetizer that is great for a large gathering.
But don’t forget to garnish with thick-cut bacon. That’s Bing and Baxter’s tip, because they love anything topped with bacon. And I concur.
Ingredients
30 (2 boxes) frozen mini phyllo shells
6 hard-boiled large eggs, peeled
1/4 cup mayonnaise
1 tablespoon lemon juice
1/8 teaspoon ground black pepper
1/4 teaspoon salt
1 package KRAFT Fresh Take Cheddar Jack with Bacon Cheese & Breadcrumbs
5 slices thick-cut bacon, crispy and chopped, for garnish
Directions
Preheat your oven to 350 F degrees. Line a baking sheet with parchment paper. Place the phyllo shells on baking sheet and bake for 5 minutes. Let cool.
In food processor, puree eggs, mayonnaise, lemon juice, pepper, salt and contents of Fresh Take Cheddar Jack with Bacon. Put egg mixture in a resealable plastic bag, cut off tip and pipe into shells.
Garnish with chopped bacon and serve at room temperature. Makes 30 deviled egg cups.
Finally, Some Fun For The Kids
I hope you found some inspiration in these recipes as you prepare your Easter menu. Whether you’re cooking for yourself or for a super-humongous group, make it easy on the chef! Simple can also be delicious and a crowd-pleaser. What’s going to be on your Easter menu this year? Share your comments below.
Dig out the plastic eggs from the basement or attic and get ready for some marathon Easter egg hunts! [For those with kids under age 6, you know what I mean. I have 13 nieces and nephews, of which 8 are under 10 years old. So I’ve hosted my share of egg-citing – and unending – egg hunts. Just don’t forget where you put the eggs. Seriously. Don’t forget.]
Many of my nieces and nephews have iPads and hand-held electronic games, so anything as “manual” as an Easter egg hunt may see alien to them as they get into their teens. I remember as a younger kid that I loved to color with crayons and do word games/puzzles, so I wanted to share with you an Easter coloring page and maze puzzle (both are downloadable PDFs) that you can share.
Who knows? It might just buy you 10 minutes of uninterrupted time in the kitchen. And for that, you’ll thank me!
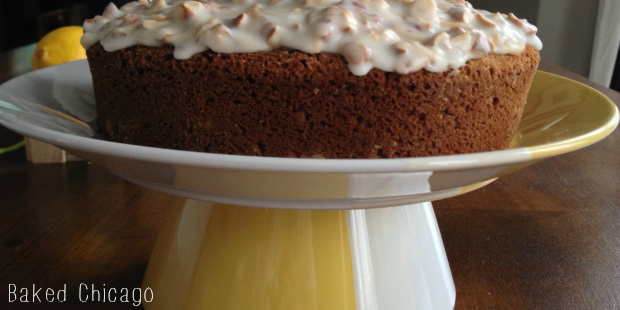
I was shopping in my local Target, getting ready for Easter. I came across some cake stands and I thought it would be nice to have one for a special cake I was making for the holiday. Normally, I’m “no fuss” and I would simply slice and serve a cake right from the pan I baked it in. Call me barbaric! And cheap.
Just as I was about to make a decision to spend $15 to $25 for a cake stand, that I’d maybe use twice a year, I saw this “fancy” cake stand-punch bowl combo. I read the back of the box and saw that by simply inverting the cover to the cake stand that it became a punch bowl. Not quite the Transformers, but still clever. Then I thought to myself that I could use the same principle with a simple plate and matching bowl to create my own DIY cake stand.
The size of the plate and depth of the bowl were critical, so I first found a large plate that had a very modern, spring-like design using yellow and white color blocking. And the matching bowl was very deep. The best part: together they were less than $7. So I easily saved at least $10.
To make this cake stand, all you need is some hot glue or a quick-drying epoxy. Because the plate and bowl are ceramic, be sure to use glue appropriate for that material and surface. Turn the bowl upside down and apply the gluing agent. Then carefully center the bottom of the plate to the bottom of the bowl. Press down to secure, then let dry.
And you have a deliciously simple DIY cake stand to showcase your culinary creations.


 I must admit for most of my adult life I’ve never made spaghetti sauce from scratch. With so many good pre-made sauces on the market, I usually stock up when there’s a sale and (occasionally) doctor it up with some fresh herbs or tomatoes. Can I get an “amen?” Browsing through one of my favorite slow cooker cookbooks –
  The arrabbiata sauce is extremely easy to make. Your slow cooker does most of the heavy lifting. To start the recipe, I browned the onion, bacon and garlic in a skillet – then transferred the contents to my slow cooker. You add all the rest of the ingredients (except for the pasta and meatballs – those come later!) into your slow cooker and give it a good stir. Set it on HIGH and put on the lid. Walk away for 4 to 5 hours and the sauce will be “perfetto!”
  About 45 minutes before your arrabbiata sauce is done, you’ll want to start making the turkey meatballs. I used pre-seasoned panko breadcrumbs with Italian seasoning spices, but you can use standard panko breadcrumbs and add in the Italian seasoning by hand. The mixture of the panko, butter and egg help bind the ingredients, and make for a great carmelized “crust” on the outside of the meatballs. I tend to like larger meatballs, so that requires even cooking. The trick is not to rush the browning process, so never go higher than medium-high heat. I don’t make homemade meatballs that often. Usually, I’ll just brown ground turkey into my sauce and make whatever sauce I’m using a meat sauce. But these turkey meatballs were to die for! Well worth the effort. You may want to make a double batch; they freeze well.
  Cook your pasta according to package directions. I used rotini pasta, but you can easily substitute your favorite pasta or what you have in your pantry. If you’re only having pasta for a meal, I like to use a bowl. It makes it easier to cover the pasta with sauce, without wasting a lot covering the entire length of a plate. Then pile on the meatballs and pour a healthy serving of arrabbiata sauce over it all. Top it with shredded Parmesan cheese and you’ve got a great weekday dinner or weekend lunch that’s good enough for company.
  I ended up adding Cabernet Sauvignon to this arrabbiata sauce recipe to make it “less angry.” What’s your favorite ingredient to add to spaghetti sauce?