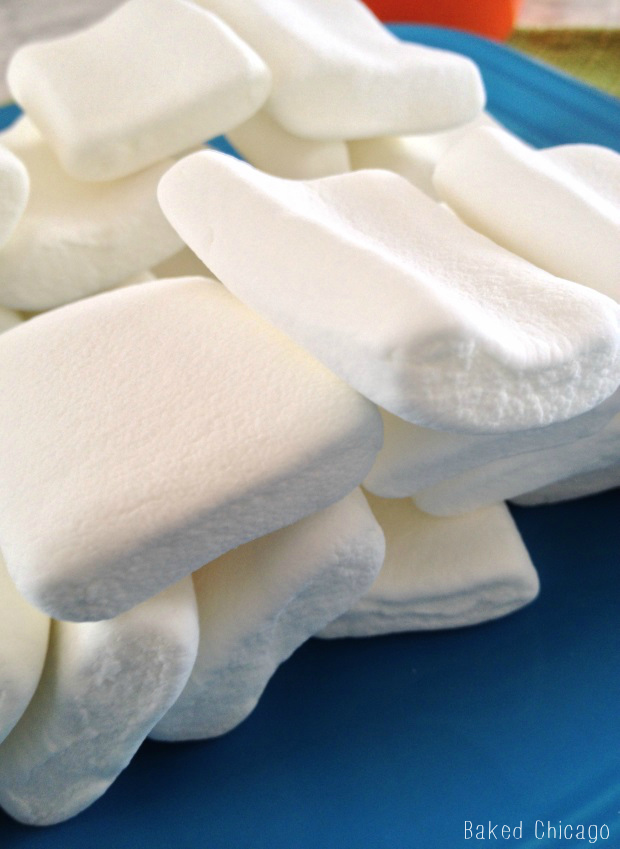
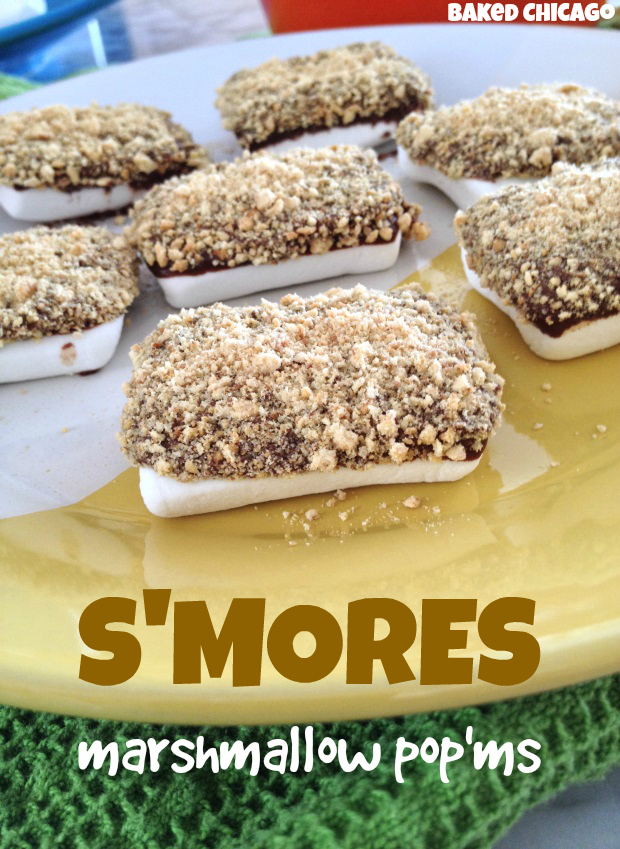
For me, a classic summertime flavor is the s’more. This no-bonfire-required recipe was inspired by the new stackable, flat marshmallows I found at my local grocery.
All you need is three ingredients (chocolate chips, graham crackers and marshmallows) and 90 seconds in the microwave to feed that childhood craving for a sweet treat.
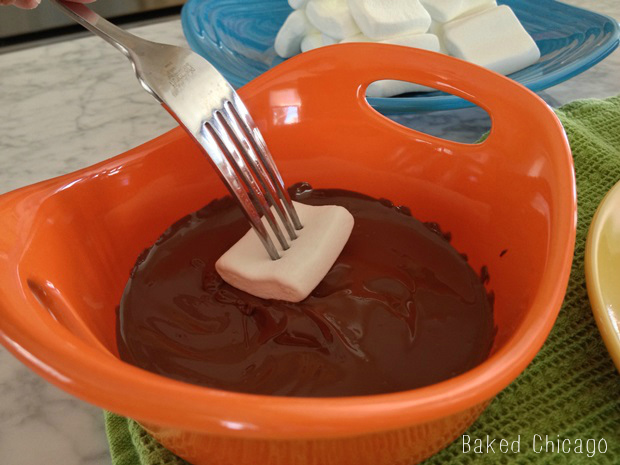
Start by melting a cup of Hershey’s milk chocolate chips in a microwavable ramekin. After 90 seconds, stir the chocolate chips to facilitate the melting. If needed, heat in additional 30-second increments and stir until melted and smooth.
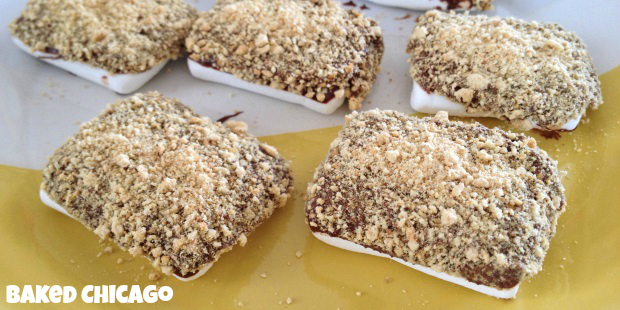
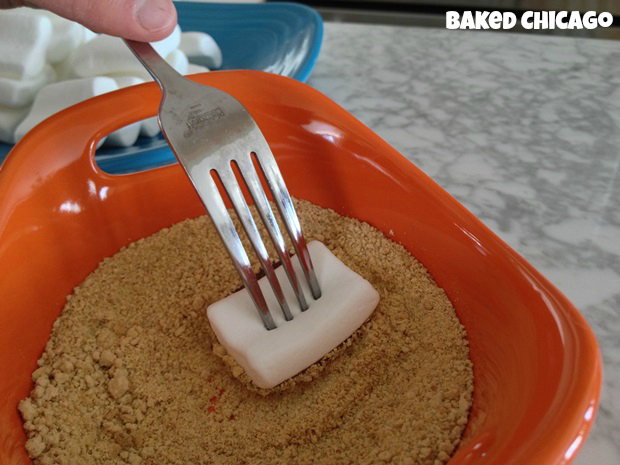
You could use your fingers, but I’ve found that to be really messy. So I recommend taking a small fork and piercing a marshmallow, then dipping it in the chocolate until the bottom is coated.
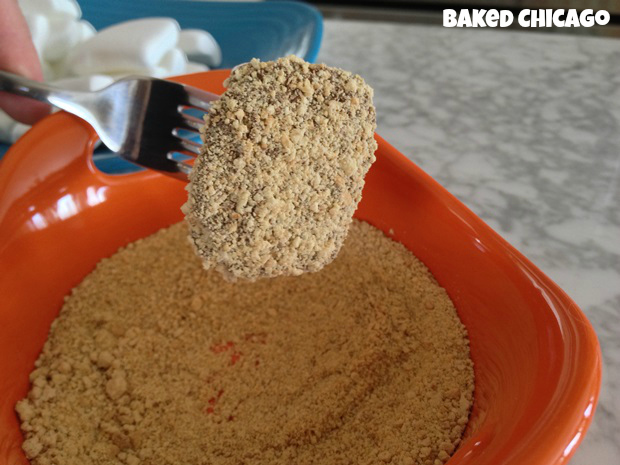
Then dip the marshmallow, chocolate side down, in the graham cracker crumbs.
Shake off the excess crumbs, and set the s’mores marshmallow pop’ms on a plate with the chocolate side facing up. Repeat the process with remaining marshmallows.
Before you know it, you’ve got 2 dozen bite-sized portions of s’mores goodness to share with your family. Or not. That’s totally your call.
Pour the graham cracker crumbs in a ramekin or small plate for dredging. Set aside.
Pour the chocolate chips in a microwavable ramekin. Cook on HIGH for 90 seconds in the microwave. Stir the chocolate chips to facilitate the melting process.
If needed, cook in additional 30-second increments, followed by stirring, until chocolate is melted and smooth.
Using a fork, pierce a marshmallow on one side. Then dip the other side of the marshmallow in the chocolate, followed by dredging in graham cracker crumbs. Shake off loose crumbs, and put on a plate.
Repeat with remaining marshmallows to make 24 s'mores marshmallow pop'ms.
Summer’s end is always bittersweet. While I love fall, I know it means we’re one step closer to winter’s bitter cold. So it’s important to savor the flavors of summer as long as possible.
For me, a classic summertime flavor is the s’more. This no-bonfire-required recipe was inspired by the new stackable, flat marshmallows I found at my local grocery.
All you need is three ingredients (chocolate chips, graham crackers and marshmallows) and 90 seconds in the microwave to feed that childhood craving for a sweet treat.
Start by melting a cup of Hershey’s milk chocolate chips in a microwavable ramekin. After 90 seconds, stir the chocolate chips to facilitate the melting. If needed, heat in additional 30-second increments and stir until melted and smooth.
You could use your fingers, but I’ve found that to be really messy. So I recommend taking a small fork and piercing a marshmallow, then dipping it in the chocolate until the bottom is coated.
Then dip the marshmallow, chocolate side down, in the graham cracker crumbs.
Shake off the excess crumbs, and set the s’mores marshmallow pop’ms on a plate with the chocolate side facing up. Repeat the process with remaining marshmallows.
Before you know it, you’ve got 2 dozen bite-sized portions of s’mores goodness to share with your family. Or not. That’s totally your call.
Pour the graham cracker crumbs in a ramekin or small plate for dredging. Set aside.
Pour the chocolate chips in a microwavable ramekin. Cook on HIGH for 90 seconds in the microwave. Stir the chocolate chips to facilitate the melting process.
If needed, cook in additional 30-second increments, followed by stirring, until chocolate is melted and smooth.
Using a fork, pierce a marshmallow on one side. Then dip the other side of the marshmallow in the chocolate, followed by dredging in graham cracker crumbs. Shake off loose crumbs, and put on a plate.
Repeat with remaining marshmallows to make 24 s'mores marshmallow pop'ms.
The arrival of summer means that s’mores season is in full bloom. It’s almost impossible to ignore the grocery store end-cap displays stacked with Hershey bars, marshmallows and graham crackers. No one ever said s’mores were subtle!
I don’t think I’ve been near a real camp fire since I was a teenager. But that doesn’t mean I don’t enjoy the iconic foods you can make with an open flame. This recipe was inspired by the new stackable, flat marshmallows. You’ve seen them; they’re marketed as an easier way to make s’mores any time of the year. A marketing message I can get behind!
All you need is three ingredients (chocolate chips, graham crackers and marshmallows) and 90 seconds in the microwave to feed that childhood craving for a sweet treat.
Start by melting a cup of Hershey’s milk chocolate chips in a microwavable ramekin. After 90 seconds, stir the chocolate chips to facilitate the melting. If needed, heat in additional 30-second increments and stir until melted and smooth.
You could use your fingers, but I’ve found that to be really messy. So I recommend taking a small fork and piercing a marshmallow, then dipping it in the chocolate until the bottom is coated.
Then dip the marshmallow, chocolate side down, in the graham cracker crumbs.
Shake off the excess crumbs, and set the s’mores marshmallow pop’ms on a plate with the chocolate side facing up. Repeat the process with remaining marshmallows.
Before you know it, you’ve got 2 dozen bite-sized portions of s’mores goodness to share with your family. Or not. That’s totally your call.
Pour the graham cracker crumbs in a ramekin or small plate for dredging. Set aside.
Pour the chocolate chips in a microwavable ramekin. Cook on HIGH for 90 seconds in the microwave. Stir the chocolate chips to facilitate the melting process.
If needed, cook in additional 30-second increments, followed by stirring, until chocolate is melted and smooth.
Using a fork, pierce a marshmallow on one side. Then dip the other side of the marshmallow in the chocolate, followed by dredging in graham cracker crumbs. Shake off loose crumbs, and put on a plate.
Repeat with remaining marshmallows to make 24 s'mores marshmallow pop'ms.
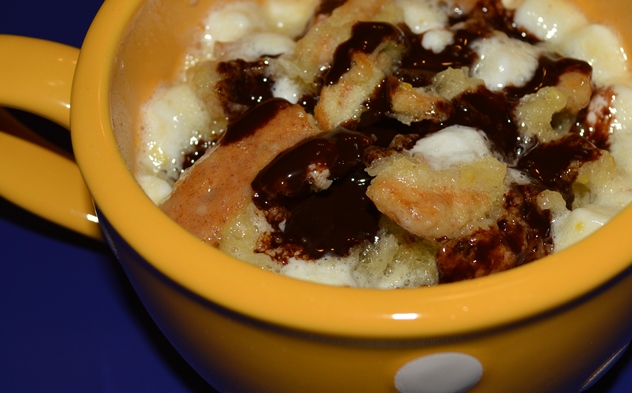
Sometimes cooking isn’t pretty. But that’s okay as long as it’s delicious. And that’s exactly the case here with this recipe for Peanut Butter Lava Mug Cake. It looks like a disaster, but it tastes rich, gooey and delicious.
For all of the peanut butter lovers out there (raise your hands high!), happy National Peanut Butter Lovers Day. In the midst of this cold winter, we get a single day that is meant to satisfy us until we get to Peanut Butter Lovers Month in November. That’s a long time away, but if there’s any food stuff worthy of the wait it’s peanut butter!
Sometimes you want a quick sweet treat but you don’t want to make an entire cake. This mug cake is the best of everything:
Cooks in 2 minutes for the impatient among us
Rich, decadent and uses the same quality ingredients you’d use in a full-size version
Great portion control for anyone who can’t be trusted with more than a single-serving
The “lava” in this recipe is the rich peanut butter that you plop in the bottom of the mug, so when it’s inverted it ends up on top of the cake. Do you wanna go mega-Pompeii-style? Add some chocolate syrup for more choco-lava goodness. Now that’s a delicious disaster I can’t wait to taste!
Spray the inside of a large microwave-safe coffee mug (at least 16 ounces) with non-stick cooking spray.
Place peanut butter in the bottom of the mug. Set aside.
In a small microwavable bowl, add the butter and brown sugar. Heat on HIGH for 45 seconds, then stir with a fork. Mix in the egg and vanilla. Stir in cocoa powder, flour, baking powder, and salt. Stir just until combined. Fold in chocolate chips. Pour batter into coffee mug.
Microwave on 50% power for 2 to 2 1/2 minutes, or until set. Don't overcook. If additional cooking time is needed, do so in 20- or 30-second intervals. Invert mug onto a plate. Serve immediately.
Valentine’s Day isn’t just for lovers anymore. It’s evolved to where we’re encouraged to also show those closest to us how much we care. That might include your mom and dad, brothers and sisters, and sometimes your best girlfriend or even your pet. But don’t forget the ‘littlest Valentines’ living under your roof – aka the kids! They’ll greatly appreciate even a small gesture of how much you love them. This recipe for Chocolate-Raspberry Heart Tarts is a perfect Valentine’s Day breakfast or after-school treat for your rug rats. It’s so easy to make and you can change-up the ingredients to reflect your favorite flavor combinations.
I love the combination of chocolate and raspberry, so I used my favorite raspberry preserves and a new chocolate spread product from Hershey’s. But you could use peanut butter and jelly, banana and chocolate, or just about any flavor combo that your kids will love. And if you go the non-chocolate route, like peanut butter and banana, you could even share a heart tart with your furry, four-legged kids. My four pugs LOVE banana and peanut butter, so I’m going to make one special heart tart for them to share (remembering portion control for my svelte puggies!). That comes down to one heart chamber per pug!
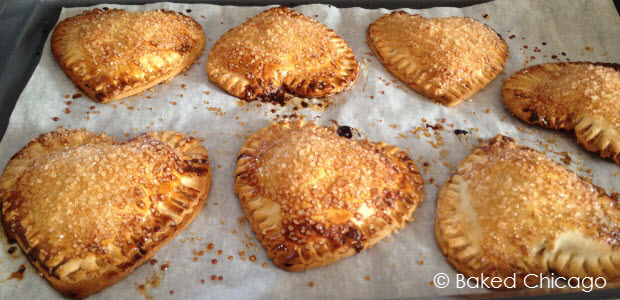
Use a heart-shaped cookie cutter (about 3.5- to 4-inches wide) to cut out your hearts from store-bought pie crust. Arrange them on a parchment paper-lined baking sheet.
Put 1 level teaspoon each of preserves and chocolate spread in the center of each heart. Don’t overfill, or the contents will just burst out during the baking process giving your heart tart a heart attack. Not pretty. Use egg wash to seal the hearts, and crimp the edges with a fork. Brush the egg wash on top of each heart and sprinkle with turbinado sugar.
Bake for about 16 minutes or until golden brown and puffy. Remove from oven and let cool slightly before serving. What a great way for you and your kids to start off Valentine’s Day!
Influencer Disclosure: I was given a free sample of Hershey’s spreads chocolate because I’m a Klout influencer. I am under no obligation to receive this sample or talk about this company. I get no additional benefits for talking about this product or company. All opinions about this product are 100% my own.
Preheat oven to 400 F degrees. Line a baking sheet with parchment paper; set aside.
Beat the egg in a small bowl. Unroll 2 sheets of store-bought pie dough. Using a 3.5-inch heart cookie cutter, cut out about 8 heart shapes from each sheet of pie dough.
Arrange half of the hearts on the prepared baking sheet. Fill the center of each heart with 1 level teaspoon of raspberry preserves and 1 level teaspoon of chocolate spread.
Moisten the edges of the remaining hearts with the beaten egg. Align each heart on top of a heart on the baking sheet. Press firmly around all edges to seal the fillings inside each tart. Crimp the edges with a fork.
Brush the tops with the remaining egg and sprinkle generously with turbinado sugar.
Bake until golden brown and puffed, about 16 to 18 minutes. Do not overbake or the turbinado sugar will burn.
Right now it’s -10 degrees in Chicago (aka #Chiberia) and I am fantasizing about sitting in front of a roaring fire. I don’t have a fireplace so my Vornado space heater under my desk will have to do for now! But if I did have a fireplace, I’d surely be popping some corn or making some toasty s’mores. The perfect fuel to keep warm through this bitter, winter night.
Since this fantasy is not going to happen right now, the next best thing is a microwaveable vessel filled with a deliciously-portioned-for-one s’mores mug cake. Recently, I’ve started playing around with mug cake versions of traditional baked goodies. I’ve been surprised how well the microwave can “bake” some individual cakes and brownies – and I think you’ll find this s’mores mug cake will definitely satisfy a craving for chocolate, graham cracker and hot marshmallow.
Find your largest microwaveable mug; I recommend one that can hold at least 16 ounces. Coat it with non-stick spray for easy cleanup, then mix all the ingredients together in the mug just until combined. Zap it on HIGH in your microwave for about 90 seconds and voila! You’ve got a campfire treat courtesy of your microwave.
Pair a s’mores mug cake with a cup of steaming hot cocoa and you’ll be ready to face the polar vortex head on!
Combine all ingredients in a large microwaveable mug (recommend 16 ounce-size). Whisk well until blended.
Microwave on HIGH for 90 seconds, then check to see if it is done. If not, continue to microwave in additional 30-second intervals. Be careful not to overcook or cake will become rubbery.
Let cool down for a bit (the cake will continue to cook in the mug), then enjoy with a spoon!
If you ever went camping as a kid, you probably made s’mores with the classic Hershey’s milk chocolate bars, graham crackers and toasted marshmallows. And if you did, you probably became (like me) addicted to the iconic flavor combination. So much so that anytime you can recapture that flavor, that special feeling in a recipe you can make in your own kitchen that you jump at the chance. Am I right?
S’mores remind any of us over the age of 35 of a simpler time. Food manufacturers know that, which is why you see so many s’mores flavored versions of products and those gigantic store displays that put all three key ingredients together conveniently. I know I immediately reach for them, even though I haven’t been camping in decades! And I doubt many of us are still going camping, so I’m assuming we’re all just toasting the marshmallows in the fireplace or over the top of our gas cook tops – quietly enjoying s’mores in the “virtual campgrounds” inside our homes.
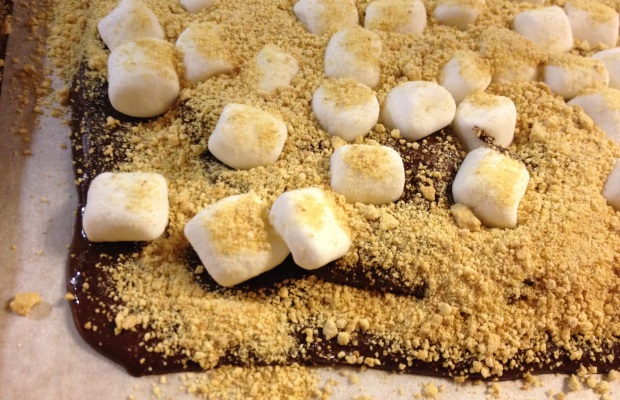
This recipe for cinnamon s’mores bark captures the core ingredients of a traditional s’more and adds a pinch of cinnamon for a modern twist. I will admit that using un-toasted marshmallows means that it cannot truly capture the smoky flavor of a burnt marshmallow inside a gooey, sticky s’more that you remember eating in front of the camp fire. But it’s still quite delicious. And if I can figure out how to toast the marshmallows without melting the chocolate bark holding it all together, I will share that with all of you. Or if you discover a way, please share as well. Until then, we’ll just have to bear the burden (not!) of un-toasted marshmallows in our s’mores bark.
Gently melt the bittersweet chocolate over very low heat, just until it barely melts. You can do this over a hot water bath or in a skillet. I prefer the microwave, heating the chocolate in 30-second intervals just until it starts melting. Then stir with spatula (chocolate will continue to melt as you stir) until completely smooth.
Spread the chocolate on a parchment-lined baking sheet into (approximately) an 8' by 12' rectangle. Allow the chocolate to set, but not harden completely.
Melt the milk chocolate in the same way. Then mix half of the crushed graham crackers thoroughly in the milk chocolate. Spread the chocolate-graham cracker mixture over the bittersweet chocolate layer.
Sprinkle marshmallows and remaining graham cracker crumbs on top, gently pressing them in before they set. Allow the candy to cool until hardened.
Break or cut into chunks. Store in an airtight container for up to 1 week (or freeze for longer storage).
Notes
Adapted from a recipe on the King Arthur Flour website.
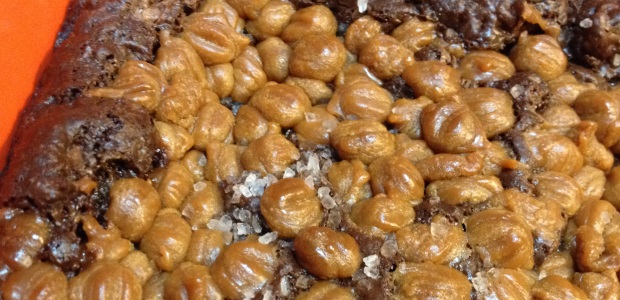
Who doesn’t love Kraft caramels!?! We all grew up with those little tan squares of sugary goodness. As delicious as they are, it can some times be a bit of a chore to unwrap them in bulk for when a recipe calls for caramel. And because making caramel is not difficult to make (it just takes patience and an attentive eye so it doesn’t burn), most of my “from scratch” brownie recipes call for making caramel on the stove top. So when I saw the new Kraft Caramel Bits product at the grocery store, I just had to give it a try by creating a new brownie recipe where caramel is the star of the show. Find the closest store near you carrying this new product (or any Kraft product) using the Kraft Product Locator at http://productlocator.kraftfoods.com/kraftfoods/productlocator.htm.
Start by preheating your oven to 375° F. Lightly grease the bottom of a 13×9-inch baking pan (I prefer to use butter).
In a large bowl, whisk together the cocoa powder, flour and baking powder. Then set aside.
Melt the butter in a medium-sized saucepan over low heat. Add the dark brown sugar, stirring until completely blended with butter. Then stir the flour mixture into the butter. After it is mixed, remove the saucepan from heat and set aside. Note: the mixture at this point will be very dry.
In a medium bowl, whisk together the eggs and vanilla. Incorporate the egg mixture into the brownie batter in the saucepan. I like to take hard sourdough pretzels in a double plastic food bag – so if one bag breaks it doesn’t make a mess – and use a French rolling pin to smash them to bits. It’s a great way to let off some steam, too! Then fold in the crushed pretzels and chocolate chips.
Pour the batter into the prepared baking pan. Spread the caramel nibs evenly over the top of the brownie batter. Sprinkle sea salt evenly over the caramel.
Bake for 25 minutes, or until set. Let the brownies cool completely, about 1 hour. Cut into 6 rows by 4 rows to make 24 brownies.
So what did I think of the new Kraft Caramel Bits? They are a great time saver – and the salted caramel was heavenly in this brownie recipe. I did notice that the caramel bits didn’t lose their shape during the baking process. Because the caramel is on top, the brownies look like they are covered with caramel pebbles. Not a bad thing, but if you prefer a more traditional look to a caramel topping then I’d recommend melting them first in the microwave and then spreading the melted caramel on top of the brownies.
Preheat oven to 350° F. Lightly grease the bottom of a 9x9-inch baking pan with butter or shortening. Whisk together in a large bowl the cocoa powder, flour and baking soda. Then set aside.
Melt butter in a medium saucepan over low heat. Add dark brown sugar, stirring until completely blended with butter. Stir flour mixture into the butter mixture. When mixed, remove from heat and set aside. The mixture at this point will be very dry.
In medium bowl, whisk together the eggs and vanilla. Incorporate egg mixture into brownie batter in the pan. Fold in pretzels and chocolate chips. Pour into the prepared baking pan.
Spread the caramel nibs evenly over the top of the brownie batter. Sprinkle the sea salt evenly over the caramel.
Bake for 30 minutes, or until set. Let brownies cool completely, about 1 hour. Cut into 4 rows by 4 rows to make 16 brownies.
I am known to have sudden, overwhelming and (often) uncontrollable cravings for chocolate. Let’s be honest. The craving is for almost anything sugary-sweet! And a warm, dark chocolate dessert like a chocolate lava cake fits that description quite well.
Usually my chocolate cravings lean toward brownies or slice of cake. But you know what happens if you make an entire pan of brownies or cake – you end up eating the entire thing. Or at least I often do. And then that warm gooey chocolate feeling turns to cold shame because I have trouble turning “off” the sweet tooth switch.
Not everyone has impulse control issues, but I do with food. But I’ve learned that ignoring a craving can often make it worse. So sometimes you just have to say “yes” to chocolate. But you have to do that with purpose and parameters. The best parameter that works for me is portion control. If I only make one serving, I am less likely to over-indulge. So I’m giving you permission (and me, too!) to say “yes” to this chocolate lava cake for one.
Why I love chocolate lava cake for one
it’s lightning fast (you can make it in under 2 minutes in most microwaves)
it’s satisfyingly decadent
it’s actually a large single serving so there’s enough to share without feeling like you’re depriving yourself
the calories can be dialed down by substituting some of the simple sugars (e.g. dark brown sugar) with sugar substitutes (e.g. Splenda) or reducing the amount of chocolate chips and squares
Reminders for making the most of any microwave-in-a-mug recipe
use a large (at least 16 ounces) microwave-safe mug
spray the inside of the mug with non-stick cooking spray for easier clean up
don’t overcook recipes; remember that ingredients will continue to cook inside the mug after the microwaving is done. If you’re unsure how long to cook something based on your microwave’s wattage, cook in 30-second intervals and closely monitor the progress
handle containers with care inside the microwave; use an oven mitt or hot pad to avoid burning your hands
Spray the inside of a microwave-safe mug with non-stick cooking spray. Place 2 chocolate squares in the bottom of the mug.
In a small microwavable mixing bowl, add butter and brown sugar. Heat in microwave on high for 45 seconds. Remove from microwave and stir with a fork. Mix in the egg and vanilla. Stir in cocoa powder.
Add flour, vegetable oil, baking powder, salt and stir until combined. Mix in the chocolate chips. Pour mixture into prepared mug.
Microwave on high for 1 minute 30 seconds to 2 minutes (times may vary based on microwave wattage; do not overcook). Cake will appear lightly moist and will continue to cook in mug.
Invert onto a place. Chocolate lava will flow when mug is removed. Serve immediately, but be careful when eating the hot "chocolate lava."
Notes
Photo by Madison Myers; used with permission. Baked Chicago copyright 2013.
Eggnog isn’t just for drinking. You can also eat your eggnog in this easy holiday recipe for eggnog brownies.
We’ve all done it: we buy a quart of eggnog at the grocery store during the holidays thinking it will be a great treat. You get home and put it in the fridge. Then you forget that it’s there until after the holidays have past by. The good news is that eggnog is a great ingredient to bake with. So before the holiday season totally passes by, challenge yourself to find creative ways to use any leftover eggnog in holiday recipes like these delicious eggnog brownies. This recipe for eggnog brownies is perfect for turning any leftover eggnog into holiday treats that kids and adults will gobble up.
Can I use homemade eggnog to make these eggnog brownies?
What exactly is eggnog? It’s simply a drink made from a mixture of beaten eggs, cream, and sugar, often with alcohol. For a kid-friendly, non-alcoholic version of eggnog brownies, substitute milk or water for the rum. And if you can’t find eggnog in your local market or would prefer to make your own, here’s a great eggnog recipe from Food Network’s Alton Brown. For a more decadent version of eggnog brownies, substitute unsweetened dark chocolate cocoa powder and dark chocolate chunks.
3/4 cup plus 4 tablespoons granulated sugar, divided
1/2 cup dark brown sugar
1/2 cup milk chocolate chunks
1/4 cup rum
16 ounces cream cheese, room temperature
1/4 cup eggnog
1 teaspoon vanilla
1 teaspoon ground cinnamon
1 teaspoon ground nutmeg
confectioners' sugar for dusting
Instructions
Preheat your oven to 350° F. Lightly grease a 9x9-inch baking pan with butter or shortening. Set aside.
Melt butter in a medium-sized microwave-safe bowl. Add rum and 2 eggs to the melted butter. Stir in the flour, baking powder, kosher salt, cocoa powder, 3/4 cup granulated sugar, dark brown sugar and milk chocolate chunks just until combined.
In another medium mixing bowl, whisk the egg yolk until frothy. Stir in 4 tablespoons granulated sugar, eggnog, vanilla, cinnamon and nutmeg. Beat in the cream cheese until the mixture is smooth. The consistency will be like a creamy yogurt.
Spread half of the batter in the prepared baking pan. Top the brownie batter with the cream cheese eggnog mixture, using a spatula to level out the mixture. Spoon the remaining brownie batter over the cream cheese eggnog layer, again using the spatula to spread evenly. Drag the spatula through pan to create a marbled effect.
Bake for 40 to 45 minutes, or until the edges start to move away from the pan. A toothpick inserted in the center of the eggnog brownies should come out almost clean. Cool completely, about 1 hour.
Lightly dust the brownies with confectioners' sugar and cut into 4 rows by 4 rows to make 16 eggnog brownies.
3/4 cup unsweetened dark chocolate cocoa powder, sifted
1 cup all-purpose flour
1 teaspoon baking soda
2 cups and 1/2 cup pretzel twists or sticks, coarsely chopped, divided
1 teaspoon vanilla
4 eggs
pinch of salt
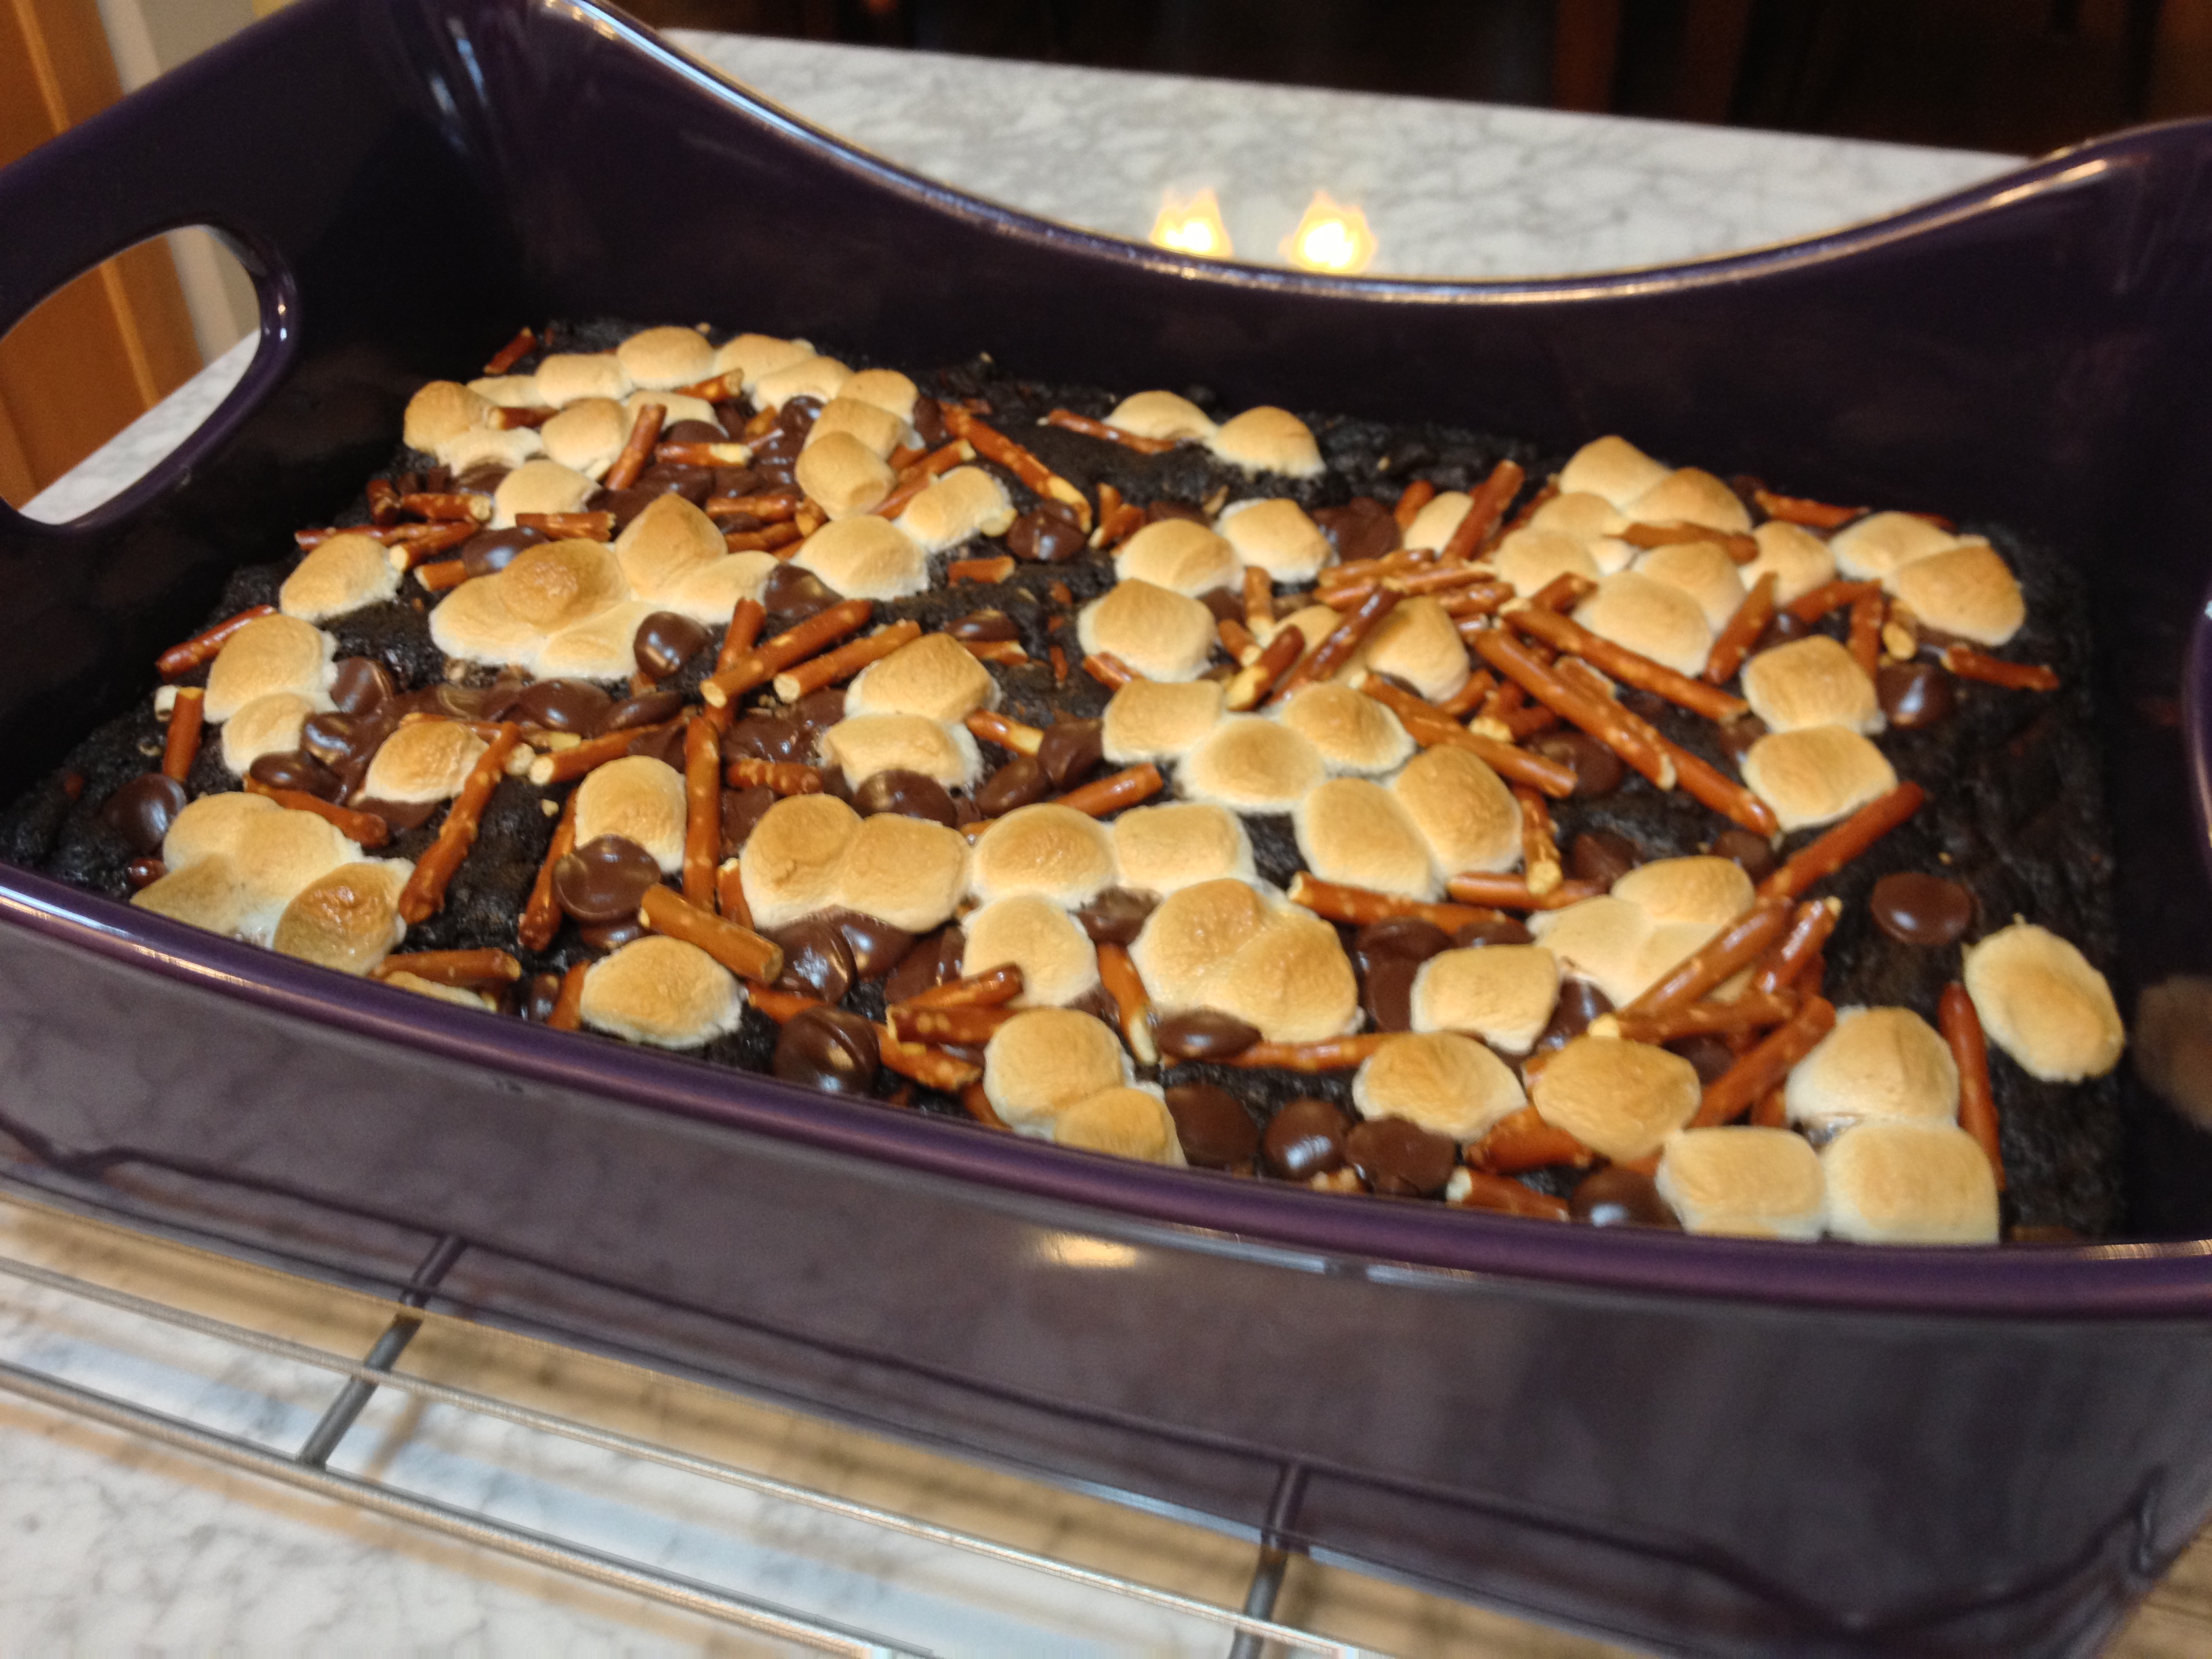
1/2 cup salted peanuts, chopped
1 cup miniature marshmallows
1 cup and 1/2 cup milk chocolate chips, divided
Instructions
Preheat oven to 375° F. Lightly grease bottom of a 13x9-inch baking pan with butter or shortening. Whisk together in large bowl the cocoa powder, flour, baking soda and salt. Then set aside.
Melt butter in a medium saucepan over low heat. Add dark brown sugar, stirring until completely blended with butter. Stir flour mixture into the butter mixture. When mixed, remove from heat and set aside. The mixture at this point will be very dry.
In medium bowl, whisk eggs and vanilla. Incorporate egg mixture into brownie batter in the pan. Fold in 2 cups pretzels and 1 cup milk chocolate chips. Pour into the prepared baking pan.
In medium bowl, stir together marshmallows, peanuts, 1/2 cup pretzels and 1/2 cup milk chocolate chips. Sprinkle evenly over the top of brownie batter.
Bake for 25 minutes, or until set. Let brownies cool completely, about 1 hour. Cut into 6 rows by 4 rows to make 24 brownies.
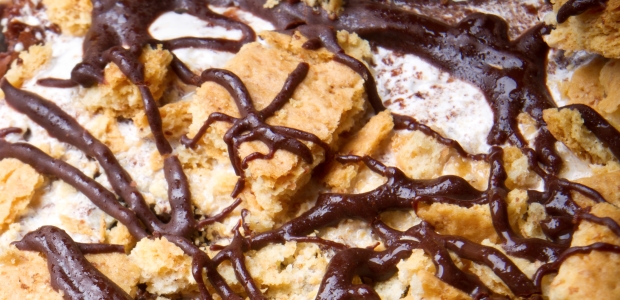
Preheat oven to 350° F. Lightly grease bottom of a 9×9-inch baking pan with butter or shortening.
In medium saucepan, melt the butter and chocolate over very low heat, stirring constantly. Remove from heat and stir in sugar, eggs and vanilla. Mix in flour, just until combined.
Spread half of the batter in the prepared baking pan. Sprinkle the broken graham crackers over the batter. Top the graham cracker layer with marshmallows. Spread the remaining batter on top of the marshmallows and graham crackers, cover them completely.
Bake for 25 minutes, or until set. Cool completely, about 1 hour. Cut into 4 rows by 4 rows to make 16 brownies.
Brownie Points: For a decadent twist, substitute dark chocolate for the milk chocolate.
Ingredients:
1/2 cup butter
2 ounces milk chocolate, chopped
1 cup granulated sugar
9 graham cracker squares, broken into bite-sized chunks
2 eggs
1 teaspoon vanilla
3/4 cup all-purpose flour
1 cup miniature marshmallows