Browsing Tag:

featured

Desserts/ Gifts & Gadgets

Holiday Survival Kit: Harvey’s Brownie Mix in a Jar

Open in case of emergency! Or when hungry…

We all know the holidays can be stressful for many reasons. You’ve got present shopping, holiday cards to write and mail, office or neighborhood holiday parties to attend, laundry and luggage to ready for holiday travel, putting newspaper and mail deliveries on hold, and much, much more on your To Do List this week.  That’s why your pantry needs (at least one, if not a half-dozen) Brownie Mix in a Jar on hand — much in the same way you have an emergency kit in your car or a fire extinguisher in your kitchen. You just never know when you’re going to need the kind of help that only a fresh, homemade brownie can deliver!

This Brownie Mix in a Jar can help you survive the holidays – and every day – in a number of ways, including as a:

  • Perfect last-minute hostess gift
  • Welcome to the neighborhood gift
  • Grab bag gift for the office party
  • Holiday gift for the letter carrier
  • A great way to personalize a holiday bonus for the dog walker
  • Gift any time of the year for that homesick college student (especially during midterms or finals)

In about 10 minutes of time and about $3 for ingredients (not including cost of airtight container or wrapping), you can have a great gift that reflects your personality and that everyone will appreciate. I started this tradition several years ago with family and friends, and quickly learned that it also inspired them to do more baking from scratch. When the ingredients are already on hand and ready to go, it’s so easy – and often more delicious – to bake from scratch. That’s what this Brownie Mix in a Jar gift can do for the recipient: inspire them to be more creative in the kitchen.

I suggest buying a case of one-quart canning jars (about $24 for 12) and making a batch of 12 to have on hand for easier gifting. Buying the canning jars and dry ingredients in bulk will also lower your overall costs. It will also ensure that you have one on hand for your own personal brownie emergencies!

brownie mix in a jar ingredients


Holiday Survival Kit: Harvey

10 minutes

Holiday Survival Kit: Harvey

Ingredients

1 quart- or 3/4-liter-sized airtight container
1/2 teaspoon baking powder
1/2 teaspoon salt
3/4 cup granulated sugar
1/2 cup chocolate chips or chunks
1/2 cup dark brown sugar

Instructions

Organize all of your dry ingredients, including measuring cups and spoons.

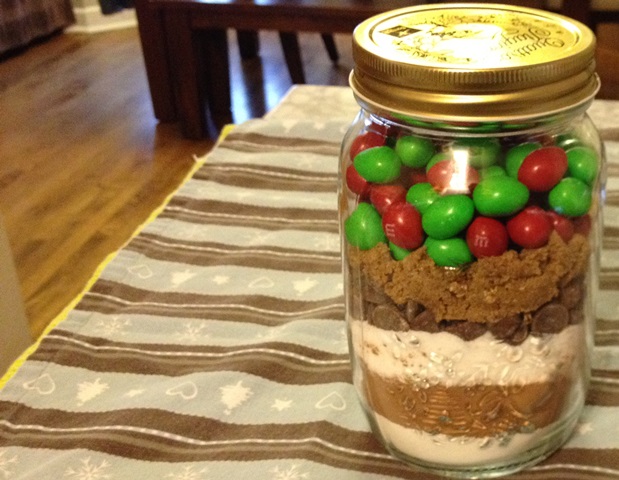
In a clean, airtight container (such as a jar), layer the dry ingredients in the order listed starting with flour and ending with M&M's®. As you add each layer, tap the sides of container to level ingredients. Seal the container and set aside.

Personalize and print out the preparation and baking instructions (below) to accompany the brownie mix jar.

DIRECTIONS FOR HARVEY'S BROWNIE MIX:

Add to dry mix:

- 1/2 cup butter

- 2 eggs

- 2 ounces milk or water

Preheat oven to 350 F degrees. Grease the bottom of an 8x8-inch or 9x9-inch baking pan.

Melt 1/2 cup butter. Mix melted butter, 2 eggs and 2 ounces of milk in medium bowl with spoon until blended. Stir in dry contents of the brownie mix, until moistened. Batter will appear slightly lumpy. Spread batter into prepared pan.

Bake for 30 to 35 minutes, or until dry around edges and toothpick inserted comes out almost clean. Cool completely, for about an hour. Cut into 4 rows by 4 rows to make 16 brownies.

Notes

Personalize as you wish to create a gift that reflects your personality. For example, you could swap the chocolate chips for peanut butter chips OR swap the peanut M&M's® for chopped walnuts. One of my favorite versions of this brownie mix swaps out the milk for raspberry liqueur and the peanut M&M's® for fresh raspberries.

http://bakedchicago.com/holiday-survival-kit-brownie-mix-in-a-jar/


Breakfast

Cinnamon Caramel Apple Coffee Cake

cinnamon caramel apple coffeecake

This recipe for cinnamon caramel apple coffee cake was inspired while I was surfing Facebook and came across Krusteaz‘s Seize the What If Virtual Bake-Off. It allowed you to mix and match ingredients to create your own recipe using one of their boxed mixes as the canvas. While I usually bake from scratch, Krusteaz is a “go to” brand for me to whip up a quick coffee cake. Their virtual bake-off had you select one of their mixes, so I chose my favorite Cinnamon Swirl Crumb Cake & Muffin mix.

Then it asked you to pick three ingredients to add to the mix.  Normally, I’d add some cherry pie filling to this mix for a satisfying cherry cinnamon coffee cake. But my second ingredient was going to be a new product, Kraft Premium Caramel Bits. I had recently used them in a Salted Caramel & Pretzel Brownies recipe, and I had a bag left over. So I went with the apple pie filling to pair with the caramel. Remembering the Salted Caramel & Pretzel Brownies gave me “salt on the brain.” So I thought I’d attempt one of my all-time favorite flavor combinations: caramel apple with peanuts.

I recommend eating this while it’s still warm from the oven (or reheat in the microwave) and pairing it with a mug of rich, hot cocoa (using milk, not water!) or a strong cup of coffee. Cinnamon Caramel Apple Coffee Cake is true comfort food on a day like today: the winter solstice and both the shortest day [and longest night] of the year.

Cinnamon Caramel Apple Coffee Cake

10 minutes

Cook Time: 40 minutes

Yield: 9 servings

Cinnamon Caramel Apple Coffee Cake

Ingredients

2/3 cup water
1 egg
2 cups
1 cup (approximately half of an 11 oz bag) Kraft Premium Caramel Bits
1/2 cup dry roasted peanuts, chopped

Instructions

Preheat your oven to 350F degrees. Lightly grease an 8x8-inch baking pan.

In a medium mixing bowl, stir together the water, egg and cake mix until moistened. Do not overmix. Batter will be slightly lumpy. Set aside.

In a small mixing bowl, thoroughly combine the apple pie filling, caramel and chopped peanuts. Set aside.

Spoon half of the batter into the prepared baking pan and spread evenly. Drop the apple-caramel mixture by tablespoonfuls evenly over the batter.This mixture will be thick and clumpy. As needed, gently spread it out so every piece of coffeecake will have elements of the apple-caramel filling.

Drop the remaining batter in small spoonfuls over the apple-caramel mixture. Spread the batter to the edges of the pan. Sprinkle the cinnamon topping evenly over the batter.

Bake for 40 minutes, or until a toothpick inserted in the center comes out almost clean. Cool for at least 10 minutes before cutting.

http://bakedchicago.com/cinnamon-caramel-apple-coffee-cake/

Desserts

Red Velvet Cake with Eggnog Frosting

red velvet cake with eggnog frosting

I admit that the popularity of red velvet cake is a bit lost on me. I can appreciate its deep roots in Southern cuisine. As the story goes, during the Great Depression (not the Great Recession of 2008!), a Texas-based company – Adams Extract & Spice Company – created a moist, noticeably flamboyant red cake in an attempt to lure back customers to their products. You can imagine during the Great Depression that simple ingredients like butter, eggs and cream cheese where expensive and often saved for special occasions. Well, the Adams Extract & Spice Company is still around today and their red velvet cake creation is a star in the culinary world.

I think the reason why I’ve always been surprised by how popular red velvet cake has become is because I’m constantly breaking down recipes and rebuilding them with my favorite ingredients. And when I break down the basics of a classic red velvet cake recipe, once you take out the MASSIVE amounts of red food coloring and the vinegar, the remaining ingredients are fairly standard for any chocolate cake recipe. So from one baker to another (Adams Extract & Spice Company), my hat is off to their genius. With the right leverage of two simple ingredients, they created a new dessert unlike anything before seen.

Red Velvet Cake with Eggnog Frosting

What I like about this red velvet cake with eggnog frosting recipe is the liberal use of cream cheese and bourbon. Cream cheese frosting is always so delicious but when you throw in eggnog and a healthy “splash” of bourbon, it becomes – wait for it – legendary. About a month ago, I was making a microwave-in-a-mug version of red velvet cake (that I’ll share at another time with y’all) for my niece. She ADORES red velvet cake. But she was also dumbfounded by how much red food coloring goes into the recipe to the point where I think she (almost) reconsidered her passion for it. When I explained to her that “red velvet” is more of a “look” than a flavor for a cake, she gave me this perplexed look. So she asked, “what does red velvet taste like to you?” What popped into my mind immediately was the word “bourbon.”  I kept that to myself (she’s still impressionable). So I wimped out and said something like, “well I’m not sure but it doesn’t taste red and it doesn’t take like velvet.”

Red Velvet Cake with Eggnog Frosting

Cook Time: 20 minutes

Yield: 6 to 8 servings

Ingredients

For the Red Velvet Cake:
1/2 cup butter, room temperature
1 cup granulated sugar
1/2 cup dark brown sugar
2 large eggs
2 ounces red food coloring
2 1/2 cups all-purpose flour
3 tablespoons unsweetened cocoa powder
1 teaspoon baking soda
1/2 teaspoon kosher salt
1 cup buttermilk
1 tablespoon apple cider vinegar
1 teaspoon vanilla extract
For the Eggnog Frosting:
1 cup butter, room temperature
4 ounces cream cheese, softened
9 cups confectioners' sugar
1/2 cup eggnog
3 tablespoons bourbon
ground nutmeg for garnishing

Instructions

Preheat your oven to 350F degrees. Grease three (3) 9-inch round cake pans with butter and dust with flour. Set aside.

In a large mixing bowl, beat together the butter and sugars on high speed with an electric mixer until fluffy. Add eggs, one at a time, beating well after each addition. With mixer on low speed, beat in food coloring.

In a medium bowl, whisk together the flour, cocoa powder, baking soda and salt. Add the flour mixture to the butter mixture in thirds. Alternate with the buttermilk, beginning and ending with the flour mixture. Add vinegar and vanilla. Beat just until blended. Divide the batter evenly among the prepared pans.

Bake for 18 to 20 minutes, or until a wooden toothpick inserted in the center comes out clean. Let cool in pans on a wire rack for 10 minutes. Remove from pans and let cool completely on the wire rack.

While cooling, prepare the eggnog frosting in a large blow. Beat the butter on medium speed with an electric mixer until smooth. Add the cream cheese, beating until blended and smooth. Reduce the mixer speed to low. Gradually add in the confectioners' sugar, eggnog and bourbon. Beat until blended. Use as room temperature when frosting the cake.

Spread the eggnog frosting between the layers and on the top, sides of the cake. Garnish with ground nutmeg. Store covered in a refrigerator for up to 2 days.

Notes

This recipe adapted from Taste of the South's Southern Christmas magazine.

http://bakedchicago.com/red-velvet-cake-with-eggnog-frosting-2/

Award-Winning Recipes/ Entrees

Ground Turkey, Edamame & Brown Rice: Harvey’s One-Skillet Wonder

Ground Turkey, Edamame & Brown Rice One-Skillet Wonder

I grew up loving all the “meal helper” products that were first introduced in the 70’s. If you’re old enough to remember the introduction of Hamburger Helper, you may recall how ‘innovative’ it seemed back then. But after college when I was responsible for making my own meals, I realized that some of the “cheesy powders” and other pre-mixed ingredients probably weren’t the healthiest things to eat – especially because I couldn’t tell what was really in them.

But it wasn’t just the taste of Hamburger Helper that I loved, it was also the convenience of cooking everything in one skillet. After learning how to cook with whole or less-processed ingredients, I started to create my own homemade version of a “helper” dish which has become my go-to main dish to make any day of the week. It’s hearty, satisfying and filled with ingredients that everybody in the family loves – even my nieces and nephews!

I submitted this recipe in the Outlook.com Healthy Recipe Challenge earlier this fall and was excited when it was selected as one of the five finalists. While it didn’t win the recipe challenge (turkey nachos reigned supreme!), it is a recipe that is so versatile. I can make a large batch on Sunday and have enough for Sunday dinner and four more lunches/dinners throughout the week. It also freezes well for when you need to dive into the freezer to save dinner.

Ground Turkey, Edamame & Brown Rice: Harvey's One-Skillet Wonder

Cook Time: 35 minutes

Yield: 4 servings

Ground Turkey, Edamame & Brown Rice: Harvey's One-Skillet Wonder

Ingredients

1 pound ground turkey (93% lean)
1 tablespoon minced fresh onion
1 tablespoon shredded fresh basil
1 tablespoon chopped fresh oregano
32 ounces vegetable or chicken broth
16 ounces edamame, shelled
1 1/2 cups instant brown rice
10 3/4 ounces cream of mushroom soup (preferably low sodium, low-fat)

Instructions

In a large skillet, begin to brown the ground turkey on medium-high. Pour in the broth and, using a cooking spoon or spatula, start to break up the meat. Add in the onion, basil and oregano. Stir regularly until the skillet starts to boil.

Then add in the edamame and brown rice. Stir until well mixed, making sure there is still enough broth to cover the ingredients. If necessary, turn down the heat to allow for the dish to simmer on the stove’s burner. Typically, it should take about 15 minutes or so for the rice and edamame to properly cook and absorb the broth. Stir regularly to ensure even cooking.

Watch the level of broth in the skillet. As soon as it almost disappears, remove the skillet from the burner and stir in the cream of mushroom soup until well blended.

http://bakedchicago.com/ground-turkey-edamame-brown-rice-one-skillet-wonder/

Award-Winning Recipes/ Breads

Bonfire® Bacon Popovers

Bonfire Bacon Popovers

For as much as I like to bake sweet treats, I often find the challenge of savory baked goods to be more rewarding. Perhaps it’s because when spices are on the center stage in a recipe there can be so many more possibilities to explore with a flavor profile.

When it comes to condiments or spices (and minerals in the case of salt!), I am a purist at heart. I don’t have ketchup in my home, and the only time I recall happily eating ketchup is on a Burger King Whopper. [The sugar in the ketchup is a nice balance to the pickle.] But in my pantry, you’ll easily find about five varieties of mustard and a number of different barbecue sauces. And – of course – freshly ground black pepper is a constant favorite as a cook and an eater!

I am a long-time fan of using sea salt and kosher salt in recipes, so when I heard about the SaltWorks Fall Recipe Contest I decided to give it a shot. I dusted off six years of recipes from the Baked Chicago blog and found a bacon popover recipe I created about one year ago in which black pepper was the lead ingredient. So I re-envisioned the recipe with smoked salt as the main ingredient to compliment the smokiness of the bacon. And as any good popover recipe does, it also has lots of butter. The result is this recipe for Bonfire® Bacon Popovers, which placed as a runner up in the SaltWorks recipe contest. The coolest thing about being a runner up is the prize: a bamboo salt sampler case filled with 24 artisan salts. I can’t wait to experiment with the Hiwa Kai – Hawaiian Black Lava Salt; maybe I’ll need to schedule a working vacay to Hawaii to do some “research.” That’s the ticket!

Bonfire® Bacon Popovers

Cook Time: 30 minutes

Yield: 12 servings

Ingredients

2 cups all-purpose flour
1 tablespoon Bonfire® Extra Bold Smoked Sea Salt
1 teaspoon black pepper
8 slices bacon, cooked crisp and coarsely chopped
3 large eggs
2 1/2 cups whole milk
3 tablespoons butter, melted

Instructions

Preheat your oven to 425° F. Generously butter a popover pan (or standard muffin tin with 12 cups), and set aside.

Cook the bacon in a skillet over medium-high heat until crispy. Remove the bacon from the pan and let cool. Coarsely chop the bacon into small bacon bits and set aside.

Whisk together the flour, Bonfire® Extra Bold Smoked Sea Salt and black pepper in a medium bowl. In a separate large bowl, whisk the eggs and milk together until well blended. Gently whisk in the flour mixture, followed by 3 tablespoons of melted butter. Gently fold in the crispy, chopped bacon. Do not overmix.

Pour batter into the prepared popover pan, filling about 3/4 full and dividing equally. Bake the popovers for 30 minutes, or until puffed and golden brown. The popovers should be crispy around the edges. Using a spatula, remove popovers from the pan and serve immediately.

http://bakedchicago.com/bonfire-bacon-popover/

Desserts

The Great Food Blogger Cookie Swap 2013: Soft-Baked Gingersnap Molasses Cookies, 3 Ways

cookie swapThis past year has been filled with many extraordinary experiences for the Baked Chicago blog, from publishing my first cookbook to winning grand prize in the State of Louisiana’s Sweet Potato Recipe Contest. And participating in the 3rd Annual Great Food Blogger Cookie Swap ranks right up there among them all because so many passionate food bloggers came together to support a great cause and to spread some baking love around the world.

The Great Food Blogger Cookie Swap brings together food bloggers from all over the world in celebration of all things cookie. This is my first year participating; last year the Great Food Blogger Cookie Swap had nearly 600 participants and raised $4,400. For 2013, there were 619 confirmed participants in 8 countries, and together with our phenomenal partners (OXO, Dixie Crystals, Gold Medal Flour and Grandma’s Molasses) we raised over $13,000 for Cookies for Kids’ Cancer.

The premise is simple: bake 3 dozen cookies using a new recipe that you’ve not tried before. You’re matched up with three other food bloggers to whom you’ll send one dozen cookies. The food bloggers get to stretch their creative muscles by trying out a new recipe and in return get one dozen cookies from three other food bloggers. In the process of learning and sharing, you also get to know (perhaps for the first time) three other incredible food bloggers who share you passion for baking and blogging.

I found my inspiration for my cookie recipe from one of my favorite blogs, Sally’s Baking Addiction. I’ve done crunchy gingersnap and molasses cookie recipes galore, but (to my surprise) I’ve never done a soft-based gingersnap molasses cookie. When I got Sally’s recipe for soft-baked gingersnap molasses cookies 4-ways, I had to try it – giving it my own stamp of individuality with some of my favorite cookie garnishes. I decided to do the recipe three ways:

gingersnap molasses original

Original

gingersnap molasses with dark chocolate2

Topped with Bittersweet Chocolate

gingersnap molasses with dark chocolate and granola topping

Topped with Bittersweet Chocolate and Dark Chocolate-Cranberry Granola Clusters

This recipe makes about 5 dozen cookies. If you don’t need that many, simply halve all of the ingredients to get about 2 1/2 dozen cookies. I recommend getting all of your ingredients in place, measured first to make execution easy and seamless. You’ll want to work with the dough chilled to make it easier to shape and manipulate. And you’ll want to work quickly when adding toppings after the baking process because you want the heat of the cookies fresh out of the oven to melt the chocolate.

Start by whisking together all of the dry ingredients in a large mixing bowl. Set aside. Cream the butter in the bowl of your stand mixer. Then add the brown sugar and beat until fluffy. Add molasses, egg and vanilla, beating well. Slowly add dry ingredients, on low-speed. DO NOT OVERMIX. Cover the bowl with plastic wrap and chill for at least 2 hours.

use small cookie scoop

roll cookie ball in sugar

flatten cookie balls and slight indent

Preheat your oven to 350F degrees. Using a cookie scoop for consistent cookie sizing, shape the dough into 1-inch balls. Roll cookie balls in granulated sugar. Place on prepared baking sheets and flatten with your thumb, leaving a slight indentation.

Bake one sheet of cookies at a time for about 12 minutes, or until edges are brown. Cookies will be puffy and appear soft in the middle. Remove from the oven and immediately press four chocolate chips into the center of the cookie and allow them to melt.

After a few minutes, transfer to a wire rack to cool completely. With the back of a teaspoon, smooth out the melted chocolate. Add one heaping teaspoon of the granola on top of the melted chocolate. Let cool completely before storing in an airtight container.

Soft-Baked Gingersnap Molasses Cookies, 3 Ways

Cook Time: 12 minutes

Yield: 5 dozen cookies

Soft-Baked Gingersnap Molasses Cookies, 3 Ways

Ingredients

2 teaspoons baking soda
4 teaspoons ground ginger
1 tablespoon ground cinnamon
1/2 teaspoon ground cloves
1/2 teaspoon nutmeg
1/2 teaspoon kosher salt
1 1/2 cups unsalted butter, room temperature
1 1/2 cups dark brown sugar
2 eggs, room temperature
4 teaspoons vanilla extract
2/3 cup granulated sugar, for rolling

Instructions

In a large mixing bowl, combine the flour, baking soda, ginger, cinnamon, cloves, nutmeg and salt. Set aside.

In the bowl of a stand mixer, cream the butter for about 1 minute on medium speed. Add the brown sugar and beat until fluffy. Scrape down sides of the bowl, as needed. Add the molasses, egg and vanilla. Beat well.

Slowly add the dry ingredients to the wet ingredients, on low speed. Be careful not to overmix. Cover the dough with plastic wrap and chill for at least 2 hours (and up to overnight).

Preheat your oven to 350F degrees. Line two large baking sheets with parchment paper.

Take cookie dough out of refrigerator. Shape the cookie dough into 1 1/2-inch balls. I use a cookie scoop for consistent cookie sizing. Roll the cookie balls in granulated sugar. Place on the prepared baking sheet, about 2 inches apart. Lightly flatten cookies with your thumb, leaving a slight indentation to hold topping (applied after baking).

Bake for about 12 minutes, or until edges are just turning brown. The cookies will be puffy and appear soft in the middle. Remove from the oven and immediately add topping(s), as desired. Press 4 chocolate chips into the center of the cookie and allow to melt.

After a few minutes, transfer to a wire rack to cool completely. At this point, take a teaspoon and use the back of the spoon to smooth out the melted chocolate. Add about 1 heaping teaspoon of the granola, if desired, on top of the melted chocolate.

Store in an airtight container for about one week at room temperature.

Notes

Adapted from a recipe by Sally's Baking Addiction

http://bakedchicago.com/soft-baked-gingersnap-molasses-cookies-3-ways/

Contests & Promotions

Happy National Brownie Day!

12-8-2013 8-49-47 AMTo celebrate, Baked Chicago is giving away digital copies of the Simply Decadent Brownies Cookbook – Amazon’s top-rated chocolate desserts cookbook for 13 months and going!

Simply sign up for email alerts (sign up box is in the right channel) and you’ll get a digital coupon to download a copy from the Baked Chicago Online Store.

Desserts

Gingerbread Brownies Recipe, available exclusively on Yummly!

gingerbread brownies

As the holidays fast approach, certain flavors like pumpkin, peppermint and gingerbread take center stage in a variety of kitchen creations. To kick off the holiday baking season and to celebrate the start of the 7th year of the Baked Chicago blog, you’ll find my Gingerbread Brownies recipe exclusively on Yummly. This gingerbread brownie recipe is an easy way to get your gingerbread fix in a simply decadent (and deliciously easy) dessert that you can make any night of the week. Click here for the recipe.

Desserts

Black Raspberry Liqueur-infused Coconut Macaroons

coconut macaroons

Why limit yourself to just drinking if you can also “eat your liquor?”

On this National Cookie Day (yes, some genius made today an annual homage to the most portable dessert invented!), that’s the question! My favorite liquor to drink is champagne, but my favorite liqueur to bake with is Chambord. Do you have a favorite alcohol you like to cook with? Share it in the comments section of this post for a chance to win the Rachael Ray Oven Lovin’ Nonstick Bakeware Collection or a copy of Baked Chicago’s Simply Decadent Brownies Cookbook.

What I love about this recipe for Black Raspberry Liqueur-infused Coconut Macaroons is the texture of the flaked coconut. It’s crispy on the outside and lightly chewy on the inside, which is filled with black raspberry goodness. Don’t confuse macaroons with the French macaron, which I did for years. Besides a similar size and spelling, they are quite different. A macaroon typically refers to moist, dense coconut but it’s also a generic term that can apply to a number of small confections. The coconut macaroon, or congolais, as it’s known in France, is frequently served during Passover because it contains no flour.

For some holiday visual flair, you could add some red or green food coloring to the coconut flakes. Now that’s festive!

Black Raspberry Liqueur-infused Coconut Macaroons

Cook Time: 15 minutes

Yield: 2 dozen cookies

Black Raspberry Liqueur-infused Coconut Macaroons

Ingredients

4 egg whites
2/3 cup granulated sugar
1/4 teaspoon sea salt
1/4 teaspoon almond extract
12 ounces Bob's Red Mill Flaked Coconut, unsweetened
1/2 cup all-purpose flour

Instructions

Preheat your oven to 350F degrees. Line two baking sheets with parchment paper.

In a small bowl, whisk together egg whites, sugar, liqueur, salt and almond extract until blended.

In a large bowl, toss the coconut flakes with flour. Then stir in the egg white mixture.

Drop by tablespoonfuls about 2 inches apart onto prepared baking sheets. Bake for 15 - 18 minutes, or until tops are lightly browned. Remove from pans and let cool completely on a wire rack.

Store in an airtight container. Makes about 2 dozen cookies.

Notes

This recipe adapted from Lime & Gin Coconut Macaroons by Milissa Kirkpatrick of Angel Fire, New Mexico, as it appeared in Taste of Home magazine (November 2013).

http://bakedchicago.com/black-raspberry-liqueur-infused-coconut-macaroons/


Entrees

Stir Fry Italian-style Chicken with Sun-Dried Tomatoes and Petite Green Beans

italian chicken french green bean stir fry

More turkey, stuffing or yams, anyone? Not me! At least for a few weeks. As much as I love a traditional Thanksgiving menu, I hate having leftovers that last into the new week. So my answer is to pull some staple ingredients from my freezer and create a quick, healthy one-pot meal that reboots my palate.

This stir fry combines one of my favorite proteins (chicken breast) with sun-dried tomatoes (which I adore) and petite green beans. Though I am not a traditional green bean fan, I really enjoy petite green beans.  They’re so “petite” and when properly seasoned with fresh black pepper and olive oil they are delicioso!

Stir Fry Italian-style Chicken with Sun-Dried Tomatoes and Petite Green Beans

Stir Fry Italian-style Chicken with Sun-Dried Tomatoes and Petite Green Beans

Ingredients

extra virgin olive oil
kosher salt
fresh black pepper

Instructions

In a large skillet, cook the green beans - just covered in water - on medium high. Let boil for about 4 minutes, stirring regularly. Then blanch the green beans by adding cold water to halt the cooking process and keep the beans as green as possible. Drain the water from the pan and move it back to the stove top.

Add the chicken breast strips and sun-dried tomatoes. Generously pour olive oil over the contents and stir to coat. Heat on medium-high until chicken starts to sear, stirring regularly.

Remove from heat and serve immediately. Season to taste with salt and pepper.

http://bakedchicago.com/stir-fry-italian-style-chicken-french-style-green-beans/

Breakfast/ Gluten-Free

Blueberry Coconut Muffins [gluten-free]

gluten-free blueberry coconut muffins

As the holiday season kicks into high gear, it’s easy to “fall off the wagon” with so many butter-rich, delicious baked goods surrounding you at office parties, family gatherings and such.  One of the strategies I use to combat this potential problem is to volunteer to bring baked goods from my kitchen. That way I can control the quality of ingredients, especially their nutritional value, and ensure that there will be something delicious and nutritious available for me to snack on and for others to enjoy.

Blueberry coconut muffins are a satisfying breakfast option during the holidays or a weekend brunch. Or you could easily turn it into a dessert option for the office or family party by making bite-sized blueberry coconut mini muffins.

One of the things I like about this recipe is the use of coconut flour, coconut oil and coconut milk to achieve a flavor-upon-flavor layering that is subtle enough to let the fresh blueberries be the star of the show. I had not used coconut flour a great deal in the past, but I find that I’m using it more and more because sweet baked goods just taste better and lighter with coconut flour. The coconut flour also has a mild sweetness that elevates and pairs well with the blueberries. Did you know that coconut flour is naturally gluten-free? Every ingredient in this recipe is gluten-free. Yea!

Even though winter is nearly here, it’s still easy to find fresh blueberries in local markets. My local Mariano’s always has a great variety of berry harvests throughout the year and blueberries are available right now in Chicago.

Blueberry Coconut Muffins [gluten-free]

Cook Time: 22 minutes

Yield: 12 muffins

Blueberry Coconut Muffins [gluten-free]

Ingredients

1 1/2 cups coconut flour
2 teaspoons baking powder
1 teaspoon baking soda
1 cup dark brown sugar
1/2 teaspoon kosher salt
1/2 cup unsweetened shredded coconut
2 eggs
1/3 cup coconut oil
2 cup coconut milk
1 teaspoon vanilla extract
1 1/2 cups blueberries

Instructions

Preheat your oven to 350 F degrees. Lightly grease a standard 12-muffin tin and set aside.

In a large mixing bowl, combine the flour, baking powder, baking soda, brown sugar, salt and coconut.

In a separate medium bowl, whisk together the eggs, coconut oil, coconut milk and vanilla. Pour the wet ingredients into the dry ingredients and mix just until combined. Fold in the blueberries.

Pour the batter into the prepared muffin pan with each tin about 1/2 to 2/3 full.

Bake for 22 to 25 minutes, or until a toothpick inserted in the center comes out clean.

http://bakedchicago.com/blueberry-coconut-muffins-gluten-free/