Browsing Tag:

featured

Desserts

Salted Caramel & Pretzel Brownies

salted caramel and pretzel brownies

Who doesn’t love Kraft caramels!?! We all grew up with those little tan squares of sugary goodness. As delicious as they are, it can some times be a bit of a chore to unwrap them in bulk for when a recipe calls for caramel. And because making caramel is not difficult to make (it just takes patience and an attentive eye so it doesn’t burn), most of my “from scratch” brownie recipes call for making caramel on the stove top. So when I saw the new Kraft Caramel Bits product at the grocery store, I just had to give it a try by creating a new brownie recipe where caramel is the star of the show. Find the closest store near you carrying this new product (or any Kraft product) using the Kraft Product Locator at http://productlocator.kraftfoods.com/kraftfoods/productlocator.htm.

Kraft caramel bits - salted caramel brownies 620 pixels wide

Start by preheating your oven to 375° F.  Lightly grease the bottom of a 13×9-inch baking pan (I prefer to use butter).

In a large bowl, whisk together the cocoa powder, flour and baking powder. Then set aside.

Melt the butter in a medium-sized saucepan over low heat. Add the dark brown sugar, stirring until completely blended with butter. Then stir the flour mixture into the butter. After it is mixed, remove the saucepan from heat and set aside. Note: the mixture at this point will be very dry.

In a medium bowl, whisk together the eggs and vanilla. Incorporate the egg mixture into the brownie batter in the saucepan. I like to take hard sourdough pretzels in a double plastic food bag – so if one bag breaks it doesn’t make a mess – and use a French rolling pin to smash them to bits. It’s a great way to let off some steam, too! Then fold in the crushed pretzels and chocolate chips.

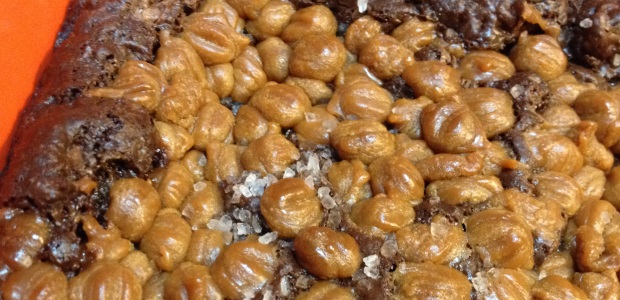
Pour the batter into the prepared baking pan. Spread the caramel nibs evenly over the top of the brownie batter. Sprinkle sea salt evenly over the caramel.

Bake for 25 minutes, or until set. Let the brownies cool completely, about 1 hour. Cut into 6 rows by 4 rows to make 24 brownies.

So what did I think of the new Kraft Caramel Bits? They are a great time saver – and the salted caramel was heavenly in this brownie recipe. I did notice that the caramel bits didn’t lose their shape during the baking process. Because the caramel is on top, the brownies look like they are covered with caramel pebbles. Not a bad thing, but if you prefer a more traditional look to a caramel topping then I’d recommend melting them first in the microwave and then spreading the melted caramel on top of the brownies.

Enjoy!

Salted Caramel & Pretzel Brownies

Rating: 51

Cook Time: 25 minutes

Yield: 24 servings

Salted Caramel & Pretzel Brownies

Ingredients

10 tablespoons butter
1 3/4 cups dark brown sugar
3/4 cup unsweetened cocoa powder
1 cup all-purpose flour
1 teaspoon baking soda
2 cups pretzels, coarsely chopped, divided
1 teaspoon vanilla
3 eggs
1 tablespoon coarse sea salt
1 package (about 2 cups) Kraft Caramel Bits
1 cup milk chocolate chips

Instructions

Preheat oven to 350° F. Lightly grease the bottom of a 9x9-inch baking pan with butter or shortening. Whisk together in a large bowl the cocoa powder, flour and baking soda. Then set aside.

Melt butter in a medium saucepan over low heat. Add dark brown sugar, stirring until completely blended with butter. Stir flour mixture into the butter mixture. When mixed, remove from heat and set aside. The mixture at this point will be very dry.

In medium bowl, whisk together the eggs and vanilla. Incorporate egg mixture into brownie batter in the pan. Fold in pretzels and chocolate chips. Pour into the prepared baking pan.

Spread the caramel nibs evenly over the top of the brownie batter. Sprinkle the sea salt evenly over the caramel.

Bake for 30 minutes, or until set. Let brownies cool completely, about 1 hour. Cut into 4 rows by 4 rows to make 16 brownies.

http://bakedchicago.com/salted-caramel-pretzel-brownies/

Desserts

Amaretto-Pecan Chocolate Pound Cake

amaretto pecan chocolate pound cake

Happy National Cake Day! With all of the pre-Thanksgiving holiday prep, I almost forgot. [Note to whomever decides when these holidays are scheduled: pick another month with less competition for a home cook’s attention, why don’tcha!]

I am not one to make a recipe twice – unless it’s absolutely exceptional. I believe there’s always room for improvement and unless you take the risk to experiment you’ll never know how good something can be. So I took my Chocolate Rum Pound Cake recipe from four years ago and changed up the alcoholic content a bit. I almost changed up the nuts by swapping out almonds, but I didn’t have any on hand in the pantry. Ah, nuts!

This recipe is great for a quick dessert option. But if you want to turn it into a special holiday breakfast treat, simply swap the amaretto for orange juice and dust the final cake with confectioners’ sugar.

Amaretto-Pecan Chocolate Pound Cake

Ingredients

2/3 cup unsweetened cocoa powder, divided
1/4 cup boiling water
1 1/4 cups butter, softened
2 2/3 cups granulated sugar
1 teaspoon vanilla extract
5 eggs
2 cups all-purpose flour
1 teaspoon kosher salt
1/2 teaspoon baking powder
1/4 teaspoon baking soda
1/2 cup buttermilk
3/4 cup finely chopped pecans
1/4 cup amaretto

Instructions

Preheat oven to 325F degrees. Grease and flour 12-cup fluted baking pan. Stir 1/3 cup cocoa and water in small bowl until smooth. Set aside. Beat butter, sugar and vanilla in large bowl until creamy. Add eggs, one at a time, beating well after each addition. Add reserved cocoa mixture and beat well.

Stir together flour, remaining 1/3 cup cocoa, salt, baking powder, and baking soda. Add to butter mixture, alternately with buttermilk. Beat until well blended. Stir in pecans and amaretto. Pour batter into prepared pan and bake for 1 hour and 5 minutes (or until wooden pick inserted in center comes out clean).

Cool for 10 minutes and remove from pan onto wire rack. Let cool completely.

http://bakedchicago.com/chocolate-amaretto-pound-cake/


Breads

Bacon, Sour Cream & Chives Dinner Rolls

bacon sour cream chives dinner rolls

Got a ways to travel this Thanksgiving but still want to bring a dish for the holiday table? Try this recipe for bacon, sour cream & chives dinner rolls. It travels well and you can make it up to 48 hours in advance.

Bacon, Sour Cream & Chives Dinner Rolls

Cook Time: 15 minutes

Yield: 12 dinner rolls

Ingredients

2 1/4 cups all-purpose flour
2 tablespoons dark brown sugar
1 envelope rapid-rise yeast
1 teaspoon kosher salt
3/4 cup sour cream
2 tablespoons chives, chopped
8 slices bacon, cooked and crumbled
1/4 cup water
2 tablespoons butter
1 egg

Instructions

Combine 1 cup of flour, brown sugar, undissolved yeast and salt in a large mixing bowl. Heat the sour cream, water and butter until very warm (about 120 F or 130 F degrees). Add to the flour mixture and beat for 2 minutes at medium speed with an electric mixer.

Add the egg and remaining flour. Fold in the chives and bacon. Set aside for a moment.

Preheat your oven to 400 F degrees. Generously grease a standard 12-cup muffin tin.

Spoon the dough evenly among the 12 muffin cups in the prepared baking pan. Cover with a clean kitchen towel. Let rise until it has doubled in size, about one hour.

Bake for 15 to 18 minutes, or until golden brown. Remove from pan and cool dinner rolls on a wire rack. Serve warm with butter, or store in an airtight container in the refrigerator for up to a few days. Then gently rewarm before serving in a 200 F degree oven for about 10 minutes.

http://bakedchicago.com/bacon-sour-cream-chives-dinner-rolls/

Breads

Peanut Butter Granola-Pumpkin Bread

peanut butter granola pumpkin bread

While I’m mentally getting ready for the holiday season, my body is not ready for this cold snap we’ve had in Chicago these past few days. The below-freezing temperatures have me feeling a bit achy, which has me craving some warm comfort food that I can whip up in a flash. This recipe for pumpkin bread infused with crunchy peanut butter and whole grain granola is perfect for the microwave, and cooks in about 90 seconds.

pumpkin bread in a mug cropped

Grab a large microwave-safe mug. I recommend a cup that holds at least 16 ounces. Spray the inside of the mug lightly with non-stick spray for easier cleanup.

In the mug, add the dry ingredients: flour, sugar, baking powder, ground cloves and cinnamon. Next add the wet ingredients: egg, peanut butter, vegetable oil and pumpkin puree. Mix together until smooth, then fold in the granola. I like to use KIND Peanut Butter Whole Grain Clusters for an extra crunchy texture and stronger peanut butter flavor.

peanut_517x681

Microwave on HIGH for 90 seconds and check if it is done. Don’t overcook; contents of the mug will continue to cook after it’s out of the microwave so a small amount of moisture on the top is acceptable because the pumpkin bread will continue to cook.

Let the pumpkin bread cool slight. Then grab a spoon and enjoy it warm. I recommend pairing it with your favorite coffee or hot chocolate.

Peanut Butter Granola-Pumpkin Bread

Cook Time: 2 minutes

Yield: 1 serving

Peanut Butter Granola-Pumpkin Bread

Ingredients

3 tablespoons all-purpose flour
3 tablespoons dark brown sugar
1/4 teaspoon baking powder
1 egg
3 tablespoons crunchy peanut butter
2 tablespoons pumpkin puree
3 tablespoons vegetable oil
1/4 teaspoon ground cinnamon
pinch of ground cloves

Instructions

Combine all ingredients in a large microwave-safe coffee mug (at least 16 ounces). Whisk with a fork until smooth.

Microwave on HIGH for 90 seconds, then check to see if it is done. Continue to microwave in additional 30-second intervals, as needed. The contents will continue to cook a bit inside the mug

http://bakedchicago.com/peanut-butter-granola-pumpkin-bread/

Breakfast

Cheesy Double The Bacon Breakfast Casserole

Two of my favorite culinary credos are: 1) breakfast food is delicious for any meal and 2) if bacon is good, then twice the bacon is better! This cheesy bacon breakfast casserole has two (2) pounds of hearty, delicious bacon.

I started by cooking the bacon. Everyone has a different method (by skillet or oven) for cooking perfectly crisp bacon. But my favorite is the microwave, especially for thick-cut bacon (which holds up well). It utilizes a lot of paper towels, but I find the cleanup so much easier. My microwave method for perfectly crisp bacon is pretty simple:

  • Put 10 paper towel sheets on a microwaveable plate, spread 6 to 8 bacon slices evenly on the paper towel.
  • Cover with 6 paper sheets and cook on HIGH in a microwave for 6 minutes to start. If needed, cook in additional :30 second intervals to get desired crispness.
  • Remove from microwave and set cooked bacon strips on another paper towel to cool. Throw away greasy paper towels. Repeat until all bacon is cooked.

The hardest part about this method is resisting the temptation to eat the bacon before you’re ready to serve.

I preheated my oven to 350F degrees. I greased a 9 x 13-inch baking pan generously with non-stick spray. Then I spread the hash browns evenly inside the pan. Sprinkle the hash browns with salt and pepper. Then I took the bacon and crumbled it as I spread it evenly over the hash browns.

can there ever be too much bacon?

In a large mixing bowl, I beat the eggs and milk until blended. I use a 1% milk but you can also use skim milk. I recommend a lower fat milk because of the fat content from the cheese.

Then stir in the Italian seasoning and minced onion. Pour the egg mixture over the hash browns. Layer the baby Swiss cheese slices for even coverage, and bake uncovered for 45 minutes or until fully set.

IMG_1118

This recipe makes 8 large servings, which also keeps well in the fridge. So far this week, I’ve had this bacony-good dish for breakfast, lunch and dinner. A bacon trifecta!

cheesy double the bacon breakfast casserole 2

Cheesy Double The Bacon Breakfast Casserole

Cook Time: 44 minutes

Yield: 8 servings

Cheesy Double The Bacon Breakfast Casserole

Ingredients

2 pounds thick-cut bacon, cooked and crumbled
20 ounces frozen shredded hash brown potatoes, thawed (I use Simply Potatoes® Shredded Hash Browns)
10 slices (about 7 ounces) baby Swiss cheese (I prefer Sargento® Deli-Style Sliced Baby Swiss Cheese)
12 large eggs
2 cups 1% milk
1 tablespoon Italian seasoning
1 tablespoon minced onion
1 teaspoon kosher salt
1 teaspoon ground black pepper

Instructions

Preheat your oven to 350F degrees. Generously spray a 13-inchx9-inch baking pan with non-stick spray.

In the prepared pan, spread the hash browns evenly. Sprinkle with salt and black pepper. Evenly layer the crumbled bacon.

In a large mixing bowl, beat the eggs and milk until blended. Stir in the Italian seasoning and minced onion. Pour over the hash brown mixture. Layer the baby Swiss cheese slices for even coverage.

Bake uncovered for 45 minutes or until fully set. Serve warm. Yields 8 servings.

http://bakedchicago.com/cheesy-double-bacon-breakfast-casserole/


Desserts

Chocolate Lava Mug Cake

Baked Chicago's chocolate lava cake

I am known to have sudden, overwhelming and (often) uncontrollable cravings for chocolate. Let’s be honest. The craving is for almost anything sugary-sweet! And a warm, dark chocolate dessert like a chocolate lava cake fits that description quite well.

Usually my chocolate cravings lean toward brownies or slice of cake. But you know what happens if you make an entire pan of brownies or cake – you end up eating the entire thing. Or at least I often do. And then that warm gooey chocolate feeling turns to cold shame because I have trouble turning “off” the sweet tooth switch.

Not everyone has impulse control issues, but I do with food. But I’ve learned that ignoring a craving can often make it worse. So sometimes you just have to say “yes” to chocolate. But you have to do that with purpose and parameters. The best parameter that works for me is portion control. If I only make one serving, I am less likely to over-indulge. So I’m giving you permission (and me, too!) to say “yes” to this chocolate lava cake for one.

Why I love chocolate lava cake for one

  • it’s lightning fast (you can make it in under 2 minutes in most microwaves)
  • it’s satisfyingly decadent
  • it’s actually a large single serving so there’s enough to share without feeling like you’re depriving yourself
  • the calories can be dialed down by substituting some of the simple sugars (e.g. dark brown sugar) with sugar substitutes (e.g. Splenda) or reducing the amount of chocolate chips and squares

Reminders for making the most of any microwave-in-a-mug recipe

  1. use a large (at least 16 ounces) microwave-safe mug
  2. spray the inside of the mug with non-stick cooking spray for easier clean up
  3. don’t overcook recipes; remember that ingredients will continue to cook inside the mug after the microwaving is done. If you’re unsure how long to cook something based on your microwave’s wattage, cook in 30-second intervals and closely monitor the progress
  4. handle containers with care inside the microwave; use an oven mitt or hot pad to avoid burning your hands

Chocolate Lava Cake

Cook Time: 2 minutes

Yield: 1

Chocolate Lava Cake

Ingredients

2 tablespoons butter
1/4 cup dark brown sugar
1 egg
1/4 teaspoon vanilla extract
2 tablespoons unsweetened cocoa powder
1/4 cup all-purpose flour
1/8 teaspoon baking powder
1/8 teaspoon kosher salt
1 tablespoon vegetable oil
1/4 cup milk chocolate chips

Instructions

Spray the inside of a microwave-safe mug with non-stick cooking spray. Place 2 chocolate squares in the bottom of the mug.

In a small microwavable mixing bowl, add butter and brown sugar. Heat in microwave on high for 45 seconds. Remove from microwave and stir with a fork. Mix in the egg and vanilla. Stir in cocoa powder.

Add flour, vegetable oil, baking powder, salt and stir until combined. Mix in the chocolate chips. Pour mixture into prepared mug.

Microwave on high for 1 minute 30 seconds to 2 minutes (times may vary based on microwave wattage; do not overcook). Cake will appear lightly moist and will continue to cook in mug.

Invert onto a place. Chocolate lava will flow when mug is removed. Serve immediately, but be careful when eating the hot "chocolate lava."

Notes

Photo by Madison Myers; used with permission. Baked Chicago copyright 2013.

http://bakedchicago.com/chocolate-lava-cake/

Breakfast

Gingerbread Scones

With November’s arrival, it’s hard to deny that the holiday season will soon be here. I love everything about fall: the flavors, the cool weather. So before I get caught up in the frenzy of the holidays, I like to appreciate this transition between summer and winter before it’s done.

One of my favorite ingredients to bake with is ginger – which to me is a go-to fall flavor. These gingerbread scones are great for breakfast or a special treat. You can make them with or without the dark chocolate chunks, depending on your sweet tooth. Or you could substitute the chocolate for banana or caramel. The flavor combinations with ginger are almost limitless. What’s your favorite flavor to combine gingerbread?

Gingerbread Scones

Cook Time: 12 minutes

Yield: 12 scones

Ingredients

1 cup all-purpose flour
1 cup whole wheat flour
1/3 cup dark brown sugar
2 teaspoons baking powder
3/4 teaspoon ground ginger
1/2 teaspoon kosher salt
1/2 teaspoon ground cinnamon
1/4 teaspoon baking soda
1/4 cup butter, cold
1/2 cup dark chocolate chunks
1 tablespoon crystallized ginger, finely chopped
1 egg, slightly beaten
1/2 cup whipping cream
1/4 cup molasses
1 egg white, lightly beaten
1/2 teaspoon water

Instructions

Preheat your oven to 375F degrees. In a large mixing bowl, whisk the flours, brown sugar, baking powder, ground ginger, salt, cinnamon and baking soda. Using a pastry blender, cut in the butter until the mixture resembles coarse crumbs. Fold in the chocolate chunks and crystallized ginger. Make a well in the center and set aside.

In a small mixing bowl, stir together the egg, whipping cream and molasses. Add the wet ingredients at once to the flour mixture. Using a fork, stir until ingredients are just combined.

Onto a lightly floured surface, turn the dough. Knead for about 12 strokes or until nearly smooth. Divide the dough in half. Lightly pat each portion into a 5-inch circle about 3/4" thick. Cut each circle into 6 wedges.

Place the wedges about 2 inches apart on a large baking sheet lined with parchment paper. In another small bowl, combine the egg white and water. Brush the tops of the scones with egg white mixture.

Bake for 12 to 15 minutes, or until a toothpick inserted into the top of a scone comes out clean. Serve warm or at room temperature. Makes 12 scones.

http://bakedchicago.com/gingerbread-scones/

Award-Winning Recipes/ Desserts

Pumpkin Bundt Cake with Orange-Chocolate Ganache

[December 23, 2013 Update: This recipe was a finalist in the BEST DESSERT category of Safeway’s Tastier Holiday Recipe Contest, 2013. Thank you, voters and judges!]

Pumpkin Bundt Cake with Orange-Chocolate Ganache

Ingredients

1 cup all-purpose flour
1/2 cup whole wheat flour
2 teaspoons pumpkin pie spice
1 teaspoon baking powder
1/2 teaspoon baking soda
1/4 teaspoon kosher salt
1/4 cup butter, room temperature
1 cup dark brown sugar
1 cup solid pack pumpkin
1 large egg
1/2 cup buttermilk
2 teaspoons vanilla
1/3 cup bittersweet chocolate, chopped
3 teaspoons orange juice, room temperature

Instructions

Preheat your oven to 350F degrees. Coat a 6-cup Bundt pan with non-stick cooking spray.

Combine flours, pumpkin pie spice, baking powder, baking soda, and salt in medium bowl. Whisk to mix well. Combine butter and brown sugar in large bowl and beat at medium speed until mixed well. Beat in pumpkin and egg. Reduce to low speed and beat in flour mixture. Beat in buttermilk and 2 teaspoons vanilla, just until moistened. Pour batter into prepared pan.

Bake 25 to 30 minutes or until toothpick inserted comes out clean. Cool the cake in pan on wire rack for 10 minutes. Remove cake from pan and cool completely on wire rack.

Melt the bittersweet chocolate slowly in a microwave-safe bowl. Add the juice, a teaspoon at a time, while mixing well with a whisk. Drizzle over the cooled cake.

http://bakedchicago.com/pumpkin-bundt-cake-orange-chocolate-ganache/

Award-Winning Recipes/ Breads

Sweet Potato-Bacon Biscuits

Louisiana Cookin' Magazine

You might ask, “Why is there a cover of Louisiana Cookin’ magazine with the pop culture heroes from Duck Dynasty in this post?” Well, the latest issue of Louisiana Cookin’ features an exclusive Duck Dynasty down-home holiday menu with some of the favorite dishes of the Duck Dynasty family. And I have to admit I’m curious to try their recipes for Root Beer Red-Eye Gravy and a spicy Skillet Cornbread with bacon….but that’s not why I included the cover.

Sweet Potato-Bacon Biscuits Win Grand Prize

The reason I included the cover is that the very next featured spread in the November/December issue of Louisiana Cookin’ announces the winners of the 2013 Sweet Rewards Recipe Contest, sponsored by the Louisiana Sweet Potato Commission. I am excited to finally be able to share the (very surprising) news that my recipe for Sweet Potato-Bacon Biscuits won the grand prize! I was flabbergasted when I got the call, and humbly honored to receive this recognition. I had hoped that maybe the recipe could win ‘best in category’ for a side dish. I couldn’t even dream that it would be deemed good enough to win the grand prize.

sweet potato-bacon biscuits

photo3


I hope you’ll check out this recipe and consider giving it your own spin. My friend Carlyn Berghoff, chef/owner of The Berghoff Restaurant and author of Cooking For Your Gluten-Free Teen, created a gluten-free version of this recipe that I’m anxious to try. She also gives some great tips for using fresh sweet potatoes and for working with gluten-free dough.

I’d love to hear how you change up these sweet potato-bacon biscuits for your family and friends. Share your feedback and comments below.

Sweet Potato-Bacon Biscuits

Cook Time: 12 minutes

Yield: 8 biscuits

Sweet Potato-Bacon Biscuits

Ingredients

3 cups all-purpose flour
1 tablespoon baking powder
1 tablespoon dark brown sugar
1 teaspoon kosher salt
3/4 teaspoon cream of tartar
1/4 teaspoon cayenne pepper
1/3 cup butter, cut into pieces
1 cup shredded sharp Cheddar cheese
4 slices cooked and crumbled bacon
1 cup whole milk
1/2 cup mashed sweet potato

Instructions

Preheat your oven to 450F degrees. Line a large baking sheet with parchment paper.

In a large bowl, whisk together flour, baking powder, brown sugar, salt, cream of tartar and cayenne pepper. Using a pastry blender, cut in butter until mixture resembles coarse crumbs. Stir in Cheddar cheese and bacon. Make a well in the center of flour mixture.

In small bowl, whisk together milk and sweet potato. Add sweet potato mixture to flour mixture. Using a fork, stir just until combined. Turn dough out onto a well-floured surface. Knead gently 12 times. Roll dough to a 3/4-inch-thick rectangle. Cut into 8 rectangular pieces.

On the prepared baking sheet, place biscuits 1 inch apart. Bake until lightly browned, about 12 minutes. Serve warm.

Notes

This recipe won grand prize in the 2013 Louisiana Sweet Potato Commission's Sweet Rewards Recipe Contest and appeared in the November/December 2013 issue of Louisiana Cookin' magazine.

http://bakedchicago.com/sweet-potato-bacon-biscuits-2/

Soups, Salads & Sides

Lavender-Cinnamon Applesauce

What ya gonna do when you have a bushel of Honeycrisp apples? Make some rustic applesauce, of course!

With the recent cold and damp weather we’ve been having here in Chicago, my allergies have been in a total uproar. The kind of weather where you just want to cocoon inside all weekend. So I thought it was the perfect opportunity to dust off the slow cooker and do some experimenting with adding lavender to a chunky applesauce recipe. Selfishly, I also wanted to be able to smell the apples and lavender and cinnamon throughout the house all day. Sort of like aromatherapy for my allergies.

I had these elephant-sized Honeycrisp apples from Mariano’s that were crisp, juicy and perfect for a homemade applesauce. This is such a simple recipe, but – truth be told – the hardest part is peeling the apples. I’ve found the fastest way for me is to use a butcher knife to first core the apples. I cut one side, then the opposite side and finally the remaining sides. That results in two really large slices and two medium slices, both of which are pretty easy to peel with a paring knife.  To keep the apples from oxidizing (I’m impressed I know what that means) I immediately put them in the water/lemon juice mixture inside the slow cooker as I cut them.

Some homemade applesauce recipes call for brown sugar, but I wanted to keep the processed sugars to a minimum so I used instead a high-grade honey. Then you break the cinnamon sticks and toss them into the mixture. Note: the cinnamon is going to turn the applesauce a medium brown. If you prefer your applesauce “unscathed” simply omit the cinnamon for a natural, golden color.

Every now and then, I become obsessed with certain ingredients (like Honeycrisp apples!) and use them over and over in recipes. One ingredient I’ve been dying to try is edible lavender, so I took two tablespoons of lavender flower buds (sourced from The Spice House in Chicago). To release the fragrant oils, I used the back of a tablespoon and crushed the lavender inside a small bowl (see picture below). The aroma is phenomenal. Note: While I used two tablespoons of lavender, I’m recommending in the recipe for you to use only 1 tablespoon. That will make for a better balance between the cinnamon and lavender.

Lavender buds measured out

Now your slow cooker gets to do all the work. Simply cover and let it cook on high for 3 to 4 hours. If desired, you can stir every hour or so to ensure the cinnamon is steeping properly. When done, discard the stick cinnamon. If you prefer a rustic, course consistency, use a potato masher to mash the apples to the desired consistency. If you like a smoother consistency, then use an immersion stick blender to quickly blend. Stir in the vanilla and let cool for a bit before storing.

Put in an airtight container. It will store in the fridge for about 10 days or in the freezer for up to 8 months. The lavender-cinnamon applesauce is a special dish for a family gathering, and it can also be used (like you would with regular applesauce) for other baking projects like breads or muffins.

Lavender-Cinnamon Applesauce

Cook Time: 4 hours

Yield: 6 cups (about 12 servings)

Lavender-Cinnamon Applesauce

Ingredients

5 pounds Honeycrisp apples, peeled, cored and diced (approximately 8 large apples)
3/4 cup honey
1 tablespoon edible lavender flower buds, crushed (I used lavender from The Spice House, Chicago)
5 sticks cinnamon (broken into 1-inch pieces)
1 1/2 cups water
1/4 cup lemon juice
1 tablespoon vanilla extract

Instructions

In a 4-quart or 6-quart slow cooker, combine the diced apples, honey, water, cinnamon sticks and lemon juice. Crush the lavender before adding; I used the back of a tablespoon to crush the flower buds - which releases the fragrant oil. Fold the lavender into the mix; then cover and cook on high-heat for 3 to 4 hours.

Remove and discard stick cinnamon. Using a potato masher, mash apples until you've achieved a coarse consistency. Or for a smoother consistency, use an immersion blender. Stir in vanilla and turn off heat. Let set for 10 to 20 minutes.

Ladle applesauce into airtight containers and seal. Applesauce will last in refrigerator for up to 10 days or in the freezer for up to 8 months.

http://bakedchicago.com/lavender-cinnamon-applesauce/

DIY/ Kitchen 101

Homemade Vanilla Extract

whole vanilla beans

Have you ever wondered what “exactly” was in vanilla extract? For me, I’ve always been mesmerized by the calming, yet sensual, aroma of pure vanilla extract. And as good bakers know, vanilla is an essential for most recipes (especially, and somewhat ironically, those with chocolate!) – but it can be quite expensive.

I started reading Pure Vanilla: Irresistible Recipes and Essential Techniques by Shauna Sever (a former Chicagoan, so I’m already a fan!) and she does a great job of explaining the many roles vanilla plays in our cuisine and our culture. Because I’ve been on a bit of a DIY kick of late, I wanted to see if making vanilla extract was as simple as it seemed. While I quadrupled the batch, the recipe is from Shauna Sever. [Once you see the “baking time” of the recipe, you’ll understand why I made such a large batch. Time management in the kitchen!]

You’ll need only two ingredients to make this homemade vanilla extract (vanilla beans and vodka!), one sealed jar, a paring knife and lots of patience. The vanilla needs to steep for at least 2 months in a cool, dark place before you use it for the first time.

Ingredients:

  • 8 vanilla beans, cut in half (I used Madagascar vanilla beans found on Amazon; they were the highest quality beans I could locate at an affordable price)
  • 32 ounces vodka
  • sealed glass jar

Pour the vodka into a clean jar, and set aside. With your paring knife, split the vanilla beans down the middle. Insert split beans into the jar and securely seal it.


vanilla extract mise en place

Shake the bottle to ensure it’s properly sealed and to moisten all of the vanilla beans. Make sure the entire vanilla bean is submerged in the vodka.  

homemade vanilla extract in jar


Store the jar in a cool, dark place for at least 2 months before using. The liquid should be a dark amber color (see final product below, after 3 months).

homemade vanilla extract


Shauna recommends that as you use the extract you can top off the jar with more vodka (or whatever clear alcohol used) for a “nearly never-ending supply.” Mazel!